
Quite a lot of the Operational Level Wargames I looked at recently use a hex grid. And 4 inch hexes seem about the right size for the table top – at least to me – so I have been wondering what to do about terrain. My normal terrain will sit on hexes fine. But rivers are different. That realisation lead to experimenting with templates for generating river features to sit on top of a hex mat.
The Templates
This is what I ended up with. I opted for a small number of templates that, when used in combination, can quickly form any river feature. All of the features end in the middle of hex side. This is to ensure they line up nicely with the next feature.

This is what the templates would look like sitting on a table top. I’ve coloured them so you can see where each template is used.

Similarly, this is a map for a table that I made earlier and how the templates look sitting on that map.

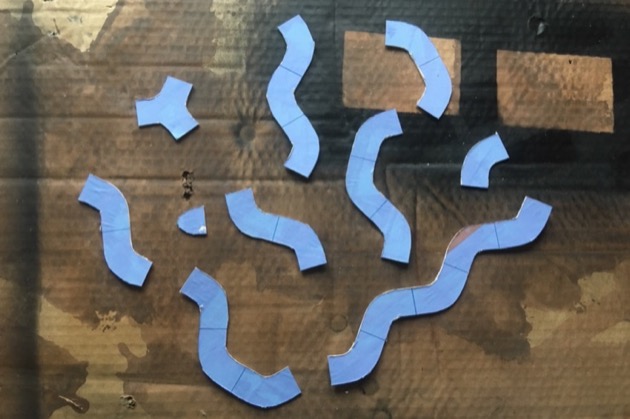
It has to be said that I experimented with quite a few different templates before settling on those ones. All these others got rejected.

Then I printed out one copy of these templates, glued them to cardboard, and cut out each section. So now I have 3D cardboard templates for the shapes I need.
And, not being completely sure about 4″ versus 10cm, I also did a version of the templates for 10cm hexes.

Now what?
Now that I have some templates for rivers to go along the sides of 4″ hexes, what do I do next?
Should I … ?
- Follow my previous instructions for Making Wargaming Terrain Streams and scratch build a bunch starting by cutting out a whole bunch of MDF sections. Oh, man, I’m already suffering.
- Make up one set and cast the rest in resin. Um, well, shocking admission, I have no idea how to work with resin. I guess I could learn. Anybody want to coach me?
- Get a company to laser cut a bunch of MDF sections based on the templates, then model the rest. This approach skips Step 1 in Making Wargaming Terrain Streams. Better but who would do this for me? And still leaves a big modelling exercise at the end.
- Buy some blue silicon rubber sheeting and cut out the river sections. Less aesthetic than the options above, but oh so quick and no slipping issue. The trouble is that silicon rubber sheeting is quite expensive, particularly if you pay postage. Another question is, how thick should the sheet be … 0.5mm, 1mm, 1.5mm, etc?
- Cut out a whole bunch of cardboard streams from blue cardboard and not bother to tart them up. This would be easier than cutting out the MDF but not much … just cutting out the cardboard templates took an hour or so of craft knife work. And cardboard would slip around on the table like crazy.
- Use heavy blue paper. Easy peasy, but the slipping factor would be even worse.
- Use blue felt. Also pretty easy, and felt is fairly cheap compared to silicon rubber, and no slipping factor.
- Persuade a terrain making company to make the features based on my templates. Hmm, I’m not sure how big the market is. Although I suspect 10cm hex templates would have wider appeal. Any thoughts?
- Enhance the templates to have a locking mechanism like Brio wood train tracks. Hmm, less aesthetic but really kills the slipping around problem. This is an idea that Willem of SixMilBuilders put me onto.
- Build with fake leather and mastic – the Dick Bryant Option [Added 29 Oct 2017 update]
- Build up 3D hex terrain like Ross Kearns’s but with rivers on the edges rather than through the hexes [Added 29 Oct 2017 update]
What do you think?
If using Hexon, thin strips of felt is the answer as anything else will slide about. I make my rivers and roads from 10mm straight strips and bend them into place. If features need to be larger (e.g. marshes) I cut them to shape.
Richard
Richard,
I don’t think I’ll use Hexon. It seems, from the outside, quite expensive. And I don’t need the 3D thing. A hex mat will be fine for me.
How long do you cut your felt roads/rivers?
Steven
The felt comes in roughly 10″ or foot squares so I just cut it into 10″-12″ strips. If a strip is too long for a particular purpose when it’s laid on the table then I just snip it ad hoc. As the strips are only 10mm wide it’s easy enough to bend them along the hex lines and they readily adhere to the Hexon when smoothed down. At 10mm wide they don’t need fancy landscaping.
The roads and rivers here https://doctorphalanx.blogspot.co.uk/2013/06/solferino-hexed.html aren’t bent around the hexes but you can see the general effect.
(BTW, have you changed your comment widget? I couldn’t post from my Android smartphone, but that may just be me.)
Richard
Richard, I like your roads/rivers. Simple but effective. Option #7 with 10mm wide felt is looking attractive.
(Comment widget not changed recently.)
Richard, if roads and rivers are 10mm wide coloured felt, what would you do with railway lines?
I use black felt:
http://doctorphalanx.blogspot.co.uk/2016/03/bloody-big-battles-spicheren.html
#3 is my second choice – I would solicit bids from the various companies in Britain that make MDF bldgs. I know of only one here in the colonies but there are several over there. -Then Tart Them Up!!
My FIRST Choice is: Stay away from felt, cardboard, etc. We have in the states something called naugahide ( a fake leather found in cloth, craft and upholstery shops. I’m sure you have it there but not what it is called – If you want, I can send you a sample. It comes in blue and other colors, I use the brown covered in Mastic to make my country roads that you see on my blog. I would use this material covered in mastic and painted for your river sections. You can roll them up (terrained side out) for storage and they have a rough underside so stay on the table. The rolls meander over hill and ale with no problem. Cut the ends carefully so they match well and then a piece of masking tape underneath between the edges of two pieces keep them
together so you hardly see a seam!
A small stream made this way can be found on my blog http://mgluteus.blogspot.com/ in the entry for the 2′ x 2′ games, the 6th table down you can see the river in the foreground.
Dick
Dick,
Okay, I’ll put your option down as #10 Build with fake leather and mastic. I once went looking for mastic in this country and couldn’t find it. I know it exists, because it used to be common, but seems to have been replaced by other materials now days in the DIY stores. Materials with less modelling attributes.
The flexibility you mention is good for roads but less so for rivers. Particularly at the operational level.
At the moment my preferred options are #3 and #8. Both of which involve very little work from me.
Dick, nice river by the way.
Curious – why did you decide to have rivers running along the hex lines instead of through the hexes themselves? Also, are your hexes measured 4″/10cm edge to edge or point to point?
Ross,
re rivers along hex sides
Because my interest in hexes is solely for operational level games. At that level the rivers are just barriers to movement. The games I have in mind are quite like board games.
re hex size
the 4″ and 10cm measurement is flat edge to flat edge.
Ross, I should have had a build your own hex terrain option in my original list. Now added as option #11 with a link to your make your own hexes kit.
Steve,
Have you looked into Kallistra? Also I used the hex sides to create my river, road terrain. And only used one hex for most of my lengths. Especially curves. Although longer lengths are workable. You are able to create almost any river, creek and road shapes and bends. “Y” and “T” also. Look at a lot of board game for ideas is also a good method. I used this for all of my rivers, creeks and my roads system.
Love the site. Lots of luck!
Rocco
Rocco,
Kallistra means Hexon II, right?
As I see it the trouble with using one hex length segments for rivers is (1) it takes much longer to set up than having long bits and (2) it is more fiddly and prone to bumping.
Steve, I called it “Mastic” because that was what I thought it was called there. I may be (usually am) wrong. I use what over here is called “caulking ” and comes in tubes which fit into an applicator and usually used for weathering around windows, etc.
Dick B
Dick, yup, that is the stuff. Mastic is the right term. But, as I said, hard to find now days.
Latex Caulking should not be hard to find at any building supply store. It is not just used around windows but around tubs, toilets, and drains. Luke from Lukes APS on youtube,(Terrain making site) and Mel the Terrain Tutor, also on you tube, both use it extensively and are from over there. It is cheap and easy to find for them. I would think they could give you a hint as to where they buy it.
Andrew,
Oh, no. With that knowledge I might have to actively pursue option #10. In some ways I preferred ignorance. 😉
Hi! Just curious as to what progress you are making in the river department (I hate working there, the floors are always wet). I too hate the short sections of river and especially of roads, they end up moving all over the place during a game and all the ends never seem to mesh. This is why the “puzzle piece” connection is such a great idea. I tend to make very long sections, then cut pieces as I need them. By the second or third game, I have all the correct sizes I will ever need to make my roads and rivers for any scenario with out a lot of edges. I am also working on a method to make my Mastic on faux leather method better “hinge” together. If if works out I will post a detailed description.
Well, I’ve contacted two companies about helping. Had one response so far: “Could help. Not now.” Still considering options. Richard’s 10mm wide felt strips is appealing in its simplicity.
I think if I was to do this (I have Hexon II) I might use felt because it does cling to the Kallistra flocked hexes.
However, I would see a better job done by drawing out the hexside shape (the zig-zag) onto stiff card, do this several times over the same piece of card to fill it and get max use out of the card and production line, keep each line 2 – 3″ away from other lines. Cover the whole thing with Cling-Film and secure tightly or better still, lay a sheet of Perspex over the card. Then using tubed Acrylic Caulk in a gun, run a very heavy bead along your drawn lines.
While wet, get a flat edge one inch wide (the end of your steel ruler would do), wet it and drag it through each bead, reinforcing the zig-zagging as you go, so that it is squashed flat to say around 1.5 mm thick and uniformly an inch or more wide, with natural banks occurring at the edges of the spread. Leave to cure and then peel the pieces off the cling-film / Perspex. You will have acrylic strips of river that can be trimmed and will be paintable.
I of course have not tried this, but I think you should and then tell me whether it is worth me doing it 🙂
Norm. I’m not sure I’ll be your guinea pig but, just in case, I thought I’d check what you mean… I think you are proposing that the card have several templates drawn on them, then water proofed with a plastic cover (with cling film or perspex). Then kind of free style the acrylic caulk on top of the plastic cover to match the drawn template. That right?
Yes – simply because a run of hexsides is a relatively complicated shape to do with repeated accuracy. The Perspex allows the template to be seen and should allow the river section to be lifted cleanly when cured.