
Adam and Chris played the seventh game of Populous, Rich and Rebellious, our four player Campaign using Tilly’s Very Bad Day, and set in the English Civil War.
Summary: Although caught by a larger Parliamentarian force, Adam had spectacular victory at the “Real Battle of Turnham Green”. London fell to the Royalists. The campaign cards were critical to the battle with the interventions of John Hurry and Sergeant-Major-General Boy, the ‘Dog-witch’, deciding the outcome.
Strategic Situation
A lot of regions had declared for Parliament. Adam and I had to fight to have a chance in the campaign. With my victory in Wales, the balance of power was starting to look more, well, balanced.

Adam decided to go for the jugular and attacked into the Lower Thames Valley, headed for the Parliamentary capital of London.

On the way to London, the Royalist army encountered a Parliamentary force at Turnham Green. The historical Battle of Turnham Green was a bit of a non-battle. A bit of posing and the sides went home. That isn’t what happened at the “Real Battle of Turnham Green”.
Phase 1: Game Set up
The mechanics of Populous, Rich and Rebellious influenced most of the game set up.
1.1. Agree game size
With two players we played a small game, with small armies on a small table.
1.2. Recruit armies
In Populous, Rich and Rebellious, campaign cards influence the orders of battle.
Campaign Cards
Both sides drew five campaign cards. One for a battle, two for a Capital, and two for other adjacent regions.

Chris (Parliament) drew two Parliament campaign cards, one Beneficial, and two Royalist. The Royalist cards were discarded as useless for Parliament.
- [Parliament] Navy declares for Parliament: Before the battle add two Cannon units to the order of battle, but only if fighting in a coastal region. Retain until used
- [Parliament] New Model Army: Before the battle add one Pike+Shot unit to the order of battle
- [Beneficial] John Hurry – Brave & skilful but lax political principles: For the entire battle increase one chosen commander’s to hit in melee from 4-6 to 3-6. Retain until deserts to victorious enemy
- [Royalist] Queen raises funds abroad: Before the battle add one Cannon unit to the order of battle
- [Royalist] Welsh rally to the King – Before the battle add one Pike+Shot unit to the order of battle
Adam (Royalist) got one Royalist campaign card, one Beneficial and three, count them three, Detrimental cards!
- [Royalist] Sergeant-Major-General Boy, the ‘Dog-witch’: Once during the battle reduce resolve of one enemy unit by 2 Resolve. Retain until used
- [Beneficial] Army fully paid: Before the battle add one Pike+Shot unit to the order of battle
- [Detrimental] ‘Let a cannonball divide me’ (Earl of Kingston-upon-Hull) – For the entire battle one chosen commander is automatically killed if hit by cannon fire
- [Detrimental] Army poorly supplied: Before the battle remove one Pike+Shot unit from the order of battle
- [Detrimental] Cavalry absent on raid: Before the battle remove one Horse unit from the order of battle
Orders of Battle
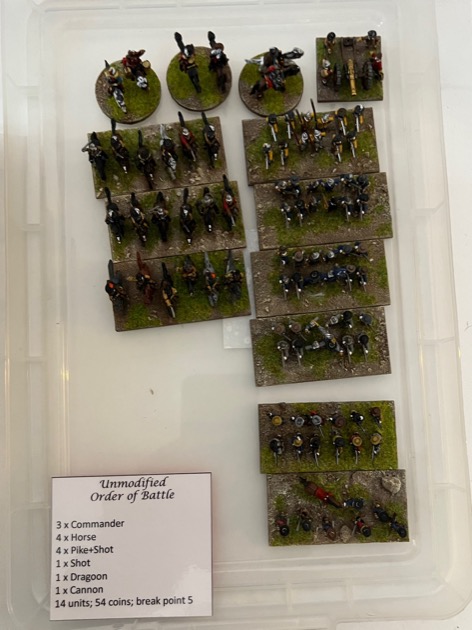
For a small game with a player a side, we started with the small order of battle.
After applying the campaign cards, the the Royalists got a 13 units, compared to the Parliamentary array of 17 units.
Royalist Order of Battle
|
Parliament Order of Battle
|
The Royalists ended up with only 13 units.
In contrast Parliament got 17 units. They got more Pike+Shot (5 to 4), more Horse (4 to 3) and a lot more Cannons (3 to 1).

1.3.A. Determine attacker
The Royalists were the strategic attacker, but with only 13 units to Parliament’s 17 units, they were the tactical defender. Parliament had received reinforcements from the Navy and New Model Army and had also noticed weakness in the Royalist camp, so seized their opportunity and attacked. We give the tactical attacker – in this case Parliament – the initiative in Tilly’s Very Bad Day.
1.3.B. Game duration
The battle was fought in fair weather in the afternoon of an Autumn’s day. That meant a game limit of 8 Game Turns (10-2=8).
1.4. Place Terrain
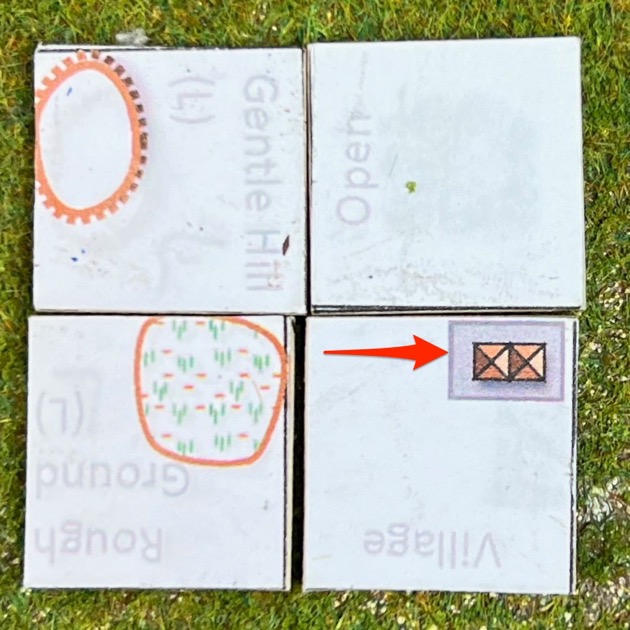
Adam randomly selected the four Terrain Cards necessary for a small game.

He made one small adjustment and rotated the terrain card with the village. This created two potential routes for any attacker: (1) between the village and marsh and (2) between the marsh and the left table edge. Adam was hoping this constriction would compensate for his weaker numbers.
1.5. Scouting
We still didn’t do scouting. Next time as it gives dragoons more value.
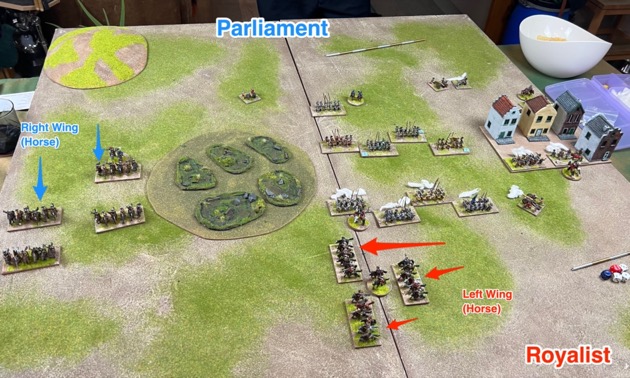
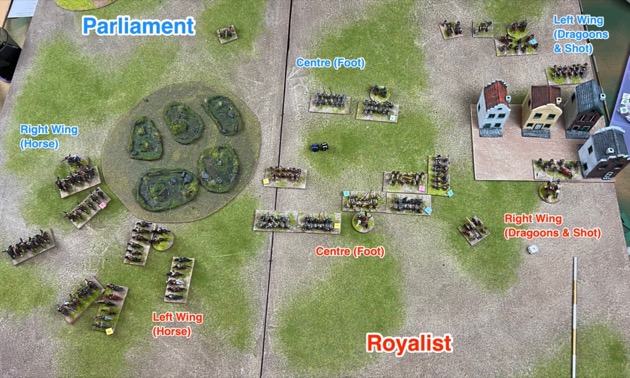
1.6. Deployment


1.7. Bombardment
As usual the bombardment was not dramatic.

Turn 1
Chris advanced everywhere. On the left, his horse rushed forward.

The Parliamentary foot also advanced in the centre.

And on the right, Chris pushed his dragoons and shot towards the village.

The only Royalist movement was on the right, where Adam moved his dragoons and shot into the village. This gave them cover in the resulting musketry duel.

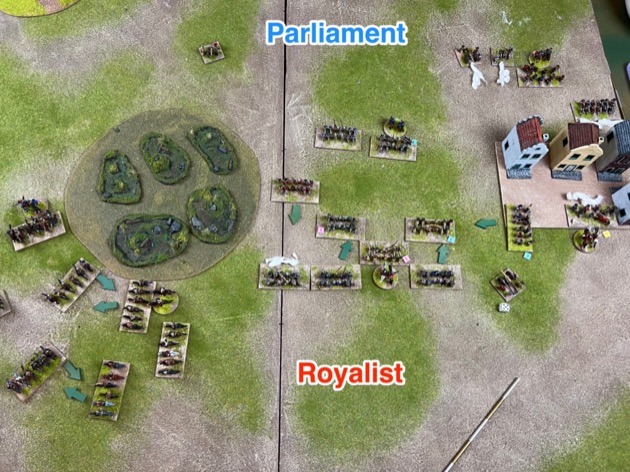
Turn 2
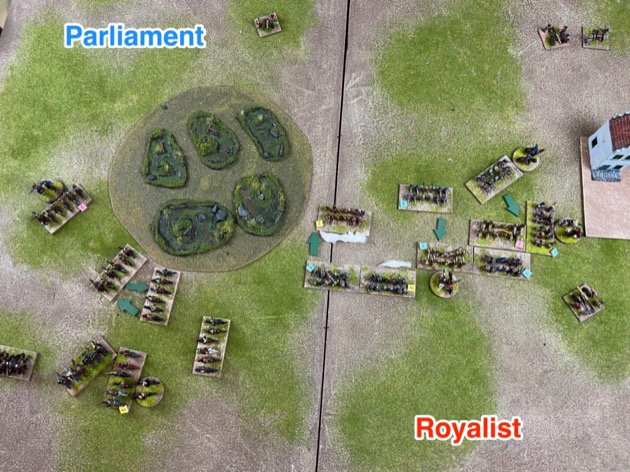
The Parliamentary centre advanced again.

Two things to notice in the photo above:
- Chris’s three cannon were not firing. Two were blocked by their friendly foot advancing and one had pivoted.
- Chris had to narrow the frontage of his centre to four units. So one Pike+Shot got left behind.
By now Adam was sure where Chris was attacking so he committed his cavalry reserve to the left wing. They would counter the Round Head horse approaching around the marsh.
Here is a close up photo of the Royalist horse. This photo has convinced me I have to do something about my lighting. All the detail of some lovely figures is hidden in shadow. Sigh.

Turn 2 saw the leading units of the Parliamentary centre declare charges.

The resulting melee was bloody but fairly even.

Turn 3
In the centre, Chris brought more foot in to support those in melee. Adam pulled back a Pike+Shot unit, hoping to get more shooting done. But he also turned his Shot unit 90 degrees to threaten the advancing Royalist Pike+Shot. This would have been risky a turn earlier, given the Royalists were just outside the village, however the Royalist dragoons had withdrawn to recover from the earlier firefight.

On the left, Chris’s horse continued to advance around the marsh.

Adam pushed his own cavalry forward within charge reach.

So, not surprisingly, there were lots of charge declarations.
The foot melee was definitely in favour of the King. A Parliamentary Pike+Shot unit routed. Another was caught to front and flank but survived.

The horse melee was slightly in favour of the Royalists, but saw no routs.


Looking at the entire battlefield, Chris still looked stronger on the left (Horse), Adam had a slight positional advantage in the centre (Foot), and the fight for the village on the right was kind of a stand off.
Turn 4
More charges in Turn 4, both horse and foot.
Adam was looking strong at the end of the horse melee. Chris still had more units, but three of them were on 1 Resolve. Only one was on full Resolve (3). In contrast, the Royalists had three units on full Resolve and only one weakened (1).

This is when Adam used his “Sergeant-Major-General Boy” campaign card. The the ‘Dog-witch’ routed a unit, and that rout caused a second to flee through morale erosion.

The result of the melee in the centre didn’t look to significant. But looks can be deceiving.

John Hurry charged and routed the Royalist Shot unit. But the brave commander was killed himself.

The death of a commander weakens the Resolve of all units in the command by one. That was enough to rout two Pike+Shots. And that took Parliament over its Army Breakpoint.

The Royalist only lost one unit, the Shot routed by John Hurry right at the end.

Parliament lost six units: 3 Pike+Shot, 2 Horse, and 1 Commander.

Conclusions and Observations
It was a short and sharp battle. They guys enjoyed it.
The game and generalship
The surprise was that, despite having a considerably larger army, Parliament lost decisively. Adam played better and was luckier.
Both Chris and Adam are good players but Adam was better on the day. I’ll call out a few points.
Parliament had 17 units to the Royalists 13. They got more Pike+Shot (5 to 4), more Horse (4 to 3) and a lot more Cannons (3 to 1). Superficially that looks overwhelming. Then Chris attacked with all three commands. Although that seemed sensible it meant he had a slight advantage on most of the field but didn’t have a decisive advantage anywhere. And various factors undermined each of those slight advantages.
Chris’s three Cannon units were spread out and often did not fire because they were either moving or blocked by friendly troops advancing.Adam’s single unit shot more often. Adam deployed his single unit in the shelter of the village and every turn fired into the advancing Parliamentary foot.
Chris’s 5 to 4 advantage was undermined by Adam’s choice of terrain. Adam deployed between the village and the marsh hence narrowing the frontage. This four unit gap gave Adam even odds against the approaching Parliamentary foot. Later, at a critical moment, Adam diverted his shot from in the Village to the infantry fight, thus giving him local advantage.
Adam’s master stroke was with the horse. He initially deployed his smaller horse command behind his foot. This gave him the option to reinforce either wing. When he saw Chris’s attack unfolding he moved his own horse to the left. Despite 4:3 odds the two cavalry wings clashed on a narrow frontage, so only two units a side actually fought. Adam got a minor advantage in the melee here but nothing decisive. With superior numbers Chris could have moved units around to allow his commander to rally weakened units. Adam didn’t give him a chance and used his “Sergeant-Major-General Boy” campaign card. This routed the directly affected unit immediately, and it routed. That rout caused another unit to rout as well. Suddenly the cavalry odds were 3-2 in Adam’s favour. Well played.
Both Adam and Chris made workmanlike use of their Shot and Dragoons. They both used these to contest the village. Adam had a slight advantage because he was in the village, hence got cover.
Napoleon Bonaparte believed in lucky generals: “I’d rather have lucky generals than good ones.” So did Eisenhower: “I’d rather have a lucky general than a smart general. They win battles.” Well, in this game, Adam was luckier. Killing John Hurry won him the game. Admittedly it was looking positive anyway, but killing John Hurry rushed the game to a conclusion.
Cool Campaign Cards
Most campaign cards from Populous, Rich and Rebellious are just add / remove a unit. A subset are more cool. In this case we had three cool cards:
- [Beneficial] John Hurry – Brave & skilful but lax political principles: For the entire battle increase one chosen commander’s to hit in melee from 4-6 to 3-6. Retain until deserts to victorious enemy
- [Royalist] Sergeant-Major-General Boy, the ‘Dog-witch’: Once during the battle reduce resolve of one enemy unit by 2 Resolve. Retain until used
- [Detrimental] ‘Let a cannonball divide me’ (Earl of Kingston-upon-Hull) – For the entire battle one chosen commander is automatically killed if hit by cannon fire
the first two of those cards played a big part in the game. Sergeant-Major-General Boy, the ‘Dog-witch’, won Adam the game. Or, more accurately, Adam’s adroit use of the card won him the game. I tend to think of Boy as an opportunity to hit a healthy unit with a 2 Resolve penalty. Adam went the other way. He use Boy to rout an already severely weakened unit, and that had a flow on effect and routed a nearby unit with only 1 Resolve let. Bear in mind the morale erosion rule specifies the lost resolve must be on “the unit nearest to the routed unit or nearest to enemy” and Adam knew that unit had only 1 Resolve and would rout.
Chris chose John Hurry as his infantry commander. Being brave & skilful, John Hurry was formidable in melee. In Tilly’s Very Bad Day his to hit in melee goes from 4+ to 3+. That was sufficient motivation for Chris to get John Hurry into combat as quickly as possible. Unfortunately, a lucky die roll by Adam saw the death of Parliamentary commander and that saw his foot command crumble.
By the way, we had to decide what happened to the John Hurry campaign card upon his death. Normally a side keeps this campaign card: “Retain until deserts to victorious enemy”. We figured a dead guy couldn’t desert and the card went back into the deck.
The third cool card – ‘Let a cannonball divide me’ – didn’t have an impact on this game. It could have but Adam had assigned the Earl of Kingston-upon-Hull to his horse command and kept them out of the way. So the Earl was never in danger from the Parliamentary guns.
Great Pick Up Games
We’ve now had seven games in the campaign. Every one was different. Different terrain. Different and unbalanced orders of battle. We are linking them as a campaign, but it seems to me that the combination of the campaign cards (from Populous, Rich and Rebellious) and Terrain Cards make for great pick up games.
Campaign so far
Here are the battle results of the campaign so far
| Game | Year + Round | Location | Game Size | Royalist | Parliament |
|---|---|---|---|---|---|
| 1 | 1642 Early | East Midlands | Small | Adam Strategic Defender Tactical Attacker Defeat |
Chris Strategic Attacker Tactical Defender Victory |
| 2 | 1642 Early | Wales | Small | Steven Strategic Attacker Tactical Attacker Defeat |
Jamie Strategic Defender Tactical Defender Victory |
| 3 | 1642 Late | South-East | Small | Adam Strategic Attacker Tactical Attacker Victory |
Chris Strategic Defender Tactical Defender Defeat |
| 4 | 1642 Late | East Anglia | Large | Steven Strategic Defender Tactical Defender Victory |
Jamie Strategic Attacker Tactical Attacker Defeat |
| 5 | 1643 Early | Upper Thames Valley | Small | Adam Strategic Defender Tactical Defender Victory |
Chris Strategic Attacker Tactical Attacker Defeat |
| 6 | 1643 Early | Wales | Small | Steven Strategic Attacker Tactical Defender Victory |
Jamie Strategic Defender Tactical Attacker Defeat |
| 7 | 1643 Late | Lower Thames Valley | Small | Adam Strategic Attacker Tactical Defender Victory |
Chris Strategic Defender Tactical Attacker Defeat |
Where to get Tilly’s Very Bad Day and Populous, Rich and Rebellious
Both are available for download as PDFs:
Tilly’s Very Bad Day (PDF)
Populous, Rich and Rebellious – English Civil War Campaign (PDF)
This is a very nice rule set, and I’m really enjoying reading through these after action reports. The campaign system is particularly nice, which of course means, I’ll be stealing ideas from it forth-with. – Peter Robbins