Recently we play tested my S12 Fighting Across the River scenario for Tilly’s Very Bad Day (which I’ll post about soon). After the game Adam and I got to talking about the premise of the scenario and Adam encouraged me to take a closer look at some 17th century battles that feature a river crossing. In this post I look at four such battles and look for patterns in four factors: (1) crossing points; (2) forces present; (3) forces engaged; and (4) the battle result. The nature of the river crossings includes whether the river was fordable and how many crossings there were. A lot of men might have been nearby but only a minority were actively engaged, which suggests whether these battles were ‘nasty fights’ or ‘grand battles’. The result of battle is on the list because the defenders of a river crossings had a habit of ‘retreating once things get serious’.
Four examples of river crossings
I look at four examples of 17th century battles which feature defended river crossings:
- Battle of Rain (15 April 1632)
- Battle of Newburn Ford (28 August 1640)
- Battle of Cropredy Bridge (29 June 1644)
- Battle of the Boyne (11 July 1690)
The first battle (Rain) is on the list because it was this battle that inspired Tilly’s Very Bad Day. Adam suggested the last three (Battles of Cropredy Bridge, Newburn Ford, and the Boyne).
River Lech and the Battle of Rain/Lech
The name “Tilly’s Very Bad Day” was inspired by the death of Johann Tserclaes, Count of Tilly’s following the Battle of Rain (15 April 1632) (Guthrie, 2001; Wilson, 2009). Tilly’s Catholic League army failed to stop Gustavus Adolphus’s Swedish army from crossing the River Lech. This was a large scale affair with 35,500 Swedes and 22,000 Catholic League troops. Tilly chose to defend a river because he was outnumbered nearly 2:1 (actually 5:3) and because many of his troops were inexperienced. Tilly destroyed the bridge just to north of Rain then fortified a position to the south with a redoubt near the river and larger camp behind. The Swedes demonstrated against the redoubt to allow them to secretly bridge the river 2 km further south at an islet. Gustavus sent infantry across to build their own fortification to cover Swedish army’s crossing. As soon as the Swedish army had crossed the river, Gustavus attacked the Catholic position. The battle was decided with the arrival of 2,000 Swedish cavalry that has forded 5 km south of the pontoon bridge and ridden north to take Tilly’s army in flank. Tilly was mortally wounded early in the battle, which can’t have helped matters. This wasn’t a mere skirmish as both armies were full engaged and suffered around 2,000 casualties, with the Swedes capturing another 1,000 Catholic League troops.

Note: Wikipedia incorrectly places the various locations in the battle and so is at odds with the references it cites itself i.e. Guthrie (2001) and Wilson (2009).
Crossing Points: River generally impassable due to high rainfall. Four potential crossings: (1) bridge at Rain (destroyed before the battle); (2) in front of Catholic League redoubt (the Swedish didn’t cross but threatened to); (3) the pontoon bridge; (4) the southern ford.
Forces Present: 35,500 Swedes and 22,000 Catholic League troops (5:3) with many Catholics inexperienced
Forces Engaged: Given the casualties, quite a big proportion of the armies must have been engaged at some point.
Battle Result: The Catholic League army marched off because Tilly was incapacitated and they failed to dislodge the Swedes from their side of the river.
River Tyne and the Battle of Newburn Ford
The Scots outnumbered the English at the Battle of Newburn Ford (28 August 1640) by 4:1 (20,000 versus 5,000). This is exactly why the English commander chose to defend a ford and why he tried to fortify the position. But the defender’s fortifications were incomplete when the Scots arrived. The English bounced an initial advance by Scots cavalry but then an intense bombardment by the better placed, heavier and more numerous Scottish artillery dismantled the English defences and drove off the defending infantry. The Scottish army then crossed the river. The English cavalry counter-attacked but could not stop the Scots.

Crossing Points: River impassable except at Newburn ford.
Forces Present: 20,000 Scots and 5,000 English (4:1)
Forces Engaged: All of the English (although for some this was a brief engagement) and an unknown number of Scots.
Battle Result: English marched to Newcastle after their infantry fled from the Scottish artillery and their cavalry counter-attack failed to drive the Scots back.
River Cherwell and the Battle of Cropredy Bridge
The Battle of Cropredy Bridge (29 June 1644) was a bit different from the other three examples as the forces were more or less equal. King Charles wanted to fight Waller so marched north from Banbury to draw the Parliamentarians out of their advantageous positions. Waller followed and attacked across the River Cherwell when he saw the Royalist rearguard lagging behind the main body. There were three crossing points over the River Cherwell (Slat Mill Ford, Cropredy Bridge, Hayes Bridge). Slat Mill ford was nearest to the Parliamentarian positions, with Cropredy Bridge 1.6km to the north, and Hays Bridge about 3.2 km further to the north-east on the road to Daventry. All crossing points were contested. The Parliamentarians succeeded in crossing at Slat Mill Ford and Cropredy Bridge. The Royalists blocked them at Hayes Bridge, couldn’t retake Cropredy Bridge, but captured Slat Mill Ford and recrossed to the Parliamentarian side. By the end of the battle the armies were in stalemate, peering at each other across the river. They stayed this way until King Charles decided he was better of withdrawing. Tactically a draw. Strategically a Royalist victory as Waller’s army dissolved.

Note: the map is a bit misleading. Cropredy Mill is at Cropredy Bridge and not south of it. Middleton crossed at Cropredy Bridge.
Crossing Points: River impassable except at the three crossing points: (1) Slat Mill Ford; (2) Cropredy Bridge (and adjacent ford); (3) Hayes Bridge.
Forces Present: The Royalists and Parliamentarians had about 9,000 each.
Forces Engaged: Initially modest forces but these were reinforced by the main bodies. The Parliamentarians initially attacked with 2,500 men and other troops were engaged over time. At the start of the battle only the Royalist rearguard was engaged (perhaps 2,000 men), then parts of the main body began to return, and ultimately the entire Royalist army was facing the Parliamentarians.
Battle Result: The Royalists marched away when they could not break the stalemate across the Cherwell.
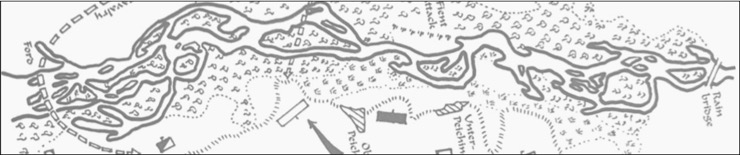
River Boyne and the Battle of the Boyne
At the Battle of the Boyne (11 July 1690) the Williamites had 36,000 troops to the Jacobite’s 23,500 (3:2 odds). The Williamites were also better trained and equipped. William surveyed the river on the 10 July and was wounded by Jacobite artillery fire. Looking at the map there were seven crossing points:
- Drogheda [Map 1] although the town was defended and the bridge unavailable to the Williamites
- Slane Bridge (or ford) [Map 13
- Intermediary ford between Rosnaree and Slane [Map 14]
- Oldbridge west ford where the French and Enniskillingers crossed at Oldbridge [Map 15]
- Oldbridge central ford where Sir J. Hansner’s & Count Nassau’s passed the river [Map 16]
- Oldbridge east ford where William’s left wing horse crossed, and beyond the right flank of James’s army [Map 17]
- Rosnaree ford where right wing of William’s army crossed [Map 19]
On the day of the battle (11 July 1690) the bulk of the Jacobite army was in the central camp [Map 2] although a regiment of dragoons (Sir Neale O’Neale) had been sent towards Slane [Map 12, 13].
At 0600 hours William caused a stir when his right wing left camp [Map 8] and marched towards Slane [Map 12, 13]. This was a quarter of his army and included both horse (Count Schomberg, the Duke of Schomberg’s son) and foot (General Douglass). This force crossed at Slane [Map 13], Rosnaree [19, 22] and a ford in between [Map 14]. Initially they were only opposed by Sir O’Neale’s 500 dragoons so James sent his left wing (De Lauzun) to face this threat. The nature of the ground between the villages of Rosnaree [Map 22] and Duleek [Map 20] – broken up into corn fields, with numerous ditches and dykes for boundaries, and a large and difficult bog [Map 21] – meant the William right and the Jacobite left did not close. The William cavalry tried to outflank via Duleek [Map 21] but De Lauzun countered with is best, French and Swiss, infantry.
William’s main hope was the fords between Oldbridge and Drogheda [Map 15, 16, 17]. By 1000 hours the tide was already coming in and William was worried that the water level would become too deep to allow infantry to cross. However, news that his right wing was established on the Jacobite side of the river meant he ordered his infantry across the fords near Oldbridge [Map 15, 16] and his left wing cavalry across the ford closer to Drogheda [Map 17]. Fierce fighting ensued around Oldbridge [Map 5] with attacks and counter-attacks. The cavalry of both sides played a vital role. The Jacobite cavalry pinned the Williamite infantry into squares or pushed them back to the river but were eventually driven off by William’s left wing horse. After a fierce fight the Jacobites were driven up the hill towards Donare [Map 4]. It didn’t help the Jacobite cause that James overestimated the threat on his left wing and pulled further troops from the hard pressed centre to reinforce De Lauzun.
The Jacobite rearguard allowed the army to retire in good order. The wide detour around the bog meant William’s right wing cavalry failed to cut the retreating Jacobites off at Duleek [Map 20]. The Jacobites lost 1,500 killed or wounded for only 500 killed or wounded among the Williamites.

The map of the Battle of the Boyne is from Cane (1859, p. 235). I have made a couple of edits to the original. Firstly I rotated the map so that north at the top; having north at the bottom was doing my head in. Secondly I redid the labels. This is because the original labels were hand written in script so were hard to read, and with the the rotation they were now also up side down.
Crossing Points: The river was impassable but there were seven crossing points. Admittedly the bridge in the town was inaccessible, so perhaps we count six. The fords at Oldbridge could have become impassable if the Williamites had delayed further.
Forces Present: 36,000 Williamites and 23,500 Jacobites (3:2) with many Jacobites inexperienced and poorly equipped
Forces Engaged: About 2/3rds of each army was engaged at Oldbridge. The Williamite right wing played a crucial part by drawing off the Jacobite left wing but the fighting on this flank was inconclusive and the Williamites failed to outflank James’ army.
Battle Result: The Jacobites marched away when they could no longer hold the fords at OldBridge.
Analysis and discussion
Okay, what can I draw out of that? For a start, every battle is different. Seven river crossings at the Battle of the Boyne and only one at Newburn Ford. An encounter battle between armies on the march (Cropredy Bridge) versus outnumbered defenders looking to tip the odds by defending a river bank (Rain, Newburn, the Boyne). Evenly matched armies (Cropredy Bridge) versus massively outnumbered (Newburn).
Crossing points
The first thing I notice is that rivers in all of the battles are impassable except at fords or bridges. This makes sense really. As the defenders need something to defend and the crossing points provide choke points to defend.
Only one of the example battles had a single river crossing point (Newburn). The other three example battles involved multiple crossings (Rain, Boyne, Cropredy Bridge). This is a small sample size so 3 versus 1 is not statistically significant. I’m sure if I looked wider there would be far more battles with a single crossing, but it does reassure me that a scenario with multiple river crossings is okay. Good commanders, when facing a defended river crossing, looked for alternatives.
In the battles where there were multiple crossing points, the crossings were far apart. This made for either uncontested crossings (e.g. the Swedish flank march at the ford south of the pontoon bridge) or disjointed battles (Boyne, Cropredy Bridge). Which leads us to the ‘nasty fights’ point.
If the attacker can cross any crossing point unopposed the defender is in trouble so the defender will try to garrison each crossing point they know about. But they might not know about them all. The Swedes used misdirection at Rain so could cross unopposed at two other locations. The southern ford was not defended, which is a bit lax by Tilly. But he couldn’t do much about the pontoon bridge the Swedes put across at the island south of Rain – this was Gustavus genius. The pontoon bridge was initially unopposed but eventually the entire Catholic League army tried to drive in the bridgehead as this is where the Swedish main body was crossing.
Forces present and engaged
Full armies were present at all of the battles. Admittedly in three of the battles the defender chose to deploy on a river crossing to compensate for a numerical disadvantage. 4:1 at Newburn Ford, 3:2 at the Boyne, and 5:3 at Rain.
Adam was right when he said (in our post game talk) that contested river crossings led to a “a series of nasty fights at the bridges, rather than a grand ‘battle'”. These were certainly not open field battles as the river meant there was no open field, so grand advances by the entire army were not possible. The fight was localised at the crossing points. The Battle of Cropredy Bridge, for example, could be viewed as three separate skirmishes, one at each at each of the three river crossings (Slat Mill Ford, Cropredy Bridge, Hayes Bridge). Each of these skirmishes was ‘nasty’ involving a relatively small number of troops, although at the southern ford and bridge the skirmishes were prolonged as the main bodies fed in more troops. The other example battles are the same. The river crossings narrowed the coal face (as it were) and only a small number of troops could fight at a time. This is, of course, why the defenders chose those positions: to overcome a numerical disadvantage.
But in all cases the main body was there to counter unexpected threats or reinforce success. By the end of Cropredy Bridge the opposing armies were lined up facing each other over the river. If an opportunity presented itself either side would have flooded over the river.
Battle result
The defeated Jacobites marched away from the River Boyne, the defeated Catholic League from the River Lech, and the defeated English from Newburn Ford. In all cases they were outnumbered armies. They chose to defend a river because they were outnumbered. So standing to fight when their opponent had crossed their main defence, the river, was suicide.
But crossing the river isn’t enough. The defenders have to be convinced the attackers have established a firm foothold before they retreat away. At the Battle of Rain, the Catholic League tried to destroy the Swedish bridgehead – both sides lost thousands in the attempt. Only when they were caught in the flank did they abandon the field. At the Newburn, the English cavalry counter attacked after their infantry had already retreated because there was a chance, slim admittedly, that they could have turned the tide against the Scots.
Interestingly it was the nominally victorious Royalists that marched away from the Battle of Cropredy Bridge. During the battle, both sides crossed the River Cherwell, but were thrown back by counter-attacks. The Royalists only marched away after a full day of stalemate, glaring at the Parliamentarians holding Cropredy Bridge. They were the initial defender of the river crossings but they had achieved their goals (drawing Waller into battle), were undefeated, and still had comparable numbers. It was the Parliamentarian army that subsequently dissolved through desertion. So even the fact of marching away was not a sign of defeat.
Conclusions and implications for wargaming
There is historical precedent for a scenario where one army is defending a river from another army. But the nature of these battles was different from battles in an open field … there is a river after all … so any wargaming scenario must be different.
Crossing points
It is obvious in hindsight, the rivers should be impassable river except at bridges and roads. My only excuse is that the river is fordable in the original “S12 Fighting Across the River scenario” in Grant and Asquith (1996). I just followed their lead in my version of S12 Fighting Across the River scenario. Ironically, by default, rivers are impassable in Tilly’s Very Bad Day except at roads and bridges. I should have just stuck with that.
In terms of the number of crossing points, well, there can be one or lots. The attacker will want more and the defender will want less.
Forces Present
Commanders chose to defend a river when numerically weaker (Rain, Newburn, Boye) or to protect a rearguard on a march (Cropredy Bridge).
For me these are ‘grand battles’, even though there is no open field. Having said that the river, bridges and fords impose serious physical constraints. The challenge for a scenario designer is how to simulate that effectively. The scenario must offer some reason to make it worthwhile to put all those extra figures out on the table, even if only some are engaged at any one time. Even if the scenario focusses on the skirmishes at the crossing points, it must give the main body a part to play as they provided reinforcements for threatened sectors. For example, a simulation of Cropredy Bridge would not be the same without the two main bodies being represented somehow. They may or may not be on table, but they should be able to feed in reinforcements.
Battle result
A scenario’s victory conditions should simulate the tipping point for the defending army: when will they have had enough and decide to march away. The end of the game is not when the first attacker steps foot on the further bank. There is a good chance the defender can drive them back. All the example battles featured fierce counter attacks by the defending side and the outcome was not clear until those counter attacks succeeded or failed.
I think the tipping point is when the attack has established a sufficiently strong bridgehead that counter-attacks by defender will not shift them. This is long after things have gotten serious. The attacker must force one or more crossings, establish a bridgehead and reinforce the bridgehead, while driving off the defender’s counter-attacks. This might take several attempts by both the attacker and defender. Only when the defending army decides counter-attacks are pointless will they march off.
I think that will give a good game.
Other contested river crossings
I’d appreciate your help collecting other examples of battles featuring a contest river crossing. After a quick search I only found two:
Battle of Piercebridge (1 December 1642)
Battle of Upton (28 August 1651)
Where to get Tilly’s Very Bad Day
Tilly’s Very Bad Day is available for Download (PDF).
References
Cane, R. (1859). The History of the Williamite and Jacobite Wars in Ireland; from their origin to the capture of Athlone.
Grant, C. S., and Asquith, S. A. (1996). “Scenarios for all Ages”. CSG Publications.
Guthrie, W. (2001). Battles of the Thirty Years War: From White Mountain to Nordlingen, 1618-1635. Praeger.
Wilson, P H. (2009). Europe’s Tragedy: A History of the Thirty Years War. Allen Lane.
Wikipedia: Battle of Cropredy Bridge (29 June 1644)
Wikipedia: Battle of Newburn Ford (28 August 1640)
Hi The Battle of Torruella 27 May 1694 or the river Ter is an other example of river crossing battle ( and it is well suited with your main interest with spanish history).
Thanks Jean-Michel
I notice that in all these battles the river line was successfully forced (the English Civil War example notwithstanding). How many times were battles fought where the river line held? I suspect a bit of historic bias here – successful forcing of a river line being more noteworthy than an effective defence.
Good point Chris. It would be interesting to find successful defences.
While I enjoy the look of a wargame table with a river, it always seems to result in a somewhat boring game. As you mentioned, the action is at the choke points (bridges and fords) and the rest of the game is two armies staring at each other, with not much maneuver. I’ve taken to not using any rivers on my tables to avoid this.
This is exactly why Adam said contest river crossings weren’t ‘grand battles’. No manoeuvre.
For me that is the scenario design challenge. To get a good game even when the two main bodies seem to be just staring at each other.
Scenario design is critical, as is the scale of the game. If the game is “zoomed in”, the critical action of assaulting and defending a single bridge can be the entire focus of the game. As you “zoom out” and the unit scale is increased (maybe to a brigade/regiment instead of a battalion per unit), then there could be more fords abstracted into a river which allows for units to cross, albeit slowly. I’m no scenario design expert, however! I’m presently struggling with creating a scenario for our WW2 game next Saturday.