
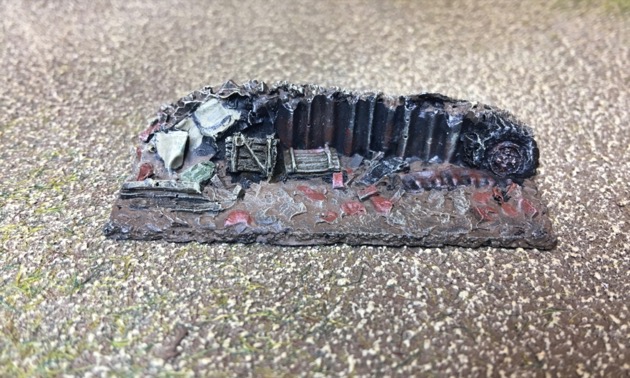
A long time ago I got some 15mm Jarvis city barricades. Perfect for WW2, perhaps Stalingrad, or Spanish Civil War. I finally got around to painting them. There are a lot of different bits on these features but it was pretty straight forward. I’ve paint almost everything on here before … except the corrugated iron. That was new.
The model
The item is “JAVIS 15mm BARRICADES # J152”. I got mine on eBay and several folks sell them. I specifically got mine from eModels. Postage is a bit steep from eModels as it is per item.
The barricades are cast resin and are 6cm x 3cm. There are two variations.


Procedure
This is the order I did things:
- Undercoat black
- Paint corrugated iron
- Paint ground
- Paint sandbags
- Paint wheels
- Paint wood
- Paint bricks
- Finishing touches
Actually aside from the undercoat and the finishing touches you could do it in any order.
Step 1: Undercoat black
Step 2: Paint corrugated iron
The corrugated iron was the new bit for me. I’ve very familiar with corrugated iron as it is the default roofing material for houses in New Zealand. But I’ve never paint it before.
Most houses have painted corrugated iron roofs as it is more durable. But for this model I wanted the corrugated iron both natural / unpainted and slightly rusty.
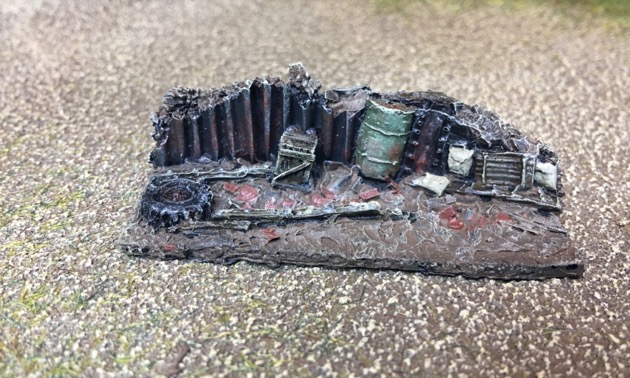
Steps for painting rusty natural corrugated iron:
- Paint Vallejo (162) 70.869 Basalt Grey
- Paint the ridges Vallejo (179) 70.863 Gunmetal Grey; paint them fairly wide with the basalt grey showing in the troughs
- Dry brush Vallejo (178) 70.864 Natural steel
- Light dry brush Vallejo (171) 70.997 Silver
- Dry brush Vallejo (137) 70.982 Cavalry Brown on the iron at random; rust is more likely at the bottom of the panels so brush from the bottom of the panel up; rust up some ridges from the bottom to the top
The barricade seems to have other lumps of random metal and I painted them in a similar fashion.
Step 3: Paint ground
Usual story for ground … Flat Earth and Dry Brushing.
Steps for dry earth:
- Paint Flat Earth: the Dulux version of Tamiya Flat Earth (XF-52)
- Dry brush Dark Sand: Vallejo (123) 70.847 Dark Sand
Light dry brush Pale Sand: Vallejo (007) 70.837 Pale Sand… not yet as this comes later in the process
I painted on the flat earth making sure the paint was quite runny to ensure it got into the crevices. Then I dry brushed the Dark Sand but left the Pale Sand for later.
Step 4: Paint sandbags
Sandbags: Making and painting sandbags for wargames
Step 5: Paint wheels
Steps for wheels:
- Paint tyres black.
- Dry brush hubs metal like the corrugated iron.
Step 6: Paint wood
- Heavy dry brush Vallejo (145) 70.826 German Camouflage Mid Brown (Coat D’arms 534 Dark Leather)
- Dry brush Vallejo (113) 70.880 Khaki Grey (Coat D’arms 524 Tan Earth)
- Light Dry brush 50:50 mix Vallejo (113) 70.880 Khaki Grey (Cote D’arms 524 Tan Earth) and White
Step 7: Paint bricks
I used a fairly simple scheme for the bricks.
Steps for bricks:
- Paint Vallejo (139) 70.846 Mahogany Sand
- Dry brush Vallejo (137) 70.982 Cavalry Brown
- Dry brush 1:1 Mix (137) 70.982 Cavalry Brown and (007) 70.837 Pale Sand


Step 8: Finishing touches
Highlight everything with a light dry brush of Vallejo (007) 70.837 Pale Sand.