Chris Harrod and I played the Stalingrad Scenario from the the Crossfire rules a couple of times.
Summary: Fast and brutal. Plan to play it 2 or 3 times in an evening. We managed two games in 1 hour 30 minutes.
Set up
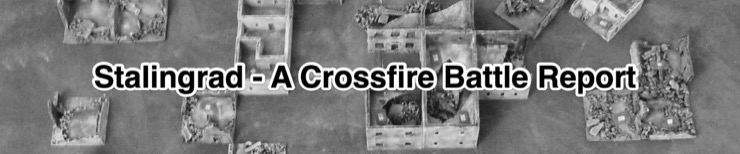
First up a black and white photo of the table. Mainly because Dick Bryant sometimes asks about “Air reconnaissance photos” as gaming props so I thought I’d try to make one.

As it happens the my Generic Building and urban table are fairly black and white-ish anyway.

Both sides got two companies of troops to spread across the table. I have just rebased my WW2 armies with Sand, Flat Earth, Dry Brushing and Static Grass and this is their first outing with their new bases. I’m quite pleased.

The Germans got two rifle companies. Only the company commanders were a +2; the platoon commander of the first platoons, normally +2, were only +1 in this scenario. For some reason all the company commanders, on both sides, were “Veteran” although this didn’t have a bearing on the game as the troops were “Regular”.

The Soviets got a large rifle company with four squad platoons and a submachine gun company with only two platoons. The submachine gunners would be key to the outcome of the two games because of their bonus in close combat.

Game One
On a roll of a die Chris got Germans and I got Russians.
The victory conditions encouraged both of us to have troops in every sector (A, B, C, D) and the Factory. My plan was to take Block C. This block had 10 building sectors but the Soviets start with half of them and the German sectors are all in two building complexes. All I had to do was capture those two complexes.

The first troops on the table were some of my submachine gunners. Their mission was the capture the L shaped building complex to the south-east of the factory.

The Germans weren’t too far away – right next door in fact – so close combat was the order of the day. Being in a building complex there was no reactive fire allowed. The battle was a Soviet victory.

Unfortunately, the next battle wasn’t so good for me. I had PC (+1), extra squad (+1), submachine guns (+1), and surprise encounter (-1) with a net +2. It didn’t help on a 6-2 dice roll. Sigh.

Then I realised I had no troops in Block D! Not sure how that happened. So I quickly moved a force along the length of the building complex to the south of the factory. The north was in Block C but the German controlled building sector in the south was in Block D. My advance gave me troops in Block D and confirmed there were no Germans in the complex.

Then I took a risk … I tried to cross the street. Never go into the street. Bang! A pinned squad.

With my grand plan to take Sector C crushed by a unlucky die roll I had to look elsewhere for victory. So I looked to the factory. My second submachine gun platoon was here so I got a local advantage. Success!

My submachine gunners moved on. Another success.

My submachine gunners then back tracked through the factory to take the remaining, unoccupied, building sector. Victory to the Soviets.

45 minutes in and we’d brought the first game to a conclusion. Chris finished this game convinced that the Germans were disadvantaged in the factory because their initial positions were split with Russians in between.
Rather than pack up we thought we’d have another go.
Game Two
We kept the same sides for the second game – Chris/German and Steven/Russian. Chris made minor tweaks to his deployment – beefing up the garrison of the factory and stripping other areas of the board to do that. Chris got the first initiative but he chose to PASS.
I kept the same strategy from Game 1, i.e. take Block C. All I had to do was capture the 4 sector L shaped complex and the 3-in-a-line building complex. So I just tweaked my deployment to get more submachine gunners near Block C and started. I wanted to clear out a complex near the scene of impending action.

Some of my submachine gunners immediately assaulted the building complex next door. Success! This meant I reduced the threat on my guys in the L shaped complex and could, possibly, bring support into the L shaped complex if I needed to.

The action then shifted to the L shaped block itself. Another Soviet victory.

My guys kept going and wiped out the occupants of the next building sector in the complex. Chris, it has to be said, wasn’t rolling well.

The last building sector in the complex happened to be where Chris had placed his company HQ for his second company. With a +2 commander and the “Surprise Encounter” modifier the odds where in Chris’s favour (a net +1 in Close Combat). But a 4-2 on the dice was enough for me to clear the complex.

Then I had a bit of a brain lapse and attacked in an area I didn’t need to. It cost me a couple of squads and PC.

As with Game 1, we avoided the streets. Except once. In this case Chris wanted to redeploy a squad in the factory so it popped out into the street to dash to another part of the factory. Unfortunately for Chris I had troops right next door and PINNED his squad in the open.

Both games were dominated by close combat but, for a change, Chris decided to try direct fire at my recently revealed stands near the factory. Just got a PIN. [We got a rule wrong here. The PINNED German stand in the street could not have joined this Crossfire as it was facing the wrong way. All stands in a group fire must face towards the enemy.]

I considered the firefight near the factory a distraction as my goal was Block C. So I revealed another platoon and stormed through the 3-in-a-row building complex. I was lucky – this was one of the areas that Chris had stripped to beef up his force in the factory. Block C was mine. Victory!!!

This game also took 45 minutes. Chris finished this convinced the Germans were advantaged in the factory because their initial positions were split with Russians in between. And they can gang up.
Observations and conclusions
This scenario is brutal. Because movement in building complexes doesn’t attract reactive fire the focus was on clearing complexes. Masses as much as you can in one sector and go for it. As the Russian the best I could get was a commander with two SMG squads (+1 for commander and +1 for SMG = +1). Against a lone German squad this was quite potent. Against more serious opposition it was quite dicey, particularly with the -1 modifier for Surprise Encounter that usually applied against me.
This scenario is fast. This was because of the sudden death nature of the close combat in the building complexes and also the victory condition of only having to capture 6 or 10 building sectors in a relatively sparsely populated table. We played it through twice in 1.5 hours. If we did it again we’d want the game session to last longer. So we would do one or both of these:
- Attempt it three times in an evening. Just print 3 sets of maps in advance and go for it.
- Change the victory conditions to make it necessary to capture two blocks not just one. That would make each game longer and encourage more of a to and fro combat.
This scenario has no mortars hence no smoke. No smoke!!!!! A Crossfire game with no smoke? How can you create covered approaches if you can’t call in indirect smoke fire missions? Short answer, you can’t. That is actually one of the interesting tactical challenges of the game.
The scenario poses interesting tactical choices. With no smoke, deployment is everything. A player has to deploy everywhere but only has two companies so has to make choices about where to mass troops and where to be spread thinly. And because the only terrain are buildings “massing” is quite constrained – only two squads and a commander.
The scenario needs a lot of buildings. 45 building sectors to be precise. Your average gamer will not have that many buildings ready to hand. I do because, well, I went crazy once and built a lot of Generic Building Sectors, initially for Hit the Dirt Scenario “Battle for Ponyri”. But most gamers will only have a few buildings; many gamers will have none.
The scenario is not attack-defence. Most Crossfire Scenarios are attack-defence. Usually one side, the attacker, has a bigger force, deploys visible, and has to achieve the objectives. The defender usually has a smaller force, deploys hidden, and mostly is the foil to the attacker’s plans. This scenario has very similar forces on both sides, and starts with all the troops mixed up. Nothing typical about that at all.
This scenario is an odd choice to include in the rule book as an example. It would make more sense to have a more conventional example scenario, i.e. attack-defence, hidden deployment only for the defender, more varied and rural terrain, and smoke.
This scenario is a bad choice for Crossfire Novices because it needs a lot of buildings and isn’t a typical game.
Nice board. I think everyone should do Stalingrad at one point…we tried it in 28mm.http://glasgowwarhog.blogspot.com/2019/