Jamie and Chris play tested the pre-publication version my Small Lutzen – A Tilly’s Very Bad Day Scenario. This is a small game on a small table with small armies (in numbers of units), and only normal Pike+Shot not Large Pike+Shot.
Summary: Scenario needed tweaking before publication. Swedes couldn’t win.
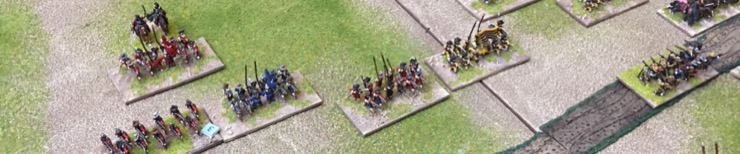
The Draft Scenario
The pre-publication (draft) scenario had a square map area is 3.6 km by 3.6 km (based on that give by Wilson, 2010, p. 509). I reproduce it here but the final published scenario will have a different map.

Key features are:
- A small table of 30 TUM x 30 TUM (this is 4′ x 4′ with my 80 wide bases)
- Shallow small table lines for those who want a more smaller battlefield – these are the thin green dotted lines – use as the base edges
- Flank lines – these are the grey dotted lines – use for deployment
- Lutzen, a medium Village (6 TUM x 4 TUM; Difficult; Impassable when on fire)
- Muhlgraben Stream (Impassable)
- Flossgraben (“Float Dyke”) Stream (Difficult)
- Ford across the Flossgraben
- Marshy areas near the Muhlgraben (8 TUM; Difficult)
- Schkolziger Wood near the Flossgraben (6 TUM x 4 TUM; Difficult)
- Windmill Hill (4 TUM x 4 TUM; Gentle Hill)
- Sunken dirt road with shallow ditches on each side (Difficult); the road is not a field fortification
The draft Scenario also had an Imperialist order of battle that didn’t survive play testing, so again I’ve included it here for reference:
Imperial Order of Battle
- Right Wing (3 Units)
- 1 x Commander (Wallenstein2)
- 1 x Horse1
- 1 x Shot4
- Centre (8 Units)
- 1 x Commander (Colloredo2)
- 4 x Pike+Shot
- 1 x Shot3
- 1 x Horse1
- 1 x Unlimbered Cannon
- Left Wing (4 Units)
- 1 x Commander (Holk)
- 2 x Horse1
- 1 x Light Horse (Croats)
- Both Army size and army morale break point increase as the reinforcements arrive:
- Initial force: 15 Units; 5 break point
- With Pappenheim’s Cavalry: 19 Units; 7 break point
- With Pappenheim’s infantry: 22 Units; 8 break point
Pre-Game
No game effect from scouting or bombardment.
Both armies deployed kind of in chequerboard.


Jamie deployed his Swedes with the cavalry wings overlapping and slightly in advance of the the infantry centre.

Jamie had a good reason for this, which you’ll see in turn 1, but it meant his infantry was further from the road.

Game Turn 1
The reason Jamie had his infantry held back was to allow him to his left wing horse under Bernhard in the front of the foot and out of the way of the Lutzen village. He could advance using an oblique and avoid the Zone of Control of the Imperialist Shot in Lutzen village.

Gustavus roared ahead.

The Swedish infantry trailed behind.

The Imperialists opened up.

And Gustavus charged.

The Swedes didn’t do well, but Chris (Imperialist) was particularly unimpressed by his dice rolling. So unimpressed he asked me to photograph the dice.

Game Turn 2
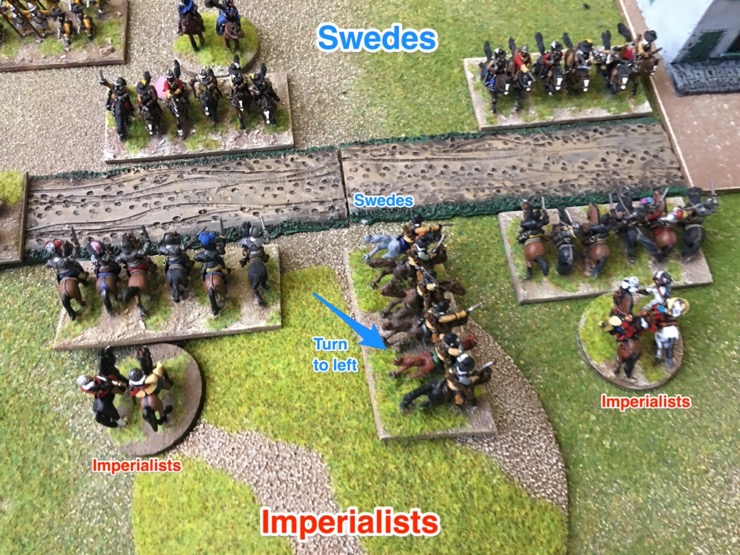
On the Imperialist right, Bernhard got to the road.

Wallenstein tried to shoot off the Swedish horse but failed.

Swedish horse then charged and destroyed the Imperialist cannon on the hill.

In the centre, the Swedish foot trudged towards the road.

The Imperialist foot waited for them stoically.

On the left, the Swedes continued to advance.

The supporting Imperialist foot shot but generally the Imperialists favoured cold steel.

The Imperialist horse unit in the bend of the road pulled back.

This allowed them to charge back in, catching their Swedish opponents crossing the road.

Generally a bad moment for the Swedes at the bend of the road.

Game Turn 3
The Swedish foot finally got within musketry range.

The Imperialist fire was modest.

The Swedish fire devastating.


And Gustavus won a melee.


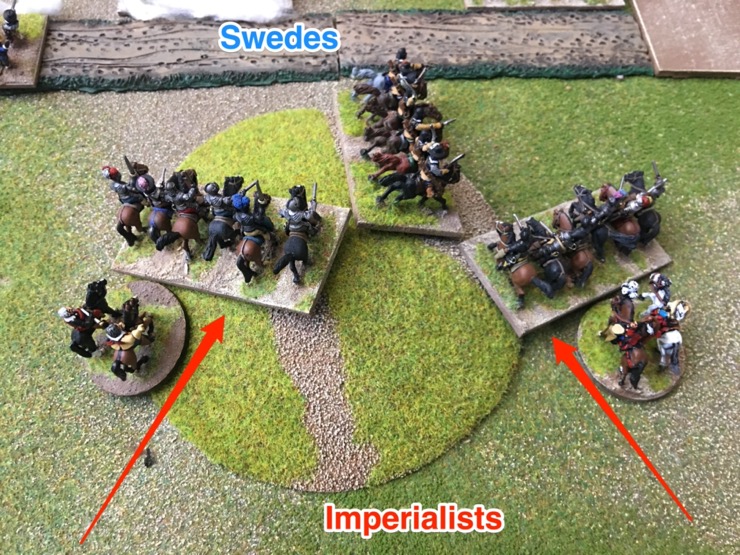
The interesting event of the game was the controversy of the game happened on Windmill Hill. Jamie had previously charged and destroyed the Imperialist cannon on Windmill hill. He now chose to turn to threaten the flank of one of the neighbouring Imperialist horse. This is a game winning DBA tactic.

But Chris calmly pulled his horse back. Both of them. The one on the right was in the Zone of Control of the Swedish unit on the hill but the rules allow a move directly backwards to get out of a ZOC.

To add insult to injury Chris then charged with both those horse units. This trapped the Swedish target and prevented their own charge.

Swedish sandwich.

And from off table Pappenheim arrived.

Game Turn 4
I only took a few photos of turn four. The first one was of the charge declarations. Lots of charge declarations.

Wallenstein routed some Swedish horse between Windmill hill and Lutzen.

Bernhard’s escort also routed.

On the far flank Gustavus’s escort routed.

That was enough and the Swedes left the battlefield.

Conclusions and Observations
Until now all our games, including the last game, Big Lutzen – A Tilly’s Very Bad Day Battle Report 2, have been very exciting and it seemed that either side might win. In this game the Swedes were never going to win. Jamie gave it a go, but the odds were against him.
I discuss a few reasons for why the Imperialists won and suggest some tweaks to the scenario to solve it. We also had a big rules rules conversation around the events on Windmill hill.
Problem 1: Imperialist defenders always win Lutzen Scenarios
We’ve now played Lutzen three times: Big 1; Big 2; Small 1. The Imperialist defenders have won every time. Can’t argue with that.
Historically Wallenstein chose this position because it was strong with the road as an obstacle and Lutzen to protect his right flank. He also predicted the direction from where Gustavus would appear, and deployed accordingly. And the Swedish army was mauled. King Gustavus died and his right flank cavalry crumbled. In the centre the two elite Swedish Brigades (Yellow, Blue) was destroyed and the other infantry savaged. Bernhard on the left is who won he battle for the Swedes. He was thrown back from Windmill Hill, and even after hearing of the King’s death, decided to have another go. He charged, got across the road again, and took the battery on Windmill Hill. Then dark fell and the two sides took stock. The battle was a bloody draw turned into a Swedish victory by Wallenstein losing heart, over ruling his subordinates, and pulling out.
So any recreation of the battle itself should be brutal. For both sides.
Road is too tough to cross
Jamie and Chris asked if the road is too tough to cross. It counts as Difficult Terrain and both the Swedish Horse and Pike+Shot have a bad time in difficult.
Historically Wallenstein deployed behind the road to provide some cover for his detached shot and to obstruct the Swedish advance. Gustavus’s horse failed in their first attempt to cross the road. This wasn’t in the face of enemy, just because they couldn’t get their horses across the ditches. So Gustavus led them further east to find a more accessible route. My point, the road was a serious obstacle.
So yes, the road makes the game tough for the Swedes, but that was Wallenstein’s aim. And the Swedes have managed to cross the road in the face of opposition in every game, even this one. Personally I don’t think the road is the problem. Well I think it emphasises the problem but is not the cause.
Crowded table
Personally I think the table was too crowded. Too many units crammed and/or two narrow a frontage. Chris could line units along the entire road and so every possible Swedish advance was going to be difficult.

I’ve got a few ideas for how to address this for the Small Lutzen scenario.
Less Imperialists
In hindsight I was overly generous to the Imperialist’s for this Small Lutzen scenario. Everything in both orders of battle was based on historical troop numbers … except the Imperialist Shot. I gave the Imperialists two full strength shot units, just like in the Big Scenario. But at the nominal unit scale, these units were negligible. So in the update to the scenario I’d remove both shot units. So the Swedes would have the same number of units but would be facing an Imperialist army with two less.
Lutzen off table
In the comments to Big Lutzen – A Tilly’s Very Bad Day Battle Report 2, Roger Calderbank expressed interest in a Small Lutzen scenario and suggested “maybe the town and the marshes on either side of it could be mostly off-table.” In hindsight I think Roger was onto something. By leaving Lutzen off table would mean the road is stretched out across the 30 TUM of the table width, making it harder for the Imperialists to cover the entire length, particularly if they have less units.
Pappenheim arrives on Game Turn 4
After every game we talk about Pappenheim’s arrival. Currently he arrives on Game Turn 3 and this is not quite long enough for the initial Imperialist attack to have made progress. The Swedes open a gap somewhere and Pappenheim immediately plugs it. That might be historical but it makes the game easier for the Imperialists.
I’m still not convinced about this, but I’m wavering. If I made that change in the small version I’d also do it in the big version.
Problem 2: Rules Controversy
I’ll end with the rules controversy.
The charges on Windmill hill
In Game Turn 2 a Swedish horse unit pushed through a gap in the Imperialist line, charged windmill hill, and eliminated the Imperialist cannon on the hill.

In Game Turn 3 Jamie did what any DBA player would do, and turned 90 degrees to threaten the flank of a neighbouring Imperialist unit.
The current Zone of Control rules allow units to do a backward move to get out of the ZOC and this is what Chris did to rescue his horse. In fact he did it on both sides of the impetuous Swedes.

But then these same Imperialist horse declared charges back the way they’d withdrawn, in the same game turn. The Swedes, being charged from both flanks, could not counter charge and took it at the halt.
And then routed.

But wait, didn’t that happen just a moment before on Game Turn 2
We found this situation unusual but didn’t comment when something similar happened in turn 2. A recap …
The Imperialist horse unit in the bend of the road pulled back.

This allowed them to charge back in, in the same game turn, catching their Swedish opponents crossing the road.
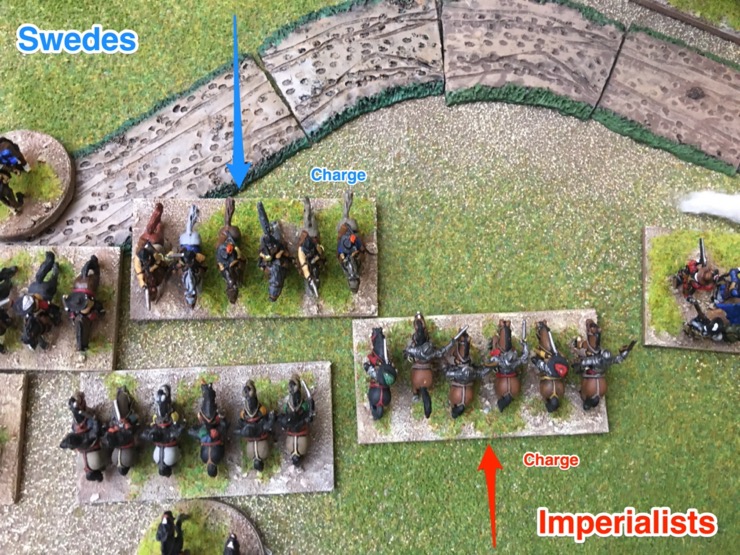
The Swedes rallied back having lost the melee. (These are the units on the right of the following photo.)

Because all of this was front to front we didn’t see it as odd. What made the situation on Windmill hill different was the turn to flank and then being charged in rear.
What do you think?
We discussed several aspects of the Windmill hill situation. But I do wonder how much our thinking is influenced by DBA. What happened was impossible in DBA and if this were DBA game Jamie did exactly the right thing by turning to flank. But that does expose his own flank and rear.
So I have three questions for you:
- Was this reasonable?
- If not, where did it go wrong?
- And, what to do about it?
What does military history/theory tell us about this?
An interesting game, and an interesting discussion. I hope to be able to play this scenario soon.
I don’t play DBA but I think the ‘move into gap and turn to make a flank attack’ more ‘gamey’ than real. It seems to be the sort of movement that wargamers love, because they can micro-control their units, but would be very hard to achieve in a battle. I struggle to think of a real example. So I don’t have a problem with the Imperial cavalry being able to fall back to avoid the flank attack from the Swedish cavalry, as falling back seems their most likely reaction when the Swedish cavalry moves into the gap between them. Wargaming ‘turns’ make these movements more discrete than they would really be.
To be honest, i think the movement that led up to this position is itself a bit ‘gamey’. One Swedish unit in a line of 3 sees a gap just sufficient for it to move into, so it ignores the close enemy units, and squeezes itself through that gap. The other Swedish units in the line don’t move (I know they would be disadvantaged by the road, but it is the idea that one unit can move forward past enemy units without support because there is ‘just’ enough room).
In any case, I’m not sure that the Swedish movement was legal in TVBD. As far as I can see, the Swedish cavalry had to make a move before it could charge the guns. In doing so, didn’t it move into the ‘buffer zone’ of the two Imperial units? As far as I can see, a gap has to be at least 4 TUM wide before a unit can move through. A good thing, to my mind, to avoid too much ‘gamey’ manoeuvre.
The only thing which strikes me as a bit problematic is the ability to move backwards then charge forwards in the same turn. It would require a high degree of control. Maybe the ability to charge after a backward move could require a command check. Or is that to complicated for a ‘fast play’ game? It is easy to make rules complicated; harder to keep simplicity without some oddities.
RogerC
The Swedish unit did charge – it charged cannon that promptly evaporate – so the buffer zone didn’t apply. Unfortunately, my first photo, Tilly-912 Swedes rush Windmill Hill, was after the cannon unit was removed.
Perhaps a unit that falls back may be disordered and have to spend a turn reordering – or pass a command check as above. I’d also like to see Pappenheim arrive a turn later and see what that does.
Does the chess-board formation work in these rules?
yes and no. The published rule do not encourage chequer-board. The draft version 2 does.
I’ve only read the rules but not played. From my reading, I don’t understand why the Swedes couldn’t charge in the same turn they made the 90-degree wheel.
Given the scale of the game it doesn’t seem unreasonable that a unit of cavalry should both fall back and charge in the same turn, as the unit will consist of many squadrons some of which are charging whilst others retreat. In the same way, a brigade should be able to intervene in the conflict to its flank without completely exposing itself to the enemy because the squadrons don’t all have to remain perfectly aligned in reality.
You are right, the swedes could turn to the left and then immediately declare a charge the Imperialist unit on that side. But the Swedish charge declaration was cancelled by by the charge of the other Imperialist unit; charges are cancelled if the unit is a target of a charge it cannot respond to.
Ah, of course. So I would say that your problem is the turn sequence – it seems that the defender always moves second so a defender could make the wheel and charge knowing that their opponent can’t respond unless there is a unit already in position to do so, whereas the attacker when wheeling risks a defender getting into position to flank charge. Simplest solution is to randomise the turn sequence.
Steve, I play ADLG Renaissance and its a good game, have a look – basing size is like yours and whats on the bse doesnt really matter – Tercios have their advantages and P& S struggle against them. Sean