This is a big Tilly’s Very Bad Day scenario for the Battle of Lutzen (16 November 1632). An outnumbered Imperialist army must hold a strong defensive position until reinforcements arrive. Historically this battle is where King Gustavus died, so was a key moment in the Thirty Years War. In game terms this is a big game on a big table with big armies.
Historical Situation
Setting: Lutzen, Saxony-Anhalt (halfway between Weissenfels and Leipzig), 16 November 1632 (Gregorian Calendar)
King Gustavus Adolphus, the Lion of the North, with an army comprising a small number of Swedish and a majority of German protestants, has caught the Imperialists retreating towards Leipzig. The protestants outnumber the Imperialists by a fair margin.
However, Wallenstein, the Imperialist commander, has deployed in a strong defensive position north-east of the village of Lutzen. His front is protected by a dirt road with ditches on both sides. The ditches are both an obstacle for the Swedes and limited protection for any shot that man them. Windmill Hill, the only raised ground in the vicinity, is on his centre-right. The village of Lutzen and the marshy ground around the Muhlgraben stream protect Wallenstein’s right. His left is more open with only the fordable Flossgraben to slow the Swedes down.
But “slow” is enough. Wallenstein only has to slow the Swedish King not defeat him. His subordinate Pappenheim, sent on detached duty a couple of days before, is racing to the battlefield with a significant reinforcements. These reinforcements, if they arrive in time, will tip the balance firmly in Wallenstein’s favour.
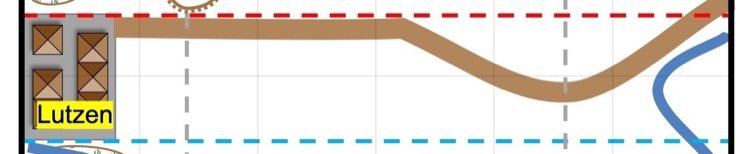
Map/Terrain
The map is based on that give by Wilson (2010, p. 509). The map area is 3.6 km by 2.4 km.

Key features are:
- A big table of 45 TUM x 30 TUM (this is 6′ x 4′ with my 80 wide bases)
- Flank lines – these are the grey dotted lines – used for deployment
- Lutzen, a Large Village (8 TUM x 6 TUM; Difficult; Impassable when on fire)
- Muhlgraben Stream (Impassable)
- Flossgraben (“Float Dyke”) Stream (Difficult)
- Marshy areas north of village (6 TUM x 4 TUM; Difficult)
- Marshy areas near the Muhlgraben (8 TUM; Difficult)
- Windmill Hill (4 TUM x 4 TUM; Gentle Hill)
- Sunken dirt road with shallow ditches on each side (Difficult); the road is not a field fortification
Pre-game preparation
The Imperialist player can elect to have the two Cannon Units in the Centre or have one each in the Centre and Left Wing.
Normal rules for scouting, deployment and bombardment. (At time of writing both Scouting and Bombardment are draft rules in play test). The Swedish Cannon start limbered so only the Imperialist Cannon can conduct bombardment.
Imperialist Player (Defending)
Objective
The Imperialists are attempting to defend the road line until the reinforcements arrive, then defeat the enemy.
Forces Available
According to Wilson (2010) Albrecht Wenzel Eusebius von Wallenstein had 8,550 foot and 3,800 horse, and 20 heavy guns, with a further 500 Croats and Dragoons detached under Collerado harassing the advancing Swedes. Guthrie (2002) gives the more: 9,870 foot, 6,900 horse, and 38 guns (both heavy and light).
I have followed Wilson for the totals and used the proportion of troop types from Guthrie (2002). I have ignored the light regimental guns (for both sides). This equates to 23 units.
Imperial Order of Battle
- Right Wing (4 Units)
- 1 x Commander (Wallenstein2)
- 2 x Horse1
- 1 x Shot4
- Centre (8 Units)
- 1 x Commander (Colloredo2)
- 5 x Pike+Shot
- 1 x Shot3
- 1-2 x Unlimbered Cannon6
- Left Wing (6 Units)
- 1 x Commander (Holk)
- 3 x Horse1
- 1 x Light Horse (Croats)
- 0-1 x Unlimbered Cannon6
- Reserve (5 Units)
- 1 x Commander
- 2 x Horse1,5
- 2 x Pike+Shot
- Both Army size and army morale break point increase as the reinforcements arrive:
- Initial force: 23 Units; 8 break point
- With Pappenheim’s Cavalry: 30 Units; 10 break point
- With Pappenheim’s infantry: 34 Units; 12 break point
Notes:
(1) By 1632 the Imperialist Cuirassiers had already lightened their armour so were basically identical to the Swedish horsemen (Brzezinski, 2001). Also, by this time, little difference between units officially designated “Cuirassiers” and those called “Arquebusiers”.
(2) Guthrie (2002) has Wallenstein leading the centre and Colloredo on the Right Wing. Wilson (2010) and Brzezinski (2001) have the reverse. Brzezinski explains that Colloredo was the infantry commander and observes that Wallenstein spent most of the battle on the right; the location he thought would be the most critical.
(3) There were only 420 shot (Guthrie, 2002; Wilson, 2010) detached to fight in the ditch at the front of the Centre command. This is half the size of other infantry units and smaller than mounted units. However, I have given them full infantry Resolve for two reasons: (a) they contested the ditch fiercely and caused the Protestants considerable problems; (b) I have rounded down the number of Pike+Shot units in the centre command rather than rounding up so I thought I should compensate elsewhere.
(4) Wallenstein detached shot to defend Lutzen village. There were probably only 346 of them (Guthrie, 2002, says 400 but I have scaled down to match total numbers in Wilson, 2010). They were deployed in the castle and environs. Again this is less than half the number of men for other infantry units and less than a mounted unit. But I have given them full infantry resolve because they have the advantage of the castle which is not otherwise simulated in the game. Although a medieval castle would not stand up to the siege of the time, it provided an advantage to the skirmishing musketeers.
(5) The Centre had 249 mounted which I have not represented above (Guthrie, 2002, lists 300 horse plus 100 dragoons, which I scaled down to match total numbers from Wilson, 2010). So I have added them to the totals for Reserve and hence bumped up the number of Horse Units there.
(6) Two Cannon Units total. I only count the 20 heavy guns. 13 of them, including all the demicannon, where on Windmill Hill in the Centre command. So the Left Wing only had seven guns of smaller calibre. Because of this imbalance, the Imperialist player can elect to have both Cannon Units in the Centre (none of the left) or have them split between the Centre and Left Wing.
Deployment
Up to three Imperialist units can deploy forward of the red dotted line:
- The Shot Unit of the Right Wing can deploy in Lutzen village
- The Shot Unit of the Centre can deploy in the road, between the village and the bend of the road
- The Cannon unit in the Left Wing, if any, can deploy between the red dotted line and the road, in the bend of the road
Otherwise all units deploy behind the red dotted line.
Normal deployment rules apply e.g. all Pike+Shot units must deploy in the centre (between the grey dotted flank lines).
Cannon deploy unlimbered.
Reinforcements
Gottfried Heinrich Graf zu Pappenheim had left Wallenstein’s army, on detached duty, only a few days before. Wilson (2010) gives him 5,800 men but Guthrie says 10,000. I went with Wilson’s numbers. Brzezinski (2001) agrees with Wilson’s total numbers and gives the breakdown I used.
When recalled by Wallenstein he marched overnight to reach the battlefield. This cavalry left earlier, and travelled faster, so arrived a long time before the infantry.
Pappenheim’s force arrives on the Imperialist base edge in two sections: cavalry and infantry. The cavalry arrive in Turn 3. The infantry arrive in Turn 8.
Historically Pappenheim arrived behind Holk’s Left Wing. I give the option to arrive anywhere on the base edge.
Imperial Reinforcements
- Pappenheim’s Cavalry (7 Units; arrive Game Turn 3)
- 1 x Commander (Pappenheim)
- 4 x Horse
- 2 x Light Horse (Croats)
- Pappenheim’s Infantry (4 Units; arrive Game Turn 8)
- 1 x Commander (Reinach)
- 3 x Pike+Shot
Swedish-German Protestant Player (Attacking)
Begins scenario with initiative.
Objective
The Swedish-German Protestant force is attacking. If there is no result within 10 Turns, they lose the battle.
Forces Available
Wilson (2010) and Guthrie (2002) basically agree on the total in the Protestant army: Wilson says 13,000 infantry, 6,200 cavalry and 20 heavy guns. I used Guthrie (2002) for the proportion of troop types. The vast majority of the men were German, with Swedes providing only one quarter of the cavalry and one tenth of the infantry (Brzezinski, 2001).
This gives King Gustavus Adolphus of Sweden 30 Units.
Swedish-German Protestant Order of Battle
- Right Wing (8 Units)
- 1 x Commander (Gustavus)
- 6 x Horse (3 x Swede; 2 x German; 1 x Finn)1
- 1 x Shot
- Centre (15 Units)
- 1 x Commander (Knyphausen)
- 6 x Large Pike+Shot (4 x German; 1 x Scot; 1 x Swede/German)2
- 2 x Limbered Cannon
- Left Wing (8 Units)
- 1 x Commander (Bernhard)
- 6 x Horse (5 x German; 1 x Livonian)1
- 1 x Shot
- 31 Units
- Army Morale break point: 11 Units
Notes:
(1) Brzezinski (2001) says the native Swedish horse were the best in Gustavus’s army (I assume the Finns are included in that). The German horse was in poor condition because the Swedes had had preferential foddering in the lead up the Lutzen (I assume the Livonians and Kurlanders also suffered). Apparently this is the reason Gustavus bolstered his wings with shot. I have chosen to ignore the campaign conditions and treat all Horse Units the same, i.e. Ordinary. But you have the option to downgrade all German and Livonian Horse Units to Inferior.
(2) The Protestant infantry was organised into eight brigades with 1370 men in each; the famous Swedish Brigades. In contrast the Imperialist infantry were organised into seven units of 892 men each. The question is, is this discrepancy enough to warrant using the Large Pike+Shot rules. On balance I think it is. However, this sets the unit size at 1,000 for an infantry unit and 2,000 for a Large Pike+Shot unit. So the Protestants end up with only six big brigades, not eight. Each Large Pike+Shot Unit counts as two units for Army Morale.
Deployment
Deploys behind the blue dotted line.
Normal deployment rules apply e.g. all Pike+Shot units must deploy in the centre (between the grey dotted flank lines).
Cannon deploy limbered.
Reinforcements
None.
Victory Conditions
Normal victory conditions apply. A side loses when, in the Army Morale step, they have reached their army break point (lost at least ⅓ of the original Units). If there is not a result within 10 Game Turns then Gustavus loses.
Scenario Special Rules
Swedish Brigade = Large Pike+Shot
A Large Pike+Shot unit:
- Has a double depth, perhaps created by putting two normal Pike+Shot bases together
- Counts as two Units for Recruiting the Army and for Unit losses / Army Morale
- Has a high starting Resolve: 8
- If Resolve is 4 or more has 4d6, rather than Resolve, for Primary Unit Shooting Dice and Melee Dice To-Front (before combat modifiers)
- If Resolve is 2 or more has 2d6, rather than 1d6, for Shooting Dice and Melee Dice To-Flank; and their flank will be bigger given the unit is deeper
- Is Supported in Melee unless there is enemy To-Rear within 4 TUM; it doesn’t need friendly units to be supported
- Remains a Large Pike+Shot unit even when Resolve drops to 4 or below
- Otherwise all other rules apply
I recommend using two Resolve Markers for the Large Pike+Shot Units. One on the front stand that remains at 4 to indicate enduring combat strength. The other on the rear stand; this is where the casualties are removed initially.
The road and its ditches
Historically the Imperialists used the ditches next to the road as both:
- an obstacle for both Protestant horse and foot
- an entrenchment (west) for Shot
The simplest way to simulate this is to have the road and ditches count as Difficult terrain. This will slow and disadvantage both horse and pike+shot. On the other hand, Shot on the road will benefit from cover.
Windmill Hill
Historically the Imperialists deployed the majority of their heavy Cannon on Windmill Hill. Presumably this was to provide better line of sight towards the advancing Swedes.
In the game, Cannon on Windmill Hill and shoot over Shot units in the road.
Burn the village
Any Imperialist infantry unit in Lutzen village can set it on fire. Lutzen burns for the remainder of the game and is impassable. Any units in the burning village must leave as soon as they can by the shortest route. That includes the arsonists themselves.
Imperialist Army Break Point
Both the Imperialist Army size and army morale break point increase as the reinforcements arrive. See the Imperialist Order of Battle.
Notes
Thanks to Richard (doctorphalanx) for advising on the orders of battle. Thanks to Adam and Chris for play testing.
I have ignored the fog or mist mentioned at Lutzen. There was an early morning mist and once the battle started gun powder smoke (the “fog of war”) reduce visibility in the same way. The Fog only seemed to have two effects on the day:
- The battle started late, once the armies were in sight of each other. However, this is the normal deployment distance for historical armies and in the game. So nothing to simulate.
- Gustavus was killed in the fog. He was wounded leading the cavalry on the Swedish right. Knowing he was badly wounded he, with a small escort, left he cavalry and tried to make his way to the Swedish baggage. But more Imperialists found him in the fog and dispatched him. The only bit of this we need to simulate in the game is the initial wounding while leading the cavalry, and this is covered by the normal Commander Casualty rules.
Historically Pappenheim, once he arrived, took over command of the left wing from Holk. So Pappenheim had both the troops of the original left wing and his own cavalry. However, he detached Isolano, the Croat Commander, with all the Croats (original and reinforcements) to attack the Swedish rear. Holk rode over to the right wing to join Wallenstein. I have ignored these command rearrangements. But you could introduce it as a Special Scenario Rule: Pappenheim takes over command of both left wing Units and Reinforcement Cavalry. He can immediate allocate some Units, historically the Croats but could be any, to the other left wing commander (called Holk or Isolano).
References
Brzezinski, R. (2001). Lützen 1632: Climax of the Thirty Years War [Campaign 68]. Osprey.
Guthrie, W. P. (2002). Battles of the Thirty Years War: From White Mountain to Nordlingen, 1618-1635. Greenwood Press.
Wilson, P. H. (2010). Europe’s Tragedy: A New History of the Thirty Years War. Penguin.
Can’t wait to see how the battle went.
John
I put together the draft scenario in an hour or so. And that is what we play tested.I was very pleased to get Lutzen on a table. It was a good game and played out in 3 hours (because of the number of units). I’ll post the report, well, sometime.
But a bit of research the next day highlighted some problems with the draft scenario. The version above is after the tweaks. The game will play out differently next time. Slightly better scenario and more experienced players.