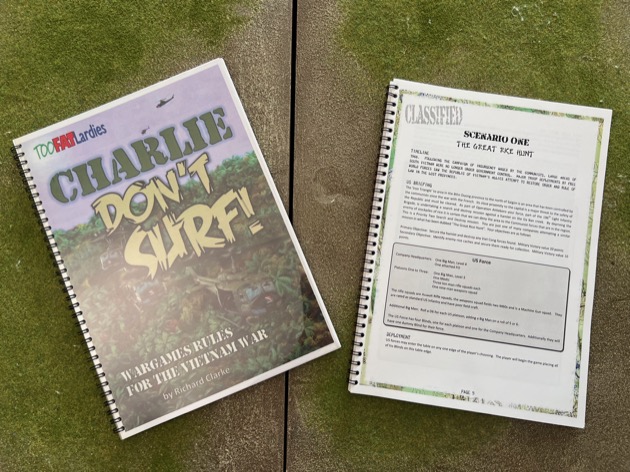
Adam has been painting US Infantry, North Vietnamese Army (NVC) and Viet Cong (VC) for the Vietnam War. Yay. I’ve been wanting to game that period for a long time. Unfortunately, for me, he has chosen Charlie Don’t Surf: Wargames Rules for the Vietnam War to game with. This is by Richard Clarke, one of the Too Fat Lardies. Personally I buy all of the Too Fat Lardies books but I find the supplements more to my taste than the rules. But Adam loves them. I had a horrible experience with ‘O’ Group so I couldn’t help but wonder, would Charlie Don’t Surf be any better?
The games
We played the same scenario twice. This was “Scenario 1 – The Great Rice Hunt” from Surf’s Up: A Collection of Scenarios for Gaming the Vietnam War.
Game 1
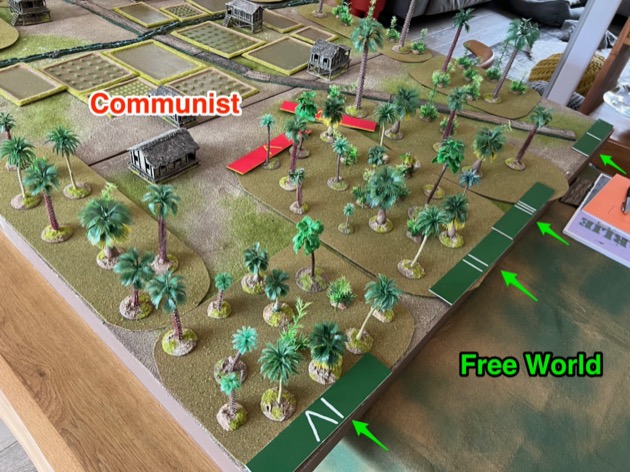
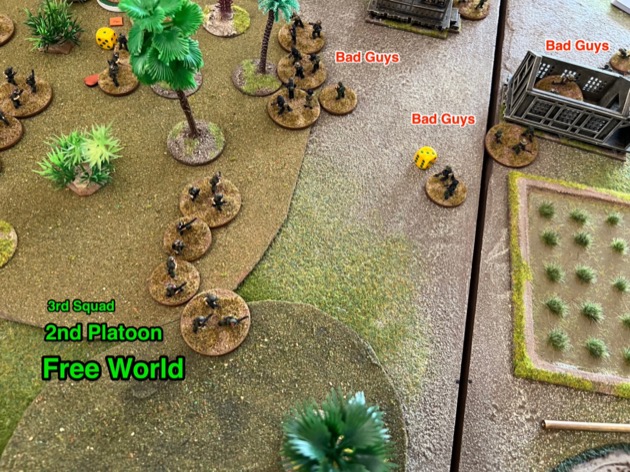
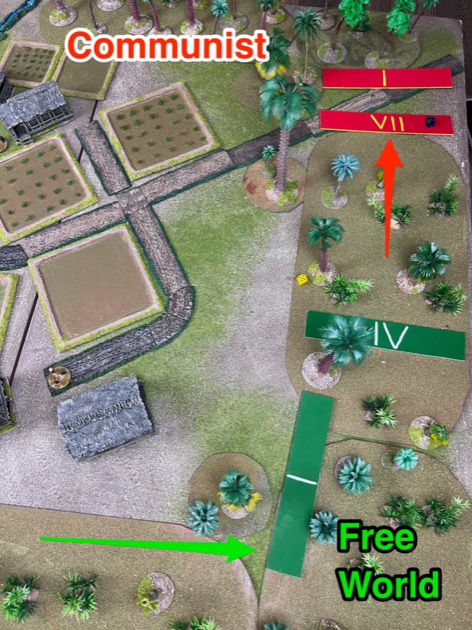
In our first game I was had US Infantry and Adam had the Viet Cong. Adam deployed his blinds on table. I came on the short western table edge with one blind in the north (the dummy), another south, and two in the middle. I discovered Viet Cong in the centre immediately on entry. We fought. I tried to send a platoon into the paddy fields but the got mowed down crossing the open – I learnt a lesson. After two hours of real time we ran out of time and stopped. The game was barely started. Adam mentioned his bug out edge was to the north; I’d only partially covered this.


Game 2
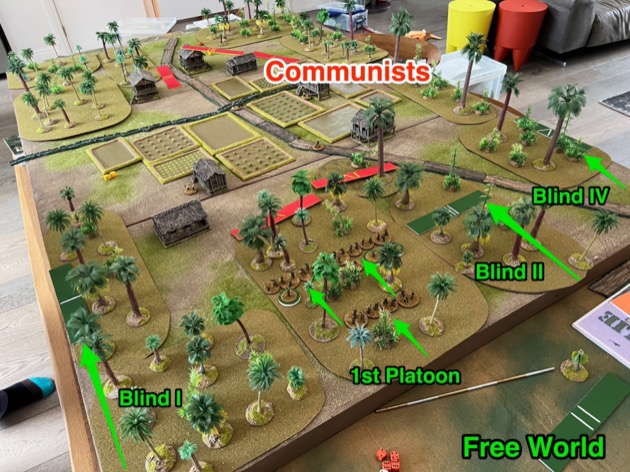
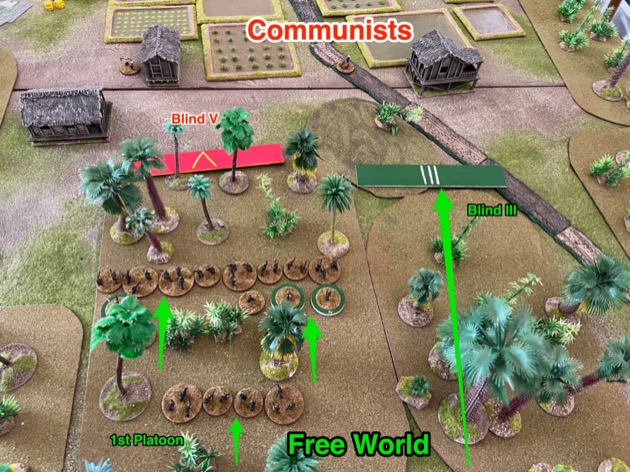
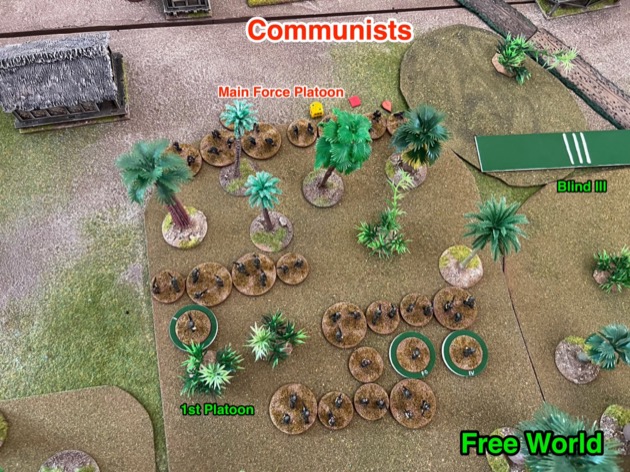
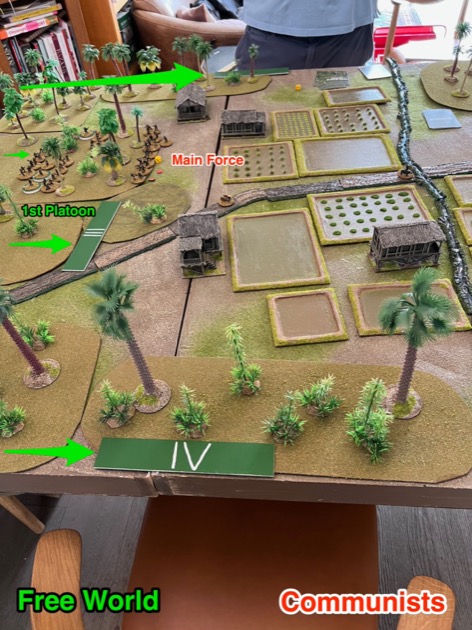
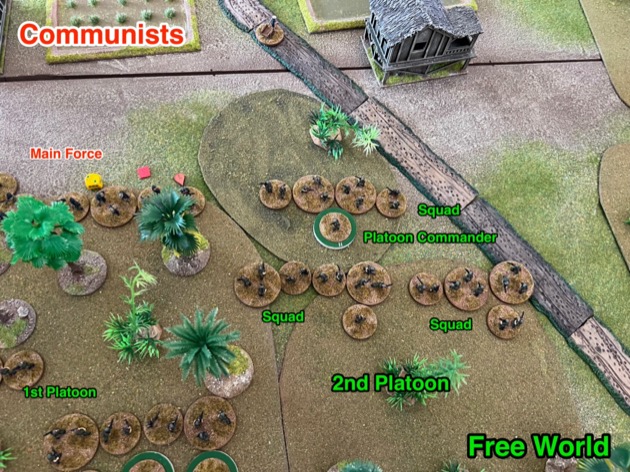
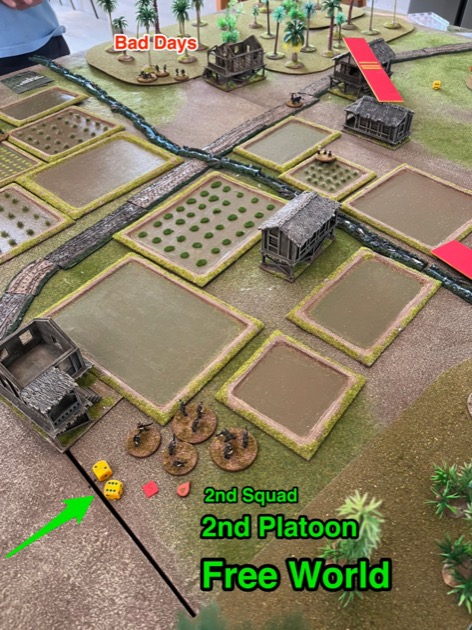
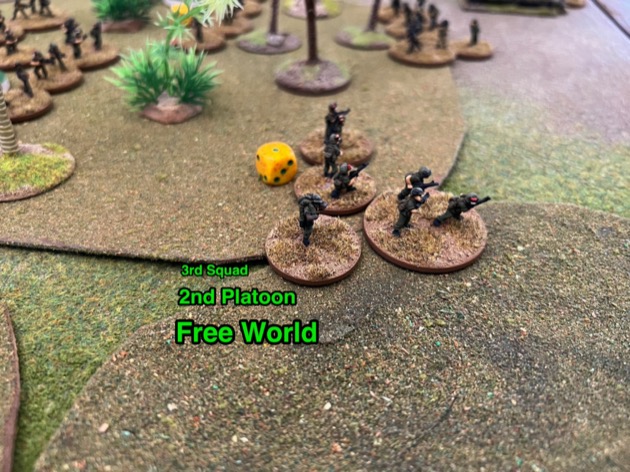
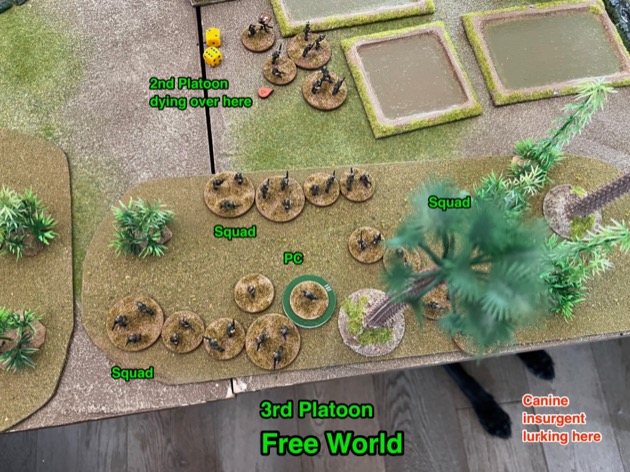
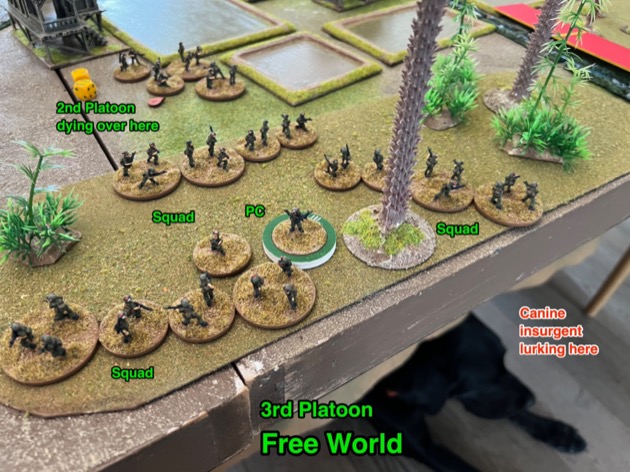
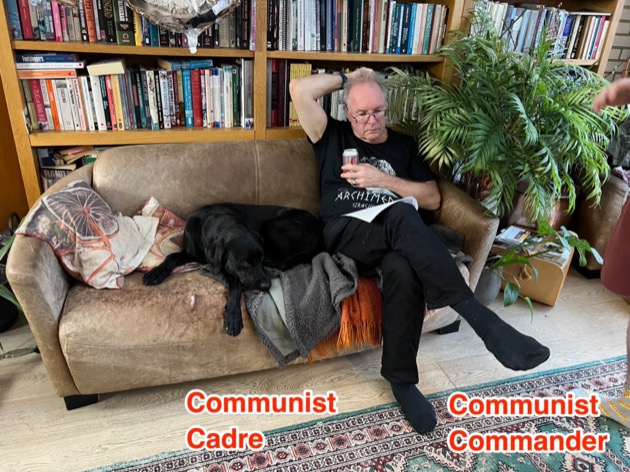
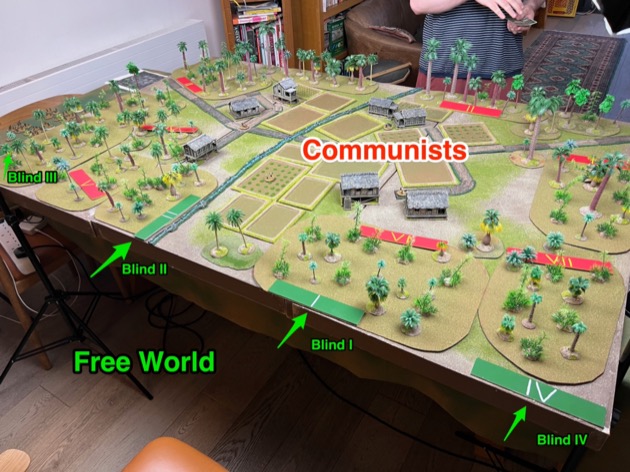
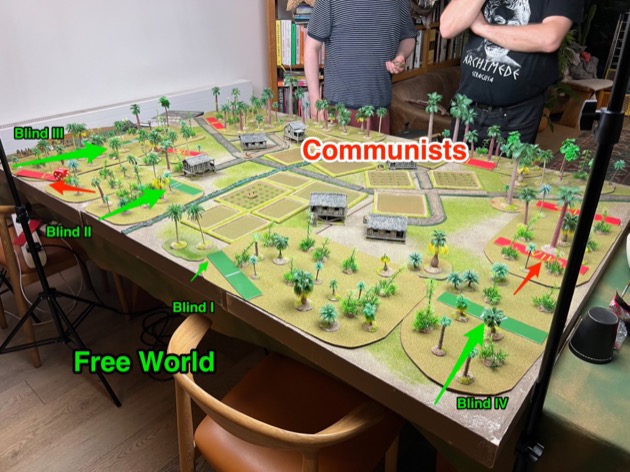
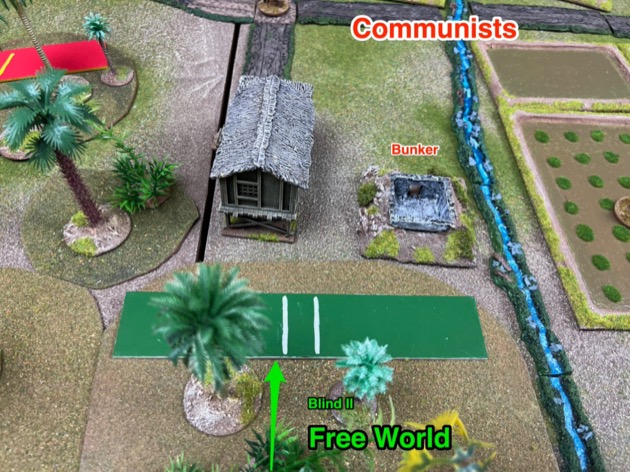
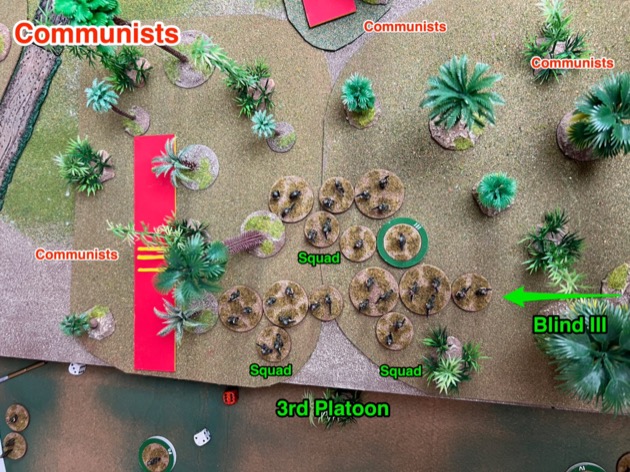
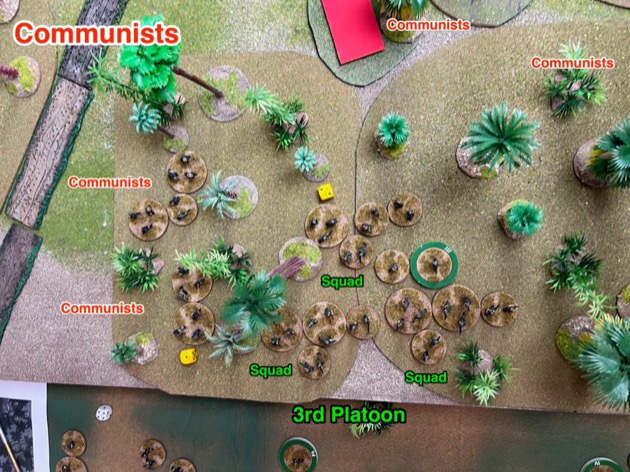
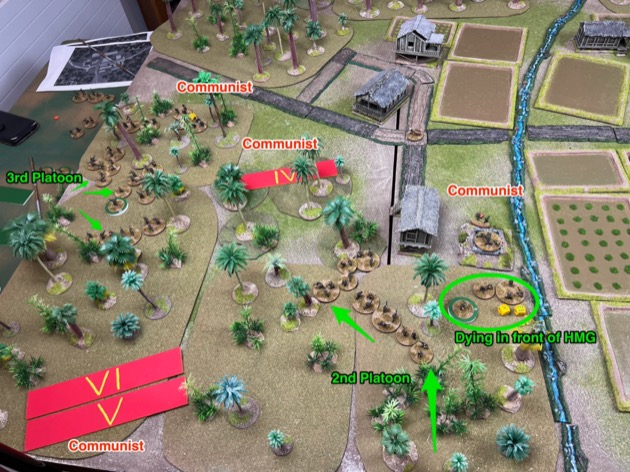
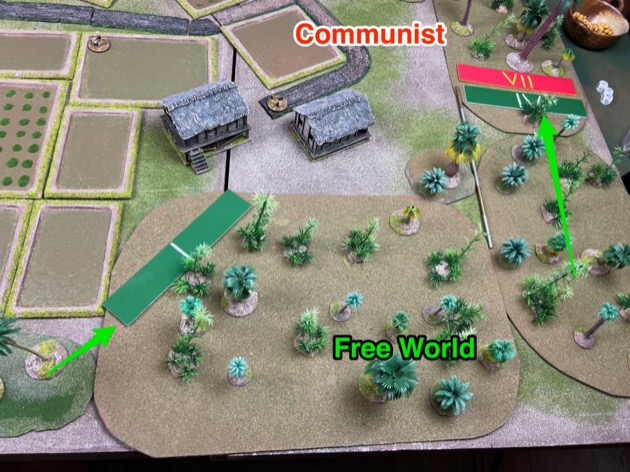
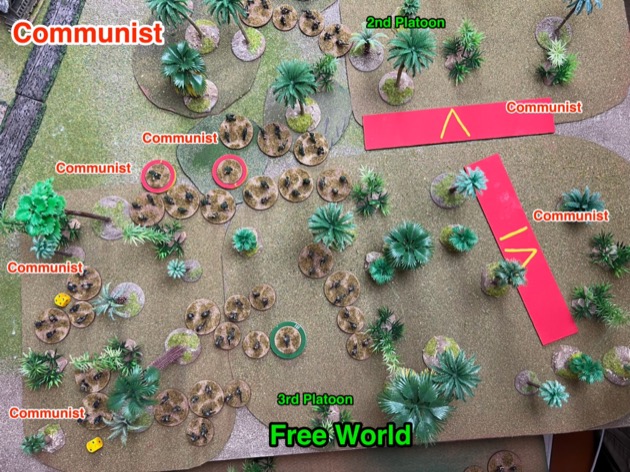
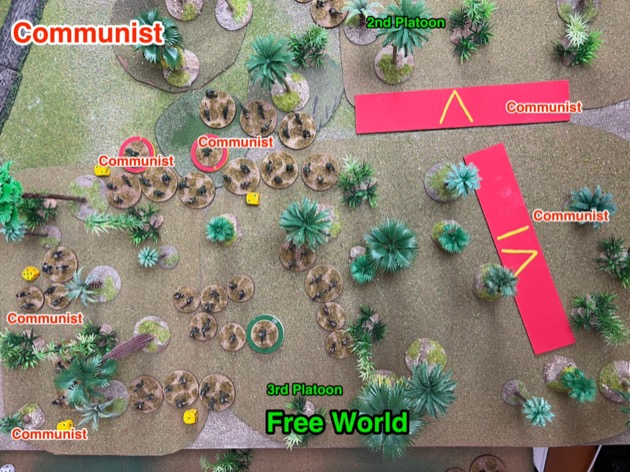
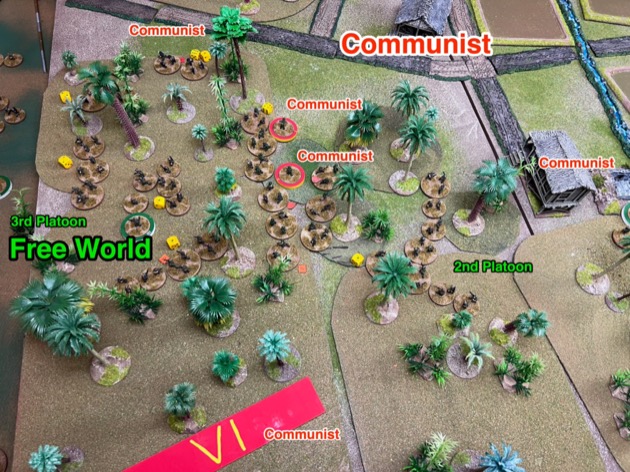
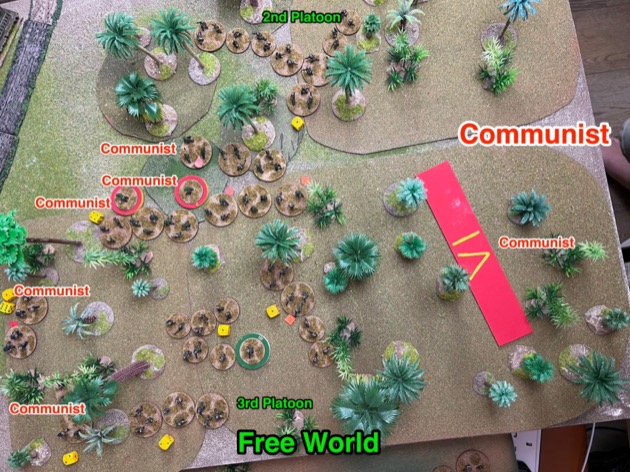
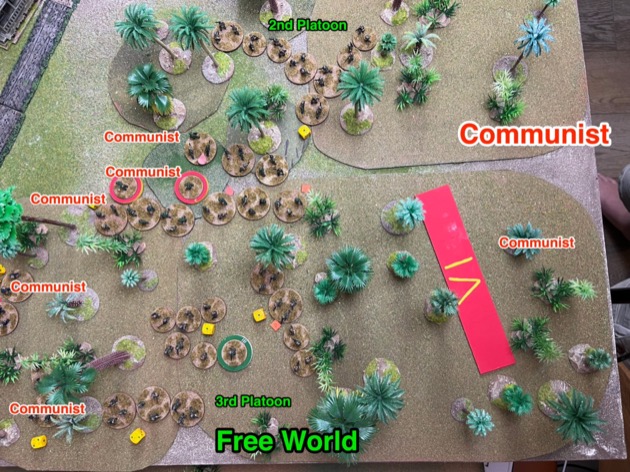
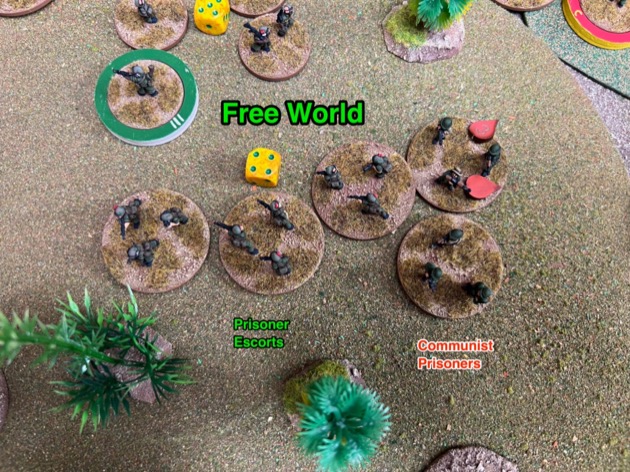
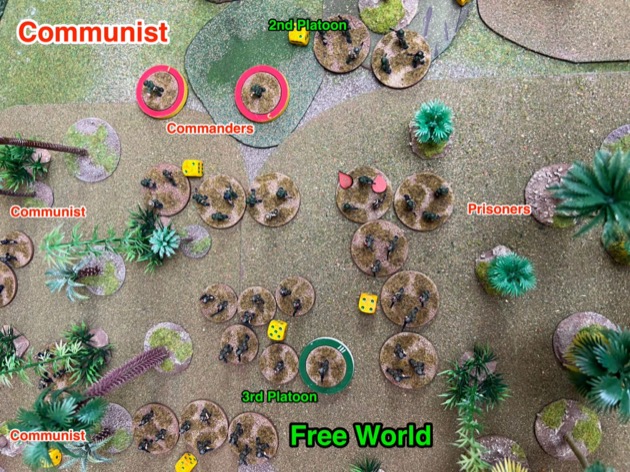
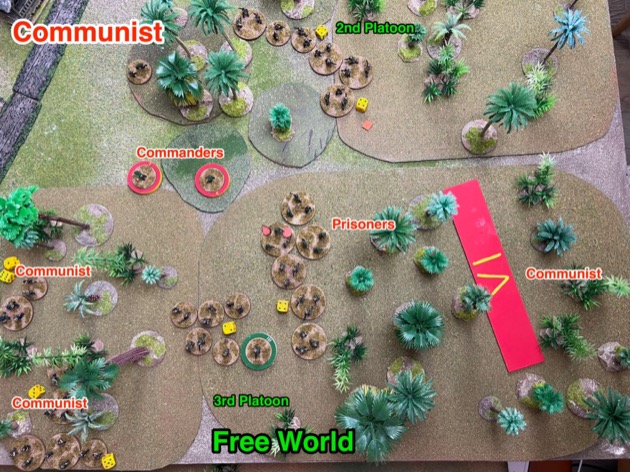
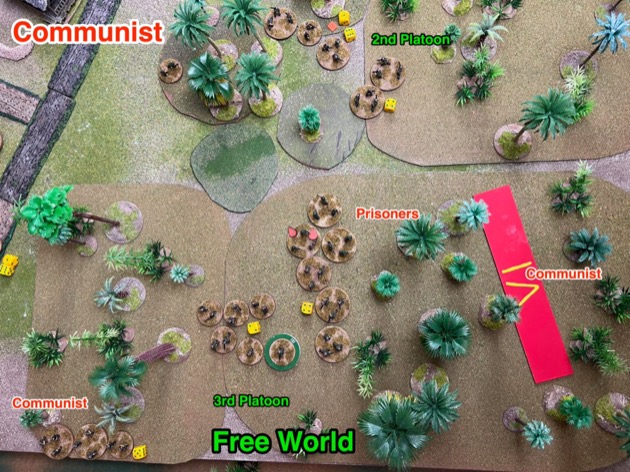
I represented the Free Word again in Game 2 with Chris as the Viet Cong. Based on the previous experience I decided to dominate three edges. I arrived from the south. One blind to the west, another east and two in the centre (one a dummy). That means I had a real platoon on three of the table edges and, hopefully, would make it hard for him to bug out. The blind in the east had my CC and FO and never contacted and was never revealed. Having my CC out of the game meant I had less options; we talked about giving the CC a blind of its own in future games. The dummy blind wandered around and achieved nothing. The real blind in the centre walked into a Communist bunker with a heavy machine gun. A squad died along with the company commander. Ouch. My bad. The rest of the platoon headed for the action in the west. Here my sole platoon was surrounded by Communists. Believe it or not, that was the plan. Locate enemy, draw them in, mince them with automatic fire. It worked.

What I liked
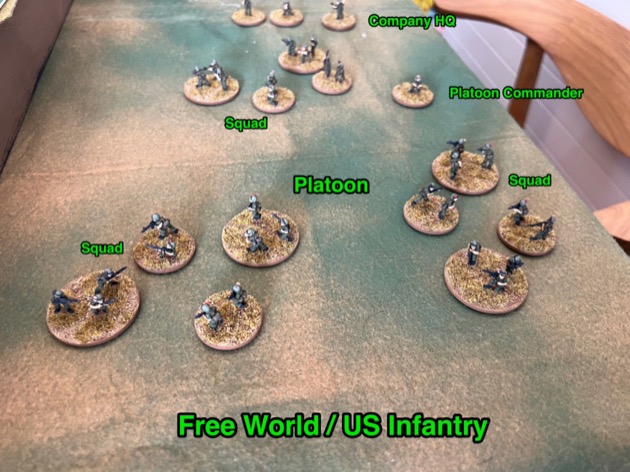
Lets start with Adam’s figures. He paints really well and these really shine. He already has US infantry, Mainforce VC and Local VC. And he keeps painting.
I’m glad Adam has moved back to 15mm. He is using figures from Flashpoint Miniatures in Australia. Jimmi, the owner, has great sculpts and his customer service is second to none. I’ve got a fair few of Jimmi’s figures in my mountain of unpainted Vietnam lead. Adam is successfully making me feel bad. I feel a wee urge to paint guys in black and khaki.
Lets move to the rules. Well, for a start, my experience with ‘O’ Group was so traumatising that I was quite surprised that I liked anything at all about Charlie Don’t Surf.
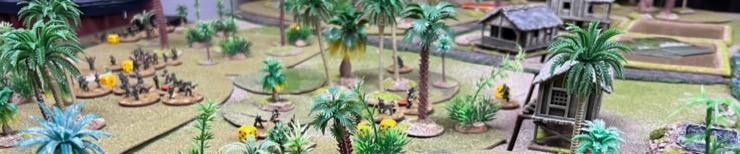
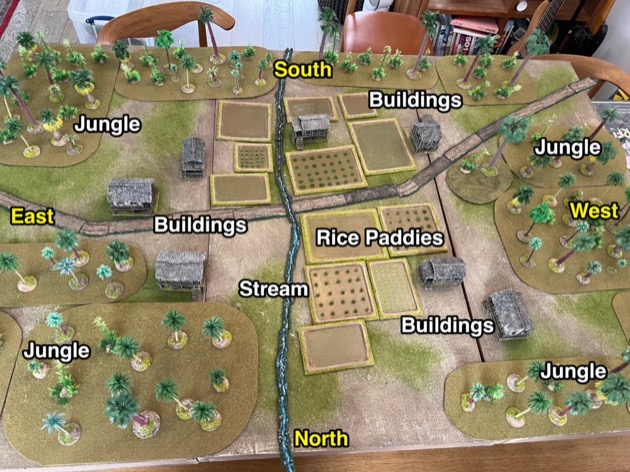
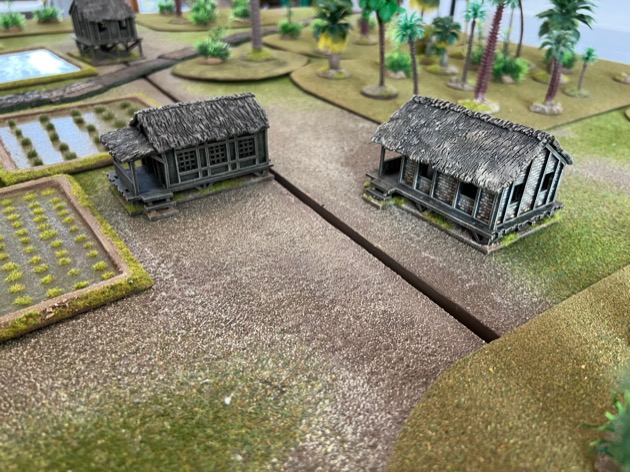
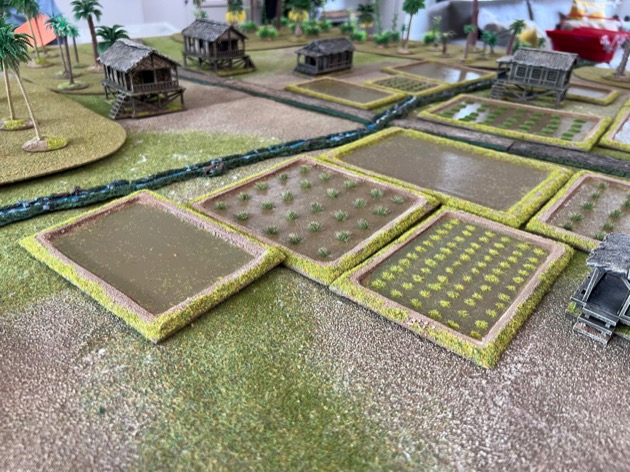
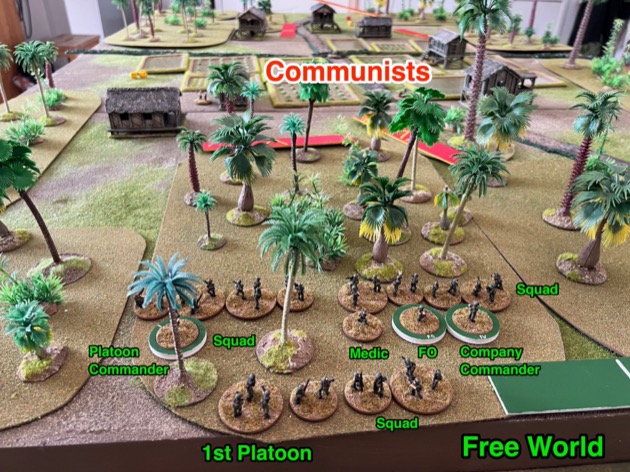
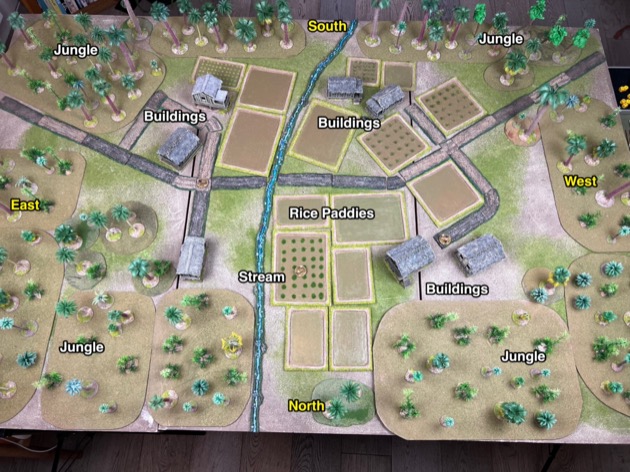
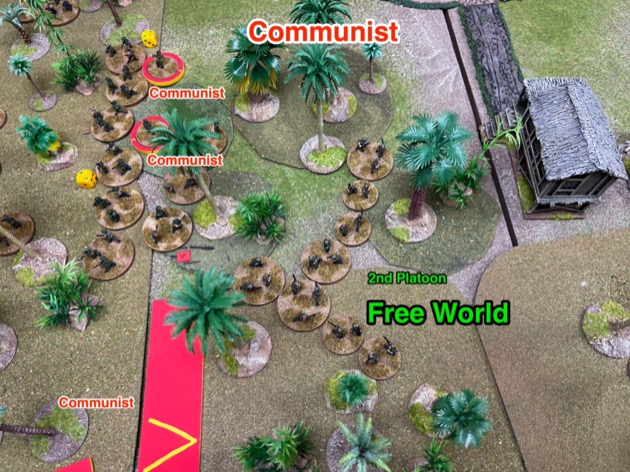
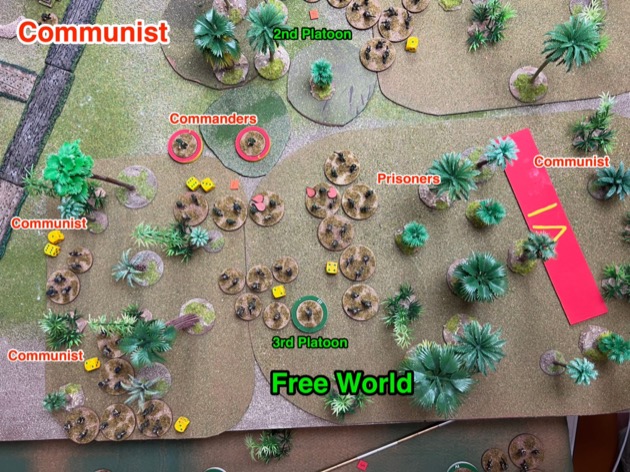
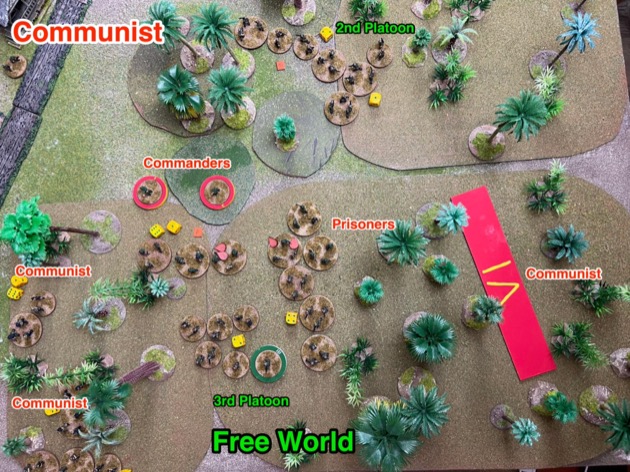
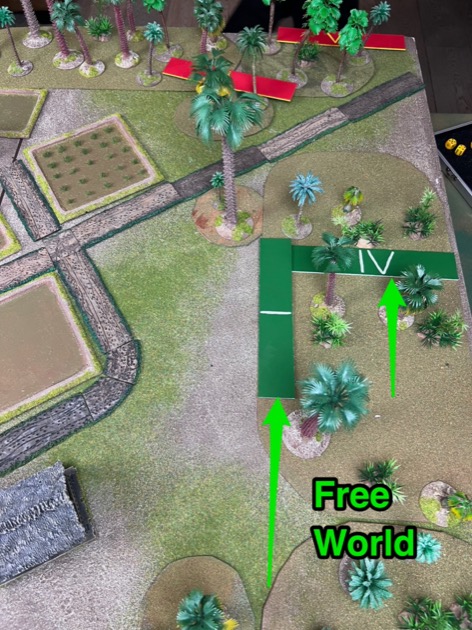
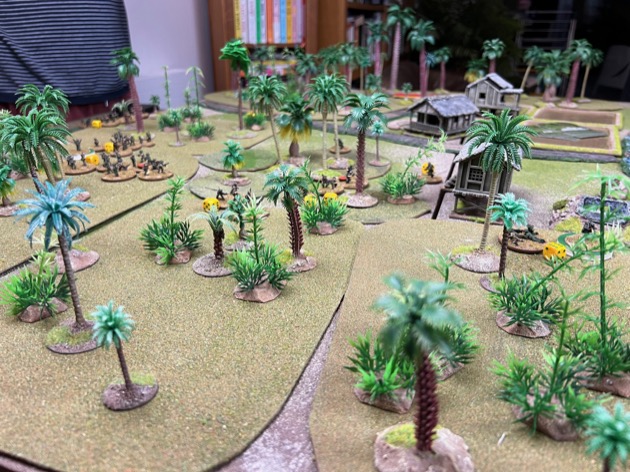
Charlie Don’t Surf has period flavour. It looks and feels like a Vietnam game. I think the the table looked great. We used my generic Jungle terrain: far eastern buildings, palms, bamboo, dirt roads, streams. Okay, we followed the wargamer convention and used palm trees for the jungles but you can forgive us on that little inaccuracy. `
I like that fact it is “company level” rather than a skirmish. I think Charlie Don’t Surf does this wrong (see below) but I think company level is the right target scale for Vietnam.
I liked that different troops behaved differently for both Command and Control and firing. The Viet Cong were less responsive to direction, reflecting the lack of radio and reliance on runners and flags. The US squads could pack a punch with their combined M16 and M60 squads … on the few occasions I could actually get all of the men pointed at the enemy. Now, to be fair, I’m not convinced US squad has more ‘effective’ fire than a Communist squad but I’ll let it go as cinematic embellishment.
I liked the blind system. It wasn’t a great system but it allowed hidden movement – at least for the Communists. I had three real blinds (75%) but only one dummy blind (25%). He pretty much knew where I was the whole game so the blinds don’t help the Free World. In contrast the Communists four real blinds (57%) and three dummy blinds (43%). To be honest I mostly treated the Communist blinds with contempt. If they moved away, I figured they were dummies. If they moved towards me, mentally tagged them as real, with troops.
I liked the fact heavy machine guns hurt. I didn’t like deploying a squad and platoon commander in front of a heavy machine gun. But that is war.
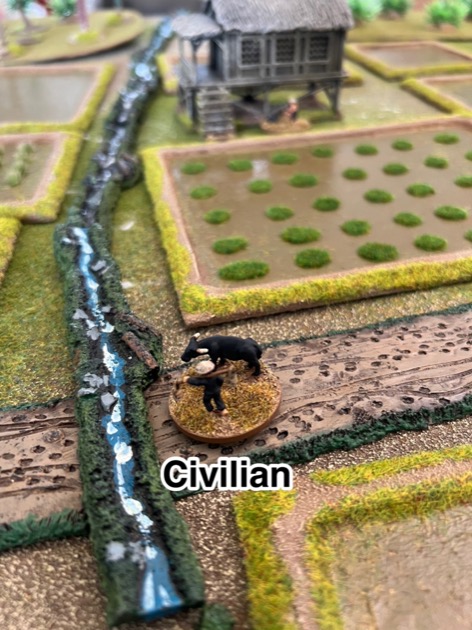
I liked the fact civilians appeared on table although the mechanisms were not great – see below.
What I don’t like
Okay, there was a lot I didn’t like. From most annoying to least annoying: Agonising Shooting, Too Many Statuses, Confused Game Scale, Tiny Ground Scale, Huge No Fire Zone, Card Driven Initiative, There are lots of rules and special cases, Civilians were Dull, Subjective Rules, No M79 Grenade Launcher.
Agonising Shooting
According the the rules:
Firing in Charlie Don’t Surf is a quick and simple process that produces fast and coherent results which combine the effect of fire with the impact on the morale of the target. Firing represents a unit’s destructive capacity and incorporates the use of grenades, the squad’s light support weapons, pistols and all infantry weapons in one dice roll.
It isn’t true. It isn’t “quick and simple”. It isn’t “fast”. It isn’t “one dice roll”. It might produce “coherent results which combine the effect of fire with the impact on the morale of the target” but by the time we get the results I no longer care.
By comparison, direct fire in Crossfire is “quick and simple” and “one dice roll”. A rifle squad shoots, rolls 3d6 at a target in the open or 2d6 into cover. One hit (5+) is a Pin. Two hits a Suppress. Three a Kill. Kind of easy to keep in mind. No look up necessary.
In Tilly’s Very Bad Day, you roll the current resolve of the unit in d6 and hit on a 6. The enemy loses resolve for each hit. They rout when they get to zero. Again a simple and easy to remember system with one roll.
Now let’s turn to Charlie Don’t Surf. The process for a squad firing is:
- Player looks up “How Many Action Dice Does My Squad Get” (p. 13, 84, 87, 91, or 98 depending on the nationality). This is a table with Nationality (e.g. U.S.) and Unit type (e.g. US Marines) along one axis and dice (0-4) along the other. You look up the Nationality and Unit type, track along to find the number of men in the squad, then look at the top of the column for the number of action dice. US Marines, for example, get 4 Action Dice if they have 7+ men. But US Infantry need 10 men to get 4 Action Dice.
- Player allocates some or all Action Dice to firing.
- Player chooses a target squad
- Player checks how many men in the firing squad can actually target that enemy squad.
- If not all men in the squad can shoot, the Player looks up “How Many Action Dice Does My Squad Get” again (remembers this is on p. 13, 84, 87, 91, or 98 depending on the nationality) using the revised number of men that can fire for the Squad. See Step 1 but use the number of men that can see the target. Of course this is simple if the target is straight ahead – they can all see it – but in other situations only some of the men can shoot.
- Player rolls that number of d6 and sums the total pips on the firing dice.
- Player decides how good a shot it is (Good, Okay, Poor). The rules say this is “subjective” but luckily also make some suggestions for new players: Good = Target in Open terrain; Okay = Light cover or Broken terrain; and Poor = solid cover or Heavy terrain. Experienced players can, apparently, take other factors into account; I hope I’m never ‘experienced’.
- Player looks up the “Fire Table” (p. 34). The combination of the pips on the firing dice, how good a shot it is (Good, Okay, Poor), and the range (Close/Effective/Long, and differs for infantry and MG/AFV) gives the result of fire. The result is the number of hits and, in addition, whether the target is Pinned or Suppressed.
- Player rolls the number of hits on d6 with 1-3 being a near miss (no effect), 4-5 being a Shock and 6 being Dead (i.e. one man in the target is killed). Killed men reduce the action points (see Step 1).
- Player looks up “How Many Action Dice Does My Squad Get” (yes, we are back at p. 13, 84, 87, 91, or 98 depending on the nationality) for the target Squad. See Step 1 but use the revised number of men of the target.
- Player calculates if the target Squad is now suffering from Awe i.e. when the Shock level reaches three times the revised Action Dice of the target
- Enemy player moves back any target suffering from Awe.
It takes about 5-10 minutes each time a squad fires. By the end of the evening I’m a blur with tables and numbers and interpretations. So I just do what Adam tells me. “Just tell me when to roll the dice. Then tell me what happens.”
By the way, I have just explained Squad on Squad fire as it is most common. Other combinations have quite different rules.
Too Many Statuses
You might have noticed there are several squad status systems in play:
- Number of Men: Charlie Don’t Surf is a casualty removal system with individual men getting killed and removed.
- Shock: Shock impacts the pips from the action dice for movement and firing. More shock is bad.
- Pinned: cannot move for the remainder of this turn
- Suppress: cannot move or fire for the remainder of this turn
Confused Game Scale
I’m a big believer in using the Two Levels Down Military Principle for game design. Both Crossfire and Tilly’s Very Bad Day embody this principle. In Tilly the player is the commander-in-chief of an army; the units are two levels down and are brigades. In Crossfire, the player is (usually) a Company Commander and the units are two levels down, being squads.
Charlie Don’t Surf says it is a “company level game” and the players are definitely Company Commanders. Superficially it adheres to the Two Levels Down Principle because the manoeuvre unit is the squad. However, playing the game, you quickly realise that individual man are significant. Firing is dependent on the position of individual men as count towards shooting of the squad each man must have line of sight to the target. And of course we have casualty removal so individual men get shot and killed.
So, for me, it is a skirmish game pretending to be a company level game.
Tiny Ground Scale
Probably because they are confused on game scale, Too Fat Lardies went for a skirmish level ground scale i.e. 1:300 or, as they also phrase it, 12″ = 100 yards (the conversion did my head in – it comes to 1:333). I would have thought a company level game would be pitched around 1:1000 so the subordinate platoons and squads are spread out in a realistic fashion.
Huge No Fire Zone
I never fired a single artillery round in either game. Under the rules, Free World forces can’t call in artillery or mortars within 18″ (450 mm) of friendly troops, and air strikes have an even larger safety distance of 24″ (600 mm). On a 6′ × 4′ (1.8 × 1.2 m) table, that’s a huge no-fire zone. [In Game 3 Adam interpreted that different and I did manage to bring in Free World Artillery.]
It comes down to ground scale. At 1:300, 450 mm represents just 135 m — and in reality, that’s far too close for artillery. So the restriction makes sense historically, but in game terms, 18″ or 24″ eat up a lot of table space. The result? My enormous off-table Free World firepower never got used. I blame the ground scale.
Card Driven Initiative
I don’t like games with Card Driven Initiative. Don’t ask me why. I don’t know. I guess I don’t really understand what the card driven initiative is trying to simulate. Charlie Don’t Surf says the card deck allows it to “represent forces in a historical fashion … how that force was trained, what its state of morale and motivation was and how well it was led” (p. 6). Yes, in Charlie Don’t Surf different forces have different cards. I’m still not convinced cards lead to a better simulation.
Having said that, I didn’t die because it was card driven. I just accepted it as a quant quirk.
Anyway, Adam did all of that and I just responded when one of my cards game up.
There are lots of rules and special cases
I don’t know why but Too Fat Lardies really love a special rule. ‘O’ Group is full of them and so is Charlie Don’t Surf. I just try to ignore this and rely on Adam to explain anything new to me. Lazy, I know, but he chose the rules. Adam kept mentioning, “There are rules for that. But we’re not using them.” So why are they in there?
Civilians were Dull
A harsh comment, I know, but the civilians were dull. I’m not talking about the individuals, I’m talking about the rules. Adam’s civilian models looked pretty but added nothing to the game. In fact they detracted from the game as we had to manage them: roll for their actions, move them. Even this tiny bit of effort seemed a poor investment in game time for what they offered to the outcome.
Subjective Rules
I mentioned above that the quality of the shot is a subjective call by the players. Um. What!!!!
No M79 Grenade Launcher
Every US squad in Vietnam had one or two M79 Grenade Launchers, but they are not represented in the rules.
I think the “Platoon Commander’s Artillery” should get a bigger billing.
In contrast the presence or absence of M60 machine guns is a massive deal. Squads without are meh and squads with gain Terminator status.
Okay, okay, we’re definitely down to petty grievances now. I’ll stop.
References
Clarke, R. (2010). Charlie Don’t Surf: Wargames Rules for the Vietnam War. Too Fat Lardies.
Clarke, R. (2010). Surf’s Up: A Collection of Scenarios for Gaming the Vietnam War. Too Fat Lardies.
Hi Steven,
Thank you very much for an entertaining, interesting and informative playtest and review. Beautifully illustrated and well annotated too. And you also let snooze the dog of war. Perfect! 🙂
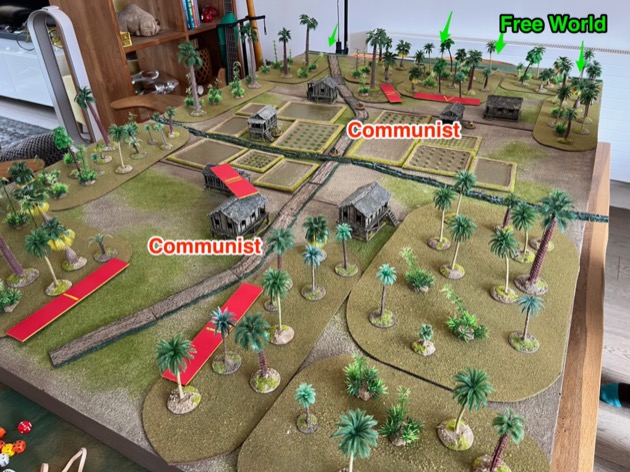
The table layout and terrain look really good in the photographs. But the pictures also do a really good job of illustrating the point you make in the commentary section “Tiny Ground Scale”, vis: “I would have thought a company level game would be pitched … so the [troops ] are spread out in a realistic fashion”.
That is bang on and it ruins the look of the game. Every troop concentration looks just, well, too concentrated. As though the 95th Rifles have stumbled through a wormhole into 60s south east Asia. In fact, that’s probably doing an injustice to the 95th.
I’ve been following your posts about Wombat Gun with interest and, as it seems clear that your experience with Charlie Don’t Surf is probably not going to lead to abandoning that project, I’ll look forward to the next installment.
Btw, fwiw, if you ever want a reasonably solid platoon-level ruleset for post-WW2, post-colonial gaming then I can recommend checking out FUBAR.
FUBAR is a one or two page (as in one or two sides of A4) ruleset, originally written by Craig Cartmell but now maintained by a small community of fans.
In its original incarnation the ruleset was focused on delivering a fairly generic, platoon-level game set roughly in the mid to late 20th century. It focused on infantry combat but vehicles and off table assets are also represented.
The original version has spawned a multitude of spin-offs, covering many genres and periods from the dark ages to the far future. But don’t let that put you off. The rules assume single figures grouped as “squads” / “fire teams” so a game is typically ~20 to ~30 figures per side.
The game mechanisms are simple, like Crossfire, but surprisingly effective. My only caveat is that the squad activation system, though simple and effective, nevertheless tends to yield an ungameworthy failure rate for mid and low quality troops. But the system is easy to tweak and there are a number of tested options around. I can suggest one should you ever be interested.
The rules have always been free to use and modify and there have been multiple adaptations to cover a huge sweep of historical and fantasy settings.
The core rules and a host of variants can be found here:
https://fubarwargames.wordpress.com/downloads/
OR here:
https://thegamesshed.wordpress.com/category/wargames-rules/
(The LDT-FUBAR version, found at the top of the first, linked page, includes a variation on the activation system that aims to fix the failure rate problem.)
Best regards,
Chris
It’s ‘Too Fat Lardies’ not ‘Two Fat Lardies’…!
More seriously, O Group is a recent set of World War Two battalion level rules by David C. R. Brown, which has got nothing to do with Richard Clarke’s Charlie Don’t Surf other than being wargame rules published by TFL / Reisswitz Press.
You complain “M79 Grenade launchers: Every US squad in Vietnam had one or two M79 Grenade Launchers, but they are not represented in the rules.”
But you quote from the rules: ‘Firing represents a unit’s destructive capacity and incorporates the use of grenades, the squad’s light support weapons, pistols and all infantry weapons.’
Maybe that is supposed to include M79 grenade launchers?
Maybe that is represented by greater overall squad firepower for US troops?
But then you complain: “Now, to be fair, I’m not convinced US squad has more ‘effective’ fire than a Communist squad but I’ll let it go as cinematic embellishment.”
Well, you can’t have it both ways!
You can’t complain that the rules don’t represent the extra firepower of M79 grenade launchers for US squads and then complain that the rules give more effective firepower for US squads!
Ground scale and the position of individual men within a squad: Yes, this is a more serious problem.
Given the ground scale of 1:300, I would be tempted to ignore this rule about the position of individual men within the same squad: Either the whole squad can shoot or it cannot.
(Incidentally, the 2nd edition of Chain of Command has got stricter about the position of individual men, but that is a _platoon_ level game!).
The common use of multi-figure bases with 2 or 3 figures each in 15mm (1:100th) makes this individual position rule more difficult to enforce.
Also, multi-figure bases require an element of recording individual casualty removal with micro-dice or other discreet markers: Commonly red dice / markers for ‘shock’ and black dice / markers for casualties.
If you want units more realistically spaced out, then I would recommend playing with 6mm / 1:300th figures to match the ground scale (as with the company level World War Two rules: I Ain’t Been Shot, Mum!).
(Also, using 1:300th scale models to match the ground scale makes it more obvious how impractical it is to make distinctions about the positions of individual men within the same squad at this scale).
I’m not sure why you find the rules about civilians ‘dull’. Maybe not much interaction with civilians actually occurred in these games, so the full civilians rules (which you haven’t read?) were not actually used.
You can’t explain why you don’t like card generated initiative, but I thought the point was fairly obvious (and clearly explained in all such rules by Richard Clarke): It creates irregular changes in initiative rather than a mechanical and predictable ‘I-go-you-go’ exchange.
Finally, you remarks: ‘Adam kept mentioning, “There are rules for that. But we’re not using them.” So why are they in there?’
I don’t know! Ask your pal Adam why he kept missing out rules! Which rules and why?
Otherwise, all you have told is is that you played some rules that you have not read and relied on an opposing player who kept missing out relevant rules without any clear justification.
I hope you give CDS another go. I think the rules are fairly easily adaptable to any Cold War era counter-insurgency.
Hi Fingers-Lane,
I can’t spot where Steven has mistakenly used “Two Fat Ladies” instead of the correct spelling. Unless he’s edited the post since and as a result of your comments.
Regards, Chris
Quite right, I edited the typo out. Thanks Fingers-Lane.
Oooops. With sheepish grin.
Well thank you for this advice I will stay with ww2 Burma, Malaya for my part.
I play the american civil war and does not want to have more american warfare at the moment.
But I like much Steve ‘s tast for simple rules permiting great tactics and fun battles. I does not like rules with too much book keeping or consulting. I m a french man and have to cope with rules written in foreign langage. That is already sufficient. I will try Crossfire with my Burma Malaya early war British and Japanese empires.
Best regards to all what ever your tast for rules. Keep playing what you want !
Jean-Michel (Paris)
An exhaustive and really useful piece. Thank you.
My few experiences with too fat lardies I’ve also gotten a bit stuck/unimpressed with the subjectiveness of the poor/okay/good ratings for shooting and moving. The game looks wonderful, but it does sound frustrating (I hate when you spend a lot of time to achieve very little). I’ve read through Charlie Don’t Surf but haven’t had a chance to play it. I’m glad to read someone elses thoughts and feelings on it.