
Chris and Adam played a very raw version of my big Lutzen scenario for Tilly’s Very Bad Day.
Summary: Good game. Some debate about how to simulate the road and ditches. Adam (Imperialists) beat Chris (Swedes) on Game Turn 6. The scenario evolved after the game.
Version of Tilly’s Very Bad Day
We played Tilly’s Very Bad Day (version 1.3) with the same experiments we’ve been playing recently:
- -1d6 in melee if unsupported; support meant any friendly unit to rear within 2 TUM
- Winner has to inflict 33% loses on the enemy rather than just 25% loses
- More effective Light Horse, Dragoons and Shot
In addition:
- Pre-game Scouting by Horse, Dragoons and Light Horse; there was no effect
- Pre-game bombardment by Cannon
- Morale erosion when a friendly unit routs
- Behind flank means BEHIND-FLANK
- 10 Game Turn time limit for the attacker
- Saving throw of 4+ on a Commander Casualty
Orders of Battle
I didn’t have enough time to scrutinise the historical orders of battle and knocked something together quite quickly. Richard (doctorphalanx) had previously put something together based on Guthrie. I hacked this a bit to weaken the Imperialists and strengthen the Swedes. So the order of battle we played was a bit different to that given in Lutzen – A Big Tilly’s Very Bad Day Scenario. Smaller for a start.
The Imperialist main force:
Imperial Order of Battle
- Right Wing (4 Units)
- 1 x Commander (Wallenstein)
- 2 x Horse
- 1 x Shot (Resolve 2)
- Centre (7 Units)
- 1 x Commander (Colloredo)
- 4 x Pike+Shot
- 1 x Shot (Resolve 2)
- 1 x Cannon
- Left Wing (6 Units)
- 1 x Commander (Holk)
- 3 x Horse
- 1 x Light Horse (Croats)
- 1 x Cannon
- Both Army size and army morale break point increase as the reinforcements arrive:
- Initial force: 17 Units; 6 break point
- With Pappenheim’s Cavalry: 22 Units; 8 break point
- With Pappenheim’s infantry: 26 Units; 9 break point
The Imperialist reinforcements:
Imperial Reinforcements
- Pappenheim’s Cavalry (7 Units; arrive Game Turn 3)
- 1 x Commander (Pappenheim)
- 3 x Horse
- 1 x Light Horse (Croats)
- Pappenheim’s Infantry (4 Units; arrive Game Turn 8)
- 1 x Commander (Reinach)
- 3 x Pike+Shot
The Swedes (although only a small proportion were actually Swedes):
Swedish-German Protestant Order of Battle
- Right Wing (6 Units)
- 1 x Commander (Gustavus)
- 4 x Horse
- 1 x Shot
- Centre (11 Units)
- 1 x Commander (Knyphausen)
- 8 x Pike+Shot
- 2 x Cannon
- Left Wing (7 Units)
- 1 x Commander (Bernhard)
- 5 x Horse
- 1 x Shot
- 24 Units
- Army Morale break point: 8 Units
Deployment
As I’ve mentioned before, it is always interesting seeing what other players do. Both Adam and Chris surprised me in this game.

Chris deployed his Swedes in a kind of inverted “U” shape. A line of infantry across the front. Then each flank had a column of horse. I imagine this was to give him flexibility as the game started.

Both Chris and Adam tried to fill up the frontage. That meant their infantry centres were very thin. And thin is brittle in Tilly’s Very Bad Day. Chris’s infantry were in a shallow chequerboard with Cannon interspersed. Adam held back one Pike+Shot Unit to provide support.

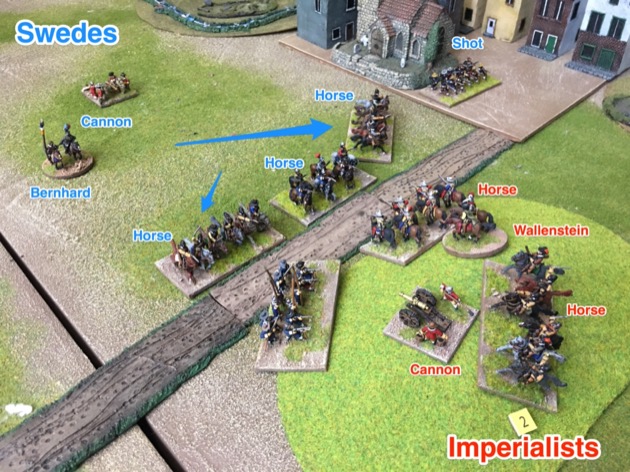
Most of the Imperialist cavalry was on the left flank. Adam had them in two lines. On the far side Adam had Cannon on Windmill Hill and his weak cavalry wing tucked in behind the hill. This was actually historical.
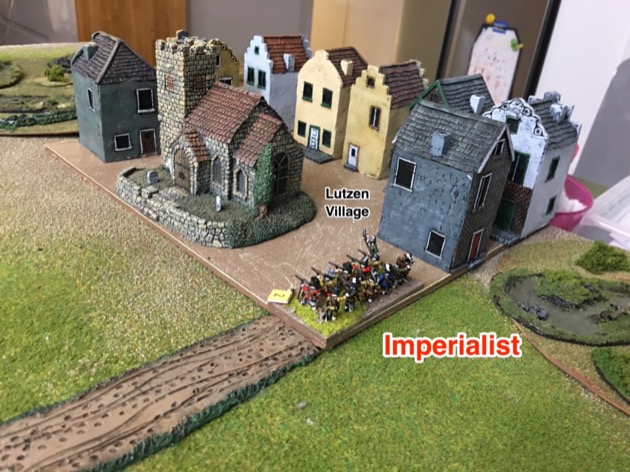
Lutzen village was on the Imperialist right and Adam deployed an understrength Shot unit there.
Turn 1
Gustavus, being the attacker, was on a clock so he set off quickly. In the centre the Swedish foot walked forward. Chris had left generous gaps for his Cannon to fire through.

Chris’s “U” shaped deployment slowed the Swedish advance. His cavalry had to fan out of column and they also had to travel from near the base line i.e. further than they needed too.

This was true on both flanks.

Adam brought his right wing cavalry forward over Windmill Hill to wait for Bernhard of Saxe-Weimar.

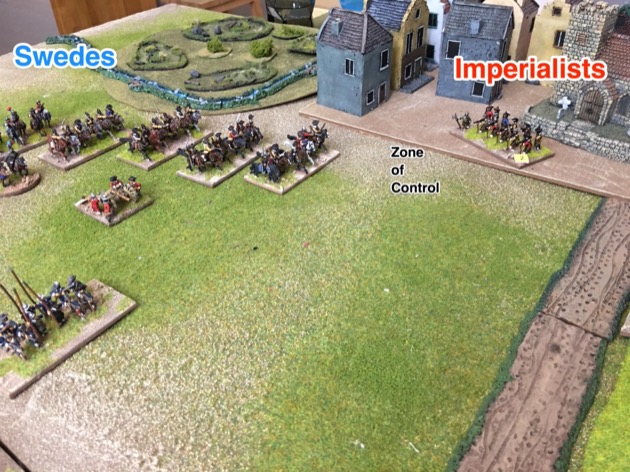
Adam also advanced the Shot in Lutzen village. He want to exert a Zone of Control into the area that Bernhard was about to ride into.
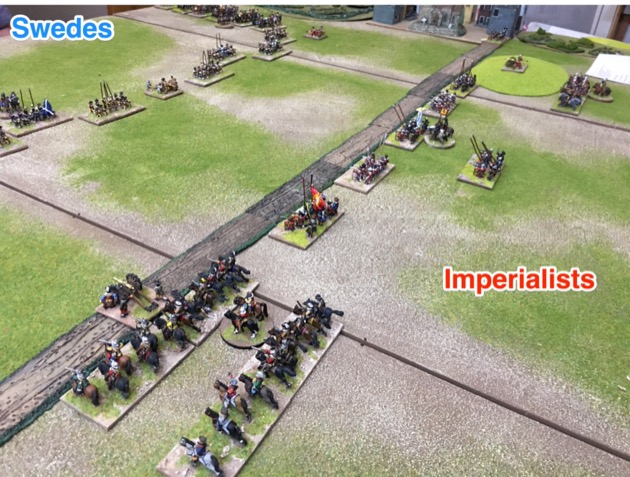
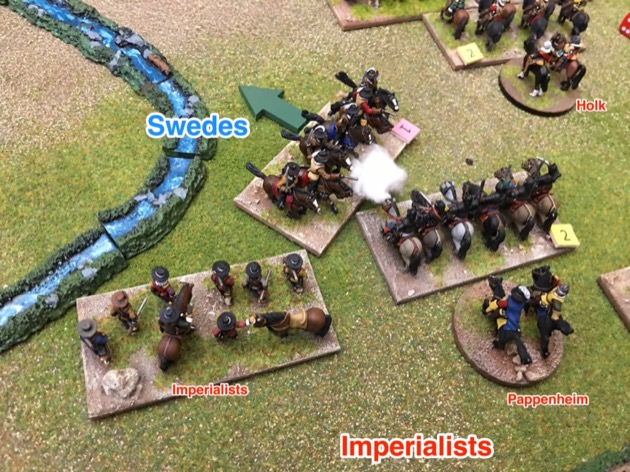
But the surprise was on the Imperialist left. General Holk led his cavalry command across the road. It appears that Adam believes the best form of defence is to attack. Holk and Gustavus were on a collision course. Time would tell if Adam had gambled correctly.

Turn 2
The Swedish foot continued their plod to the road.

It took Chris two turns to shake his cavalry out of the original “U” shaped formation and into a position to attack. Ironically, he could have deployed there at the beginning of the game. So, from my perspective, he had lost two game turns of attack.

As Adam had hoped the threat of his shot in Lutzen village interrupted Bernhard’s attack. The Swedish horse swerved away from the village to a position in front of the Imperialist cannon.

Adam also aligned his horse on Windmill hill. He also pushed a pike and shot unit into the road to face the Bernhardine horse.
Putting pike and shot into the road was controversial because:
- I had classified the sunken road with it’s ditches as difficult terrain
- Shot get cover for difficult terrain but other troop types are disadvantaged
- Under my modified rules Pike+Shot do not like fighting in difficult terrain; they get no cover benefit and fight with a lower to hit
- Units outside the road fight in the open, even if attacking the road
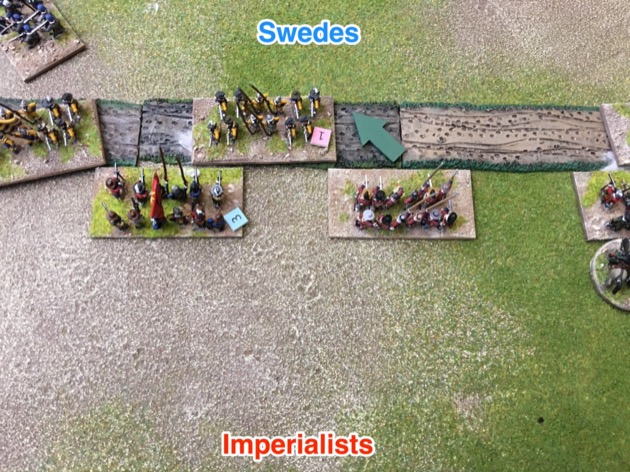
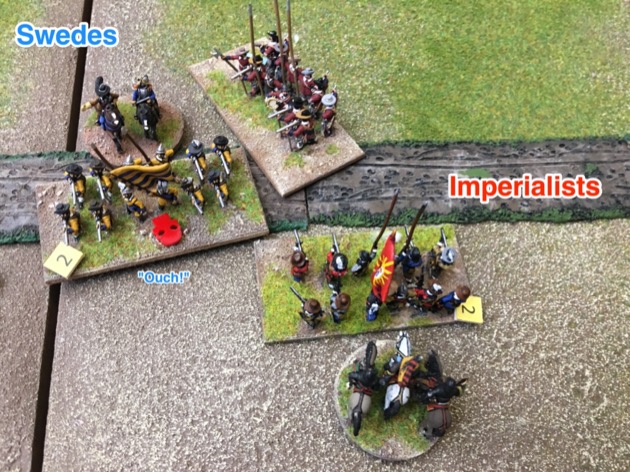
Chris sent his (Bernhard’s) horse into attack. Despite the disadvantages of fighting from the road, the Imperialist foot destroyed a Swedish horse unit.
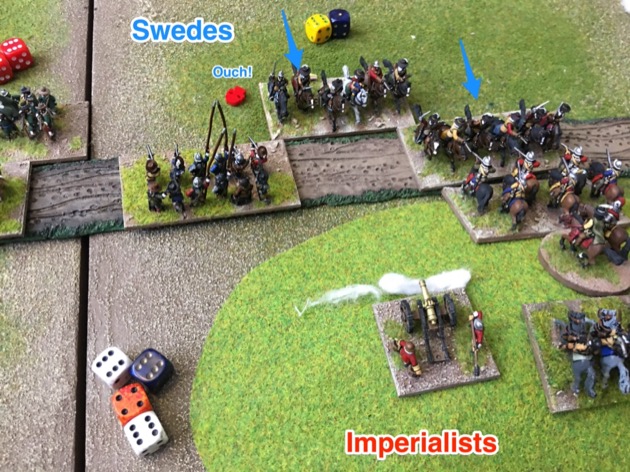
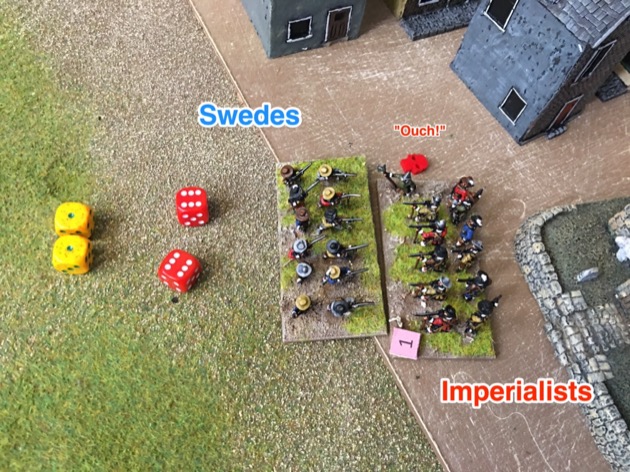
Further to the left, Adam has his shot unit in the road with a pike+shot unit nearby. I was surprised by how spread out the infantry centres were on both sides. But here you can see the big gaps between some Imperialist units.

The Imperialist shot didn’t fair well against the Swedish pike and shot.

But in the centre the Imperialist foot held their own against the attacking Swedes.

Even the unit facing two to one odds did alright.

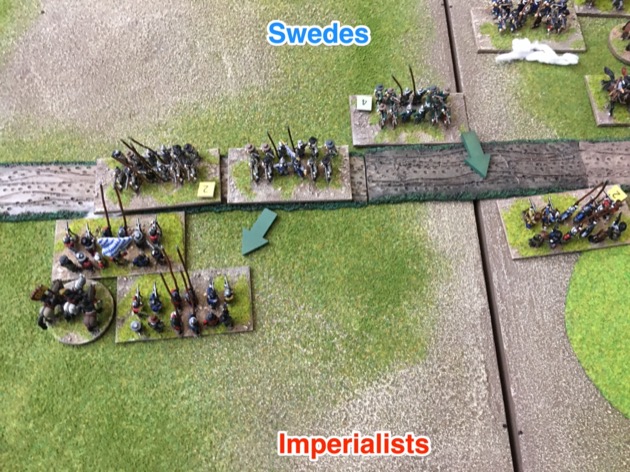
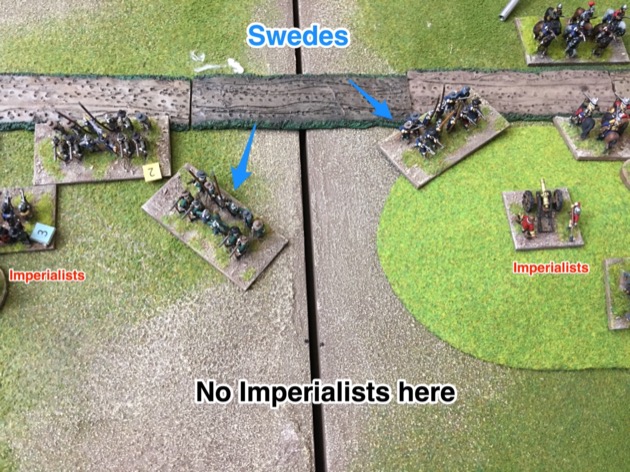
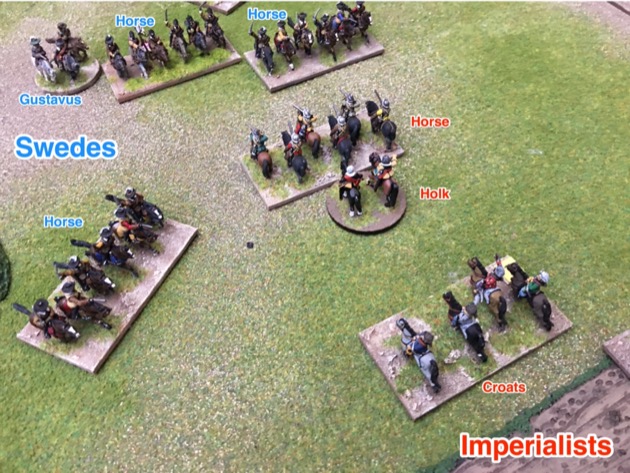
Holk continued his attack on the left.
All of Holk’s cavalry were either across the road or in the road.
Holk despatched a Swedish unit at first clash.

But the Swedish foot drove off some Imperialist cuirassiers.
Turn 3
The big news, Game Turn 3 and Pappenheim arrived.

This was just as Holk and Gustavus had started to engage on the far side of the road.

Holk was exposed, with Swedish infantry from the centre turning onto his right flank.

The infantry battle rages over the road, with both sides charging. Adam was not content to wait for Swedes to come to him and continued to send own foot into the road.
On the right, Chris pushed the attack by Bernhard’s horse forward. He was still careful to avoid the zone of control of the shot in Lutzen village. Adam, having realised pike and and shot didn’t work well in the road, pulled them back.

Another Swedish charge into the road and another unit routed.
Turn 4
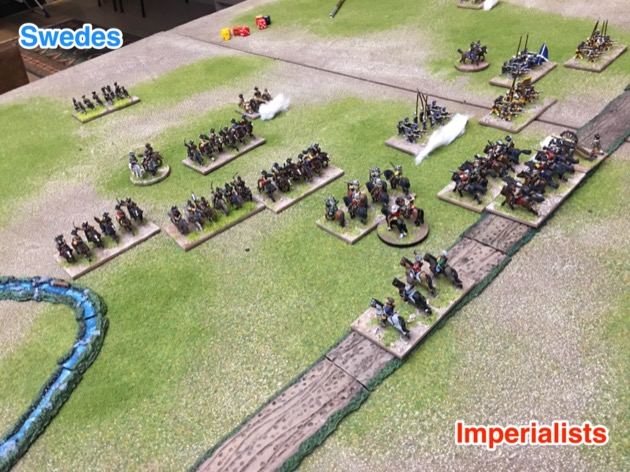
On the left Pappenheim raced to reinforce Holk. But it was going to take time.

The Croats had a surprising success and drove off their opposing horse by fire.

It looked grim for the Holk’s escort unit. The Scottish infantry charged from two sides. Looked like Imperial horse sandwich.

Boom. But Holk survived.

Although Gustavus outnumbered Holk he could never exploit the numbers before Pappenheim arrived. That meant many of the combats were one to one.

In the centre the Swedes had more casualties from being in the road. Two pike and shot units routed. Including some of the Yellow brigade (although in game terms they were like everybody else).
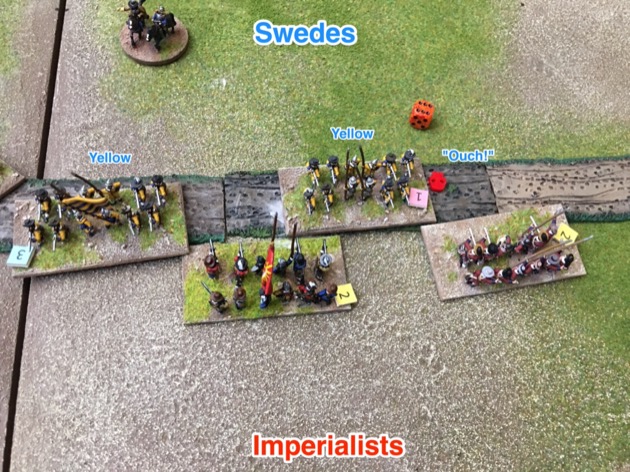

But being in the road was not always fatal and a Swedish foot unit managed to destroy the Imperialists blocking their way to Windmill Hill.

Bernhard pulled some of his horse back to reform. But he left some units near the Imperialists.

Turn 5
The Swedish attack continued on the right flank. Chris sent his shot in to counter the Imperialists in the village.

They cleared the village at the first rush.
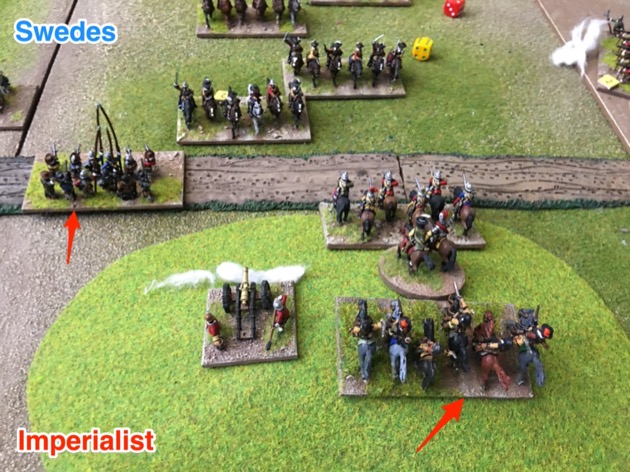
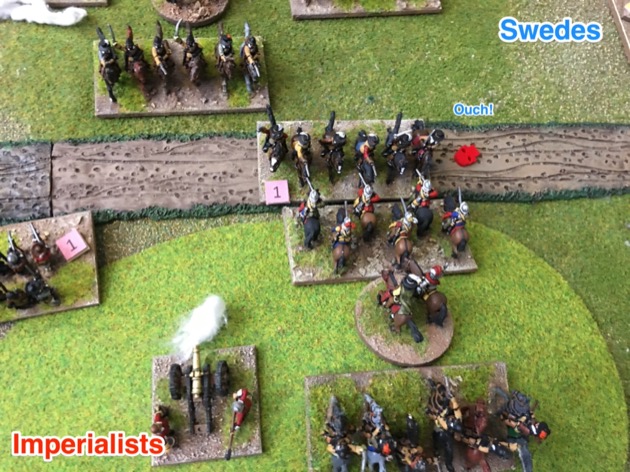
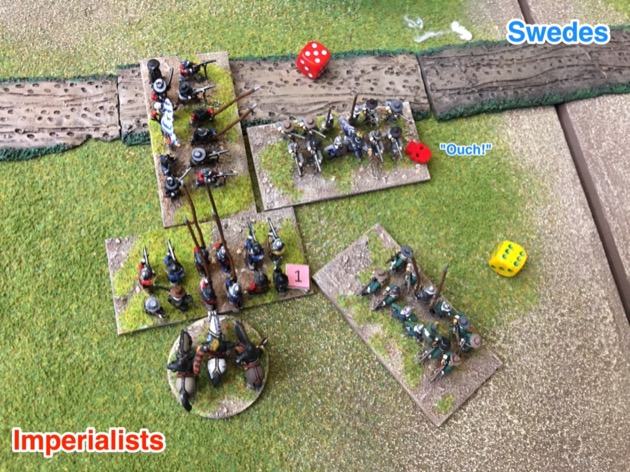
Near Windmill Hill the Swedish foot broke across the road and through the Imperialist line.
One of the Swedish unit then charged the guns. They got interrupted by the Imperialist horse charging over the crest, through the cannons, and into the Swedes.

The Imperialist horse bounced but they saved the guns.

In centre Colloredo was overseeing a bitter infantry battle. We were trying new rules for being behind flank. Basically a unit has to start and end its charge behind the front edge of the target unit to count as Behind-Flank. The Imperialist infantry unit managed this. The Swedish unit did not.

The Swedish unit caught Behind-Flank routed.
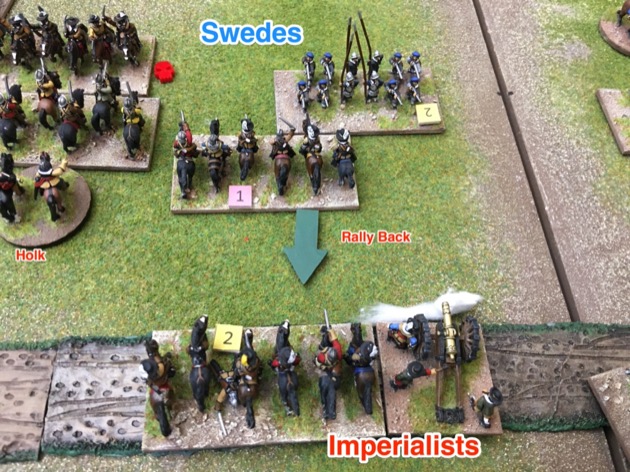
On the left Pappenheim’s horse were getting into action.

They charged in but without a significant result.
Similarly Holk’s horse.

Turn 6
On right Chris lined up his horse for another go at Windmill hill.
In the centre the infantry fight raged on. By this stage there were lots of gaps in both battle lines so unit has opportunities to get on the flanks. This turn it was the Imperialists chance. The first one didn’t quite manage to get Behind-Flank with the new definition.

But the Imperialist charge on the Yellow brigade was definitely Behind-Flank.

And boom.
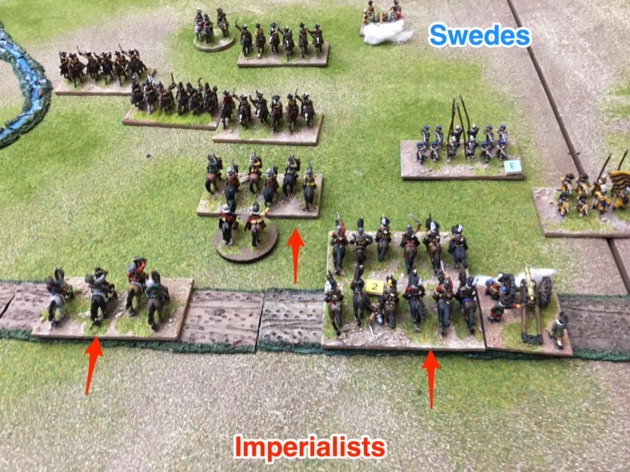
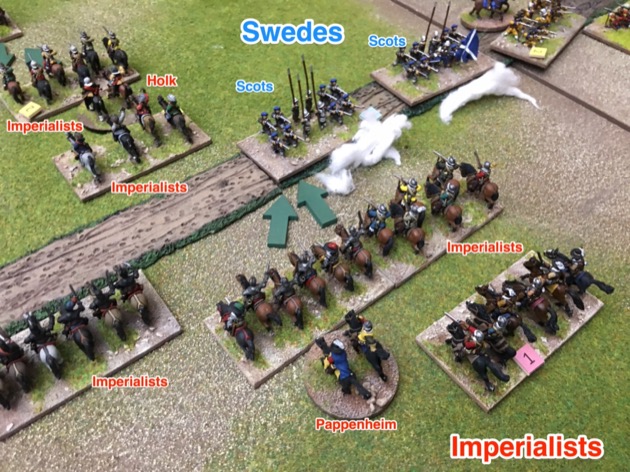
On the left the Imperialists formed a giant arrow head pointed towards Gustavus.

Holk was still out the front.
Pappenheim formed the base of the Imperialist arrow head. And he crossed the road.
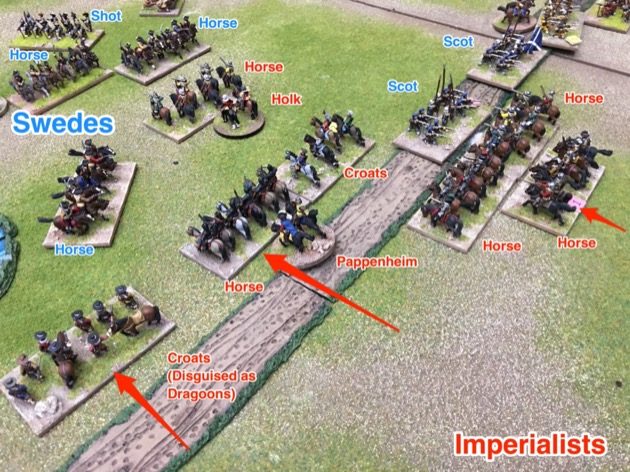
Lots of charges.

On the road a unit of Scots fell to Pappenheim’s horse.

Near the stream Imperialist horse and croats drove some Swedish horse back.
Holk lined up with Gustavus at the tip of the arrow.

Boom. Gustavus’s escort cavalry broke. End of game.

Observations and conclusions
It was another good game of Tilly’s Very Bad Day. It was a tense but Adam (Imperialist) prevailed in the end. We played 6 Game Turns in 3 hours. I’ll elaborate on this in the tactics section.
After the game I spent a couple of days furiously researching Lutzen. I found the Lutzen scenario itself, needed some work and the published version includes those changes. So I’ll look at a number of suggestions for tweaking the rules and/or scenario.
Tactics
Both Adam and Chris was very brittle infantry centres. The infantry were spread out over a wide frontage. So once a unit routed, it left a giant hole. There was no second line to close the gap. This allowed both sides to have infantry units conducting flank attacks in the centre.
I was surprised by Chris’s “U” shaped deployment. It took him 2-3 game turns for his cavalry wings to fan out to form any semblance of a combat formation. But they never managed to form a proper line so never managed to exploit their superior numbers.
Adam did better with his cavalry. He played very well on Windmill hill. Using his two units of horse to hold up the massive attack from Bernhard of Saxe-Weimar, aided for some time by the shot in the village.
Speaking of which, Chris put his detached shot at the end of the cavalry columns. It was game turn 5 before Bernhard’s shot engaged the Imperialists in the village. This could have been game turn one. The Swedish shot on the other flank never saw action at all.
The defence of Windmill hill was expert, but the thing that impressed me most was Adam’s bold move to attack across the road with Holk’s command. He did this on game turn 1, with no hesitation. It put Gustavus’s command on the back foot and compounded the problems of a clumsy deployment. It changed Pappenheim’s role from a game winner to the position of a supporting act. Go Holk!
Melee order
In almost every game Chris takes the opportunity to ask “So what is the melee order? Who chooses”. What we played was “The player that had the most charges this Game Turn chooses either left or right, then go across the table.” I think it can be even simpler, perhaps “Go across the table, from the Attacker’s right”.
Windmill hill
I think it was too big. In the game I chose the 6 TUM x 4 TUM option i.e. the smallest of my normal hill features for Tilly’s Very Bad Day. But even this took up too much space relative to the battlefield. I’d reduce to 4 TUM x 4 TUM.
Overhead shooting
I introduced overhead shooting for this game. I wanted a reason to put the Imperialist Cannon on Windmill Hill. But, having done it, I regretted it instantly. Two reasons for this:
- They didn’t do it historically
- Windmill Hill, in this battle was only 1-2 metres high. So “overhead” really means “through the head”.
For the published scenario I’ll only allow overhead shooting over Shot in the road, who are assumed to be in the ditches. For the rules I still won’t allow overhead shooting.
Off table reinforcements
I didn’t have an idea how the off table reinforcements would arrive. When they did arrive I let them appear on the base edge then move away. But that means they appear in one long line. I think they should arrive by deploying within 3 TUM of table edge. This replaces their normal movement for the Game Turn. It means they can arrive in a variety of formations, not just line.
Shrink the Imperialist army
I took the order of battle from Guthrie (2002) but seconds before the game I realised the Imperialist army was too large relative to the Swedes. So, in a rush, I tried to match the total numbers in Wilson (2010). The Imperialists need to shrink to 87% of the infantry and 62% of the cavalry. That will make the Swedish job easier. I took away the Imperialist reserve and gave more units to Swedish. That gave us a viable game but I was conscious that I had to revisit the orders of battle entirely. Which I did.
Swedish Brigades
Gustavus was in charge so all Swedish infantry were in Swedish Brigade, whether actual Swedes or German. So I gave the Swedes Large Pike+Shot units (Swedish Brigades).
The road
Adam and I had a heated debate about the road. He was very keen that I change how the road behaves. The problem was that a 1 TUM deep Unit in a 1 TUM wide road fills the road, and anybody charging that Unit is in Open Terrain. That was true but, at the time, I thought it missed the point. Both Adam and Chris seemed to view the road as an entrenchment, something to stand in, but historically the Imperialists stood behind it. Only the Shot fought from the ditches.
Historically the road was an obstacle and classifying it as difficult terrain makes it an obstacle. And for the shot deployed in it, difficult terrain gives them cover. Job done.
(although we’ll come back to this in the next play test)
Bend in the road
We used a straight road but really it should have had a bend near the Flossgraben Stream. I so put a bend in the road. Okay that won’t make any difference to the game but it is more historical.
Bolster the Imperialist Shot
The two Imperialist Shot units were half size, compared to other infantry units. That warranted giving them a reduced Resolve. But, after the battle, I decided to bring the Resolve of the of the detached Shot up to full i.e. Resolve 4.
There were only 420 shot (Guthrie, 2002; Wilson, 2010) detached to fight in the ditch at the front of the Centre command. This is half the size of other infantry units and smaller than mounted units. However, I have given them full infantry Resolve for two reasons: (a) they contested the ditch fiercely and caused the Protestants considerable problems; (b) I have rounded down the number of Pike+Shot units in the centre command rather than rounding up so I thought I should compensate elsewhere.
Wallenstein detached shot to defend Lutzen village. There were probably only 346 of them (Guthrie, 2002, says 400 but I have scaled down to match total numbers in Wilson, 2010). They were deployed in the castle and environs. Again this is less than half the number of men for other infantry units and less than a mounted unit. But I have given them full infantry resolve because they have the advantage of the castle which is not otherwise simulated in the game. Although a medieval castle would not stand up to the siege of the time, it provided an advantage to the skirmishing musketeers.
I also made their deployment in the road/ditch and village compulsory.
Pappenheim’s arrival time
Chris suggested Pappenheim arrive Game Turn 4. I left it at Game Turn 3. Pappenheim arrived 1 hour after the battle started. That isn’t very long. Even Game Turn 3 is generous.
My other reason is that Chris hindered his own attack. In the game the Swedish cavalry on both wings was deployed in a marching formation. They then had to fan out into a combat formation and this took a couple of Game Turn. The Swedes could have got to the road much faster if they deployed for battle and deployed forward.
Saving Throw for Commander Casualties
Previously we found our generals dropped like flies. Every game has seen the loss of at least one commander. We felt the casualty rate was too high.
The score to hit a commander depends on whether the attached Unit was Routed or not: 5-6 if the attached Unit took hits and Routed; 6 if the attached Unit took hits but did not Rout. (It used to tied to the number of hits and that was even more brutal.)
So I introduced a saving throw. Roll for commander casualties like normal. Then the owner has a chance to save them as a “its only a scratch!”. The saving throw was 4+ on 1d6.
No generals became casualties in this game. Adam had his general leading from the front. The saves saved them. Chris didn’t because I’d neglected to call out the saving throw before the game started. Once he discovered the rule, he sent his generals in as well.
On balance I think the idea of a saving roll is sound but perhaps the saving throw was too generous. Next time I’ll try 5+ on 1d6.
References
Guthrie, W. P. (2002). Battles of the Thirty Years War: From White Mountain to Nordlingen, 1618-1635. Greenwood Press.
Wilson, P. H. (2010). Europe’s Tragedy: A New History of the Thirty Years War. Penguin.