This Crossfire scenario simulates the attempt by surrounded Germans to break through the British 5th Seaforths at the Astrang Crossings on 29 Mar 1945. See also the Battle Report provided by Dick Bryant.
Historical Situation
Setting: River Astrang, German-Netherlands Border; 29 Mar 1945
Details from Flint (2006), although he based his work on Borthwick (1994).
After crossing the Rhine, allied forces captured the destroyed bridge at Isselburg on 28 Mar 1945. This exposed the German garrison in Anholt, about 3 km to the north-west, to encirclement. If the allies could seize the bridges over the small River Astrang to the north they would cut off this enemy force before it could withdraw to Dinxperlo in the Netherlands. The 5th Battalion of the Seaforth Highlanders was given the task of capturing the Astrang crossings.
At the time the 5th Seaforths were under strength with: Battalion HQ, A Company, C Company, D Company, 2 x Carrier Sections (dismounted), and the Mortar platoon (6 x 3″ mortars). The rifle companies were not at full complement even though B company had been disbanded to provide replacements for the other three. The men of the Carrier sections were on foot, as their vehicles couldn’t cross the destroyed bridge at Isselburg. Similarly no tanks or other vehicles were involved in the attack.
During the night of 28-29 Mar the infantry trudged north as engineers worked on the bridge at Isselburg, having promised that tanks would be able to cross by dawn. As it happens the Highlanders easily captured the Astrang crossings – although the northern section was damaged – then settled down to await daylight and the the promised tank support.
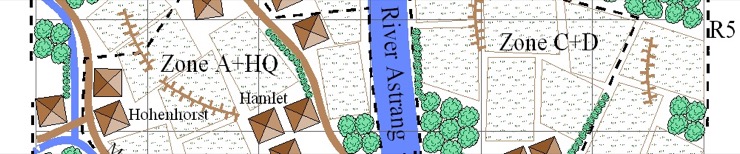
C and D companies were to the north of the crossing, facing the German held factory on the outskirts of Dinxperlo. The remainder of the force was deployed to the south of the crossing. A single platoon from A Company was stationed at each of Dreibomer and Hohenhorst, and another on the road west to Anholt. The Battalion HQ, the mortar platoon, and one of the dismounted carrier sections, settled into the hamlet just south-west of the crossings. The other dismounted carrier section was deployed between the two bridges over the Astrang (the river is divided at this point).
Unbeknownst to the Highlanders the German defenders of Anholt decided to abandon the town overnight. About 200 men marched east towards the Astrang bridges. Around dawn they met and overran the platoon of A Company deployed on the Anholt road. The Germans then attacked the Battalion HQ. The Colonel and many others were captured in hand to hand fighting.
Meanwhile C and D Companies were adjusting to the changing situation. In their case they had enemy on two fronts; those mauling the Battalion HQ and other troops in the factory to their north-east. The occupants of the factory seemed to be preparing to assist their comrades south of the river. To the consternation of the British, their FOO discovered he couldn’t contact his guns.
The second-in-command lead some survivors from the Battalion HQ north towards the area held by C and D Companies. Aside from the men they also brought a radio and the 3″ mortars. Armed with this radio set the FOO called in the artillery and suppressed the attack from the factory. The Germans south of the river, however, did press home their attack despite the British 3″ mortars pounding the area of the Battalion HQ. Small parties of Germans made it onto the southern section of the bridge, but were repulsed by the dogged Brits.
At 0900 hours the Allied tanks arrived and the Germans gave up the fight. The Germans suffered 37 known dead – although significantly more are suspected – and another 200 surrendered. The British lost 14 killed and 40 wounded.
Map/Terrain
Flint (2006) provides a couple of good maps. One is directly from Borthwick (1994) and is the historical deployment. The second is Flint’s own wargaming map for a 6’x6′ table. My own table is 6’x4′ so I drew my own map to fit. It is based on the historical map, but like Flint I have ignored the fact that the Astrang was divided into two streams with two bridges; this didn’t seem to impact the actual battle and doesn’t add to the scenario. The ground scale is roughly 1:1,100, so the table represents about 2 km by 1.3 km.

Key features are:
- The British deploy in Zone A+HQ and Zone C+D.
- The on-table Germans deploy in the Factory Zone.
- The German Breakout Force arrives from one or two of E1, E2, E3, E4 (historically it was E4).
- The German reinforcements from Dinxperlo arrive at R4, R5, or R6 (historically R4).
- The German Breakout force is trying to exit from R4.
- The River Astrang is only crossable at the bridge.
- Treat the Bridge blocks LOS and provides protective cover to any troops on it.
- The Muhlen Bach is crossable along it’s entire length.
- All fields are out of season.
Pre-game preparation
Before the game starts:
- German player secretly records their favoured edge sector for their Breakout Force (E1, E2, E3, E4).
- German player secretly records the edge sector their reinforcements from Dinxperlo will attack from (R4, R5, R6).
- British and German on-table troops deploy hidden.

British Player (Defending)
Objective
Prevent the Germans capturing the Astrang Crossings and so prevent them rescuing their Breakout Force.
Forces Available
The British defenders are the 5th Battalion of the Seaforth Highlanders.
British Order of Battle
5th Battalion of the Seaforth Highlanders
- Battalion HQ
- 1 x BC (+1)
- 1 x SMG Squad
- A Company
- 1 x CC (+1)
- 1 x on-table 2″ Mortar [6 FM]
- 1 x Rifle Platoon: 1 x PC (+1); 2 x Rifle Squad
- 2 x Rifle Platoons: 1 x PC (+1); 3 x Rifle Squad
- C Company
- 1 x CC (+1)
- 1 x on-table 2″ Mortar [6 FM]
- 2 x Rifle Platoons: 1 x PC (+1); 2 x Rifle Squad
- 1 x Rifle Platoon: 1 x PC (+1); 3 x Rifle Squad
- D Company
- As C Company
- Carrier Platoon: 2 x Rifle Squads (dismounted) *
- Mortar platoon
- 2 x FO for on-table 3″ mortar
- 2 x on-table 3″ mortars [6 FM]
- 1 x FO for off-table 25 Pounder Battery [3 FM] **
- Entrenchments for any stands that want them.
- Morale: Regular
- Command & Control: British except Carrier Platoon who count at German *
* The squads in the Carrier Platoon are adventurous, i.e. have German command and Control and don’t need a PC; in fact they don’t have a PC.
** The artillery FO is restricted in when they can first fire – see special rules.
Deployment
Deploys hidden, simultaneously with on-table Germans.
C and D Company must deploy within Zone C+D.
All other troops must deploy within Zone A+HQ.
British stands may not leave their original deployment zone (C+D, A+HQ) until 0630 hours.
Reinforcements
None.

German Player (Attacking)
Begins scenario with initiative.
Objective
Capture the Astrang Crossings and get the Breakout force off table towards Dinxperlo.
Forces Available
The only German forces on-table at the start of the game are a company within the Factory near Dinxperlo.
German Order of Battle
Factory Defence
- 1 x Infantry Company (Regular)
- 1 x CC (+1)
- 1 x HMG
- 1 x FO for off-table 120mm mortar (12 FM)
- 1 x FO for off-table 81mm mortar (12 FM)
- 3 x Rifle Platoons: 1 x PC (+1); 3 x Rifle Squads
- Morale: Regular
- Command & Control: German
Deployment
Deploys hidden, simultaneously with on-table British.
All on-table Germans deploy within the Factory Zone.
Reinforcements: First Wave of Breakout Force
Before the game starts the German player decides which edge sector (E1, E2, E3, E4) they would like their breakout to arrive from. This, however, is just a preference and the actual entry point is random.
On the first German initiative the German player rolls 1d6. On a 1 the First Wave of Breakout Force arrives on the edge sector E1; on a 2 from E2; 3 from E3; 4 from E4; on a 5 or 6, however, the First Wave of Breakout Force arrives from the preferred entry point.
German Order of Battle
First Wave of Breakout Force
- 1 x BC (+2)
- 1 x SMG Squad
- 1 x Infantry Company
- 1 x CC (+1)
- 1 x HMG
- 3 x Rifle Platoons: 1 x PC (+1); 3 x Rifle Squads
- Morale: Regular
- Command & Control: German
- Reckless like Russians and Japanese
Reinforcements: Second Wave of Breakout Force
The Second Wave of Breakout Force can arrive in any German initiative after the first, as the German player’s discretion. The arrival point is once again random requiring the German player to roll 1d6. On a 1 the Second Wave of Breakout Force arrives on the edge sector E1; on a 2 from E2; 3 from E3; 4 from E4; on a 5 or 6, however, the Second Wave of Breakout Force arrives from the same edge sector as the First Wave of Breakout Force.
German Order of Battle
Second Wave of Breakout Force
- 1 x Infantry Company
- 1 x CC (+1)
- 1 x HMG
- 3 x Rifle Platoons: 1 x PC (+1); 3 x Rifle Squads
- Morale: Regular
- Command & Control: German
- Reckless like Russians and Japanese
Reinforcements: From Dinxperlo
Before the game starts the German player decides which edge sector (R4, R5, R6) their reinforcements from Dinxperlo will arrive from.
At the start of each German initiative from 0700 hours, the German player rolls 1d6. If their chosen table edge is R4 the reinforcements arrive on 4+; if R5 then the player must roll 5+; if R6 then 6 is needed. This simulates the time it takes to form up further away from Dinxperlo, and also keeps the British player on his toes.
The German player can, however, choose not to bring on their reinforcements when the die roll allows. But if they decide not to, then they have to continue rolling to see if the reinforcements arrive in subsequent initiatives.
German Order of battle
Reinforcements from Dinxperlo
- 1 x Infantry Company
- 1 x CC (+1)
- 1 x HMG
- 1 x FO for off-table 120mm mortar (12 FM).
- 1 x FO for off-table 81mm mortar (12 FM)
- 3 x Rifle Platoons: 1 x PC (+1); 3 x Rifle Squads
- Morale: Regular
- Command & Control: German
Victory Conditions
Terrain and Casualty (AD) objectives
The game ends as soon as a German stand from the Breakout Force exits the edge sector R4 (Dinxperlo) or the Moving Clock reaches 0900. If a German breakout stand exits edge sector R4 (Dinxperlo) the German win. If the Moving Clock reaches 0900 hours the allied tanks arrive and give the victory to the British.
Scenario Special Rules
- HTD Special Rule 4: The Moving Clock is in use. The Scenario begins at 0600 hours and ends 0900 hours. The clock advances 30 minutes on 5+ at the end of each defender initiative.
- Fields are out of season, so only provide cover to direct fire and do not block LOS.
- The River Astrang is only crossable at the bridge.
- Treat the Bridge has a hill (contour with rough ground), i.e. it blocks LOS and provides protective cover to any troops on it.
- The Muhlen Bach is crossable along it’s entire length (it is a linear feature).
- Any move action a German stand uses to enter the table cannot be subject to reactive fire unless, a) the German stand is attempting to close combat a visible enemy stand, or b) the defending player is using ambush fire. This rule ensures the Germans can get on-table, despite the often open terrain. Normal reactive fire rules apply to subsequent move actions.
- The British FO for the 25 pounders was initially outside radio contact. The simplest way to simulate this is to say they can’t call in a fire mission until 0700 hours.
- The German FOs for off-table mortars cannot call in FM until 0700, representing the time it took to organise an attack.
- All British on-table mortars are assumed to have a more than usually limited supply of ammunition.
- British stands may not leave their original deployment zone (C+D, A+HQ) until 0630 hours.
Notes
- Historically the breakout force entered via the Anholt road (E4) and the reinforcements came from Dinxperlo (R4). I have made this more or less optional to ensure the British deploy in all around defence.
- I beefed up the German force from the Factory/Dinxperlo to make the game more challenging for the British.
- An alternative mechanism for the limitation on the British FO for the 25 pounders is to tie his ability to call in a FM to getting a radio from Battalion HQ.
- After comments from Dick Bryant following play testing I have:
- reduced the FM of all the British artillery and mortars.
- made the breakout force “Reckless” to reflect the near suicidal determination of such troops to escape encirclement. This means they behave like Russians and Japanese when charging to contact, i.e. ignore Pins and get killed by a Suppress.
References
Borthwick, A. (1994). Battalion. Batton Wicks.
Flint, K. (2006, Winter). The 5th Seaforths in Germany 1945. The Journal of the Society of Twentieth Century Wargamers, 56, 36-38.