Adam is keen on the 14th Army in the Burma Campaign. Accounts of the campaign feature pagodas (i.e. temples) in the villages. Luckily you can buy roughly 1/100th scale pagodas from pet stores (or Amazon or eBay). Unfortunately, these are all Chinese or Japanese. And it doesn’t take long on google to discover Burmese pagodas are unique. They feature a golden umbrella in a variety of patterns but basically a spire with wider and narrower bands around the spire. Gold of course. And the base is a white dome. Hmm. I can’t buy one, so I’ll make one.
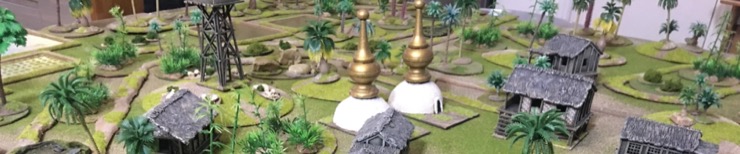
The result
Here is what the finished product looked like:
Materials
It took a bit of research but I eventually landed on two main components for the pagoda:
- Wooden Finial: Turned wood used on curtain rails or wardrobes.
- 8cm Polystyrene ball
The finial was for the umbrella and the ball for the dome. One ball is enough for two domes so I got two finials.

Construction
Firstly, cut the polystyrene ball in half. I have a bread knife reserved this moments like this. Ace at cutting foam. Beware of mess.

Then I gouged a hole in the top of each dome to fit the finials into. They got glued in with PVA (wood glue).

I normally use 75mm x 75mm (3″ x 3″) building sectors for Crossfire but I made the bases for the pagoda bigger – 120mm x 80mm. This was for a number of reasons including:
- the pagoda is solid so troops cannot be placed inside. I figured that outside but on the same base was good enough
- the domes were 80mm in diameter
- 120mm x 80mm is a standard size for me as it is the size I use for Big Base DBA camps and Big Base HoTT strongholds. So I had some spare
I put the pagoda at the end to allow room for miniatures at the other end.

Polystyrene is not super resilient so I covered the first dome in milliput (air drying craft putty). This drys rock hard. But that was a pain because it was slow. So for the second dome I used wood filler. This was much faster but the result is still a bit soft. In hindsight I should have gone with milliput for both.

A pagoda needs a door way. I’ve no idea what they should look like. So I just made an arch with milliput.

Putty and wood filler needs sanding to get out the bumps. So I sanded.

Then I undercoated in black. Because I always undercoat in black.

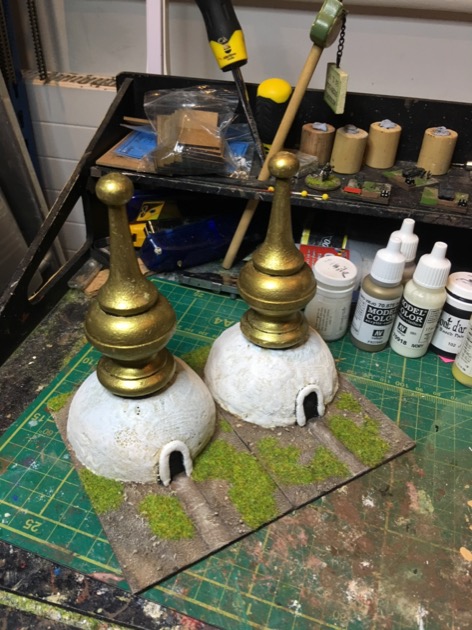
The umbrella got painted gold. I used Vallejo (173) 70.878 Old gold.
The dome got painted white. I used a base of Vallejo (007) 70.837 Pale Sand then dry brushed (005) 70.918 Ivory on top. I liked the effect and will use it for my future Spanish style buildings.
Actually I tried two different variations. The other one, shown on the right in the photo, had a grey base coat. I think it was Vallejo (154) 70.989 Sky Grey. But I preferred the sand base and repainted the grey-ish one.

Lastly, my normal Flocking Wargaming Figures with Flat Earth and Dry Brushing. Actually not quite normal. I used a bit of wood filler to raise the path above the base. This kept the path on a level with the sand that went everywhere else and makes the path obvious. Then I painted both path and sand in the same way. Then flocked.
Job done.
Nice job. Amazing what you can make with stuff that was never intended for the purpose.
Awesome stuff, just need to get them on the table!