Brett Simpson has played Mac’s Missions in the Pacific before, see Play Test of Mac Crossfire Missions in the Pacific. Recently he decided to give it another go.
Introduction
My good friend Damien came by to visit this week. He was keen to play Crossfire with me, and as he lives two hours away, I was quite impressed that he would travel all that way for a game.
After giving things due thought, I decided to offer Mac’s Missions as the scenario. This meant that I didn’t have to design a scenario myself as the cards would decide the mission objectives (and I thought Damien would enjoy that). It also meant that we could build our forces as we saw fit, we decided on 70-point armies in lieu of the suggested 80-points as we were going to play an a 3’ square table. An added bonus is that Mac’s Missions create the Fog of War, as there is little way of knowing what mission card your opponent has drawn.
Table
I set up the table ahead of time, and to keep things simple I opted to divide the four zones of the table by terrain type: jungle/farmland/farmland/jungle.

Orders of Battle
Damien requested to play the Australians and to enter from the east. His force was as such:
Reinforced AIF Company (+1 CC)
– 3 x Rifle Platoons (+1 PC)
– 1 x Boys ATR (2nd Platoon)
– 1 x HMG
– 1 x 2-inch Mortar (12 FM)
– 1 x FO 25-pound Gun (12 FM)
– 1 x Sniper (Whangarei Rules)
– 1 x Matilda II
– 1 x M3 Stuart
70.4 Points
Objective: “BREAKTHROUGH”
I played the Japanese, and my force was as such:
Reinforced IJA Company (+1 CC):
– 1 x Rifle Squad (attached to CC)
– 3 x Rifle Platoons (+1 PC)
– 3 x Knee Mortars (6 FM — attached to platoons)
– 1 x HMG
– 1 x FO 70mm Mountain Gun (12 FM)
– 2 x Snipers (Whangarei Rules)
– 2 x Ha-Gō Tanks
69 Points
Objective: “ADVANCE”
We ruled that medium/heavy tanks cost 9 points, but light tanks cost 4.5 points. AFVs received both a move/pivot and a turret rotation/fire action once per initiative. Light tanks could forgo their turret rotation/fire action in favour of a second move/pivot, but medium/heavy tanks could not. Fire actions could include both the main gun and machinegun.

Whangarei Sniper House Rules
I use the house rules for snipers from the Whangarei club in New Zealand. Snipers deploy hidden but once they fire, they reveal their position and are placed on the table where they can continue to fire and/or move. They are killed by a suppression or if an enemy unit enters the terrain feature they occupy. They have a +/- 45-degree arc-of-fire, and kill commanders on a suppression. I use these rules often for snipers, and have considered doubling their cost to 2 points each.

The battle
The Australians started with the initiative. After deployment in the jungle, they quickly advanced into the farmland to the east of the Creek, but the infantry were careful not to mobilise to within LOS of any of the Japanese units in the jungle to the west. Meanwhile, the Stuart Tank advanced toward the Creek from the north and opened fire on the Japanese 2nd Platoon, forcing them to take cover in the jungle to the southwest of its position.

One of the Japanese Ha-Gō moved swiftly forward and straight over the southernmost bridge, and the HMG and FO moved into the central field (west of the Creek between the two bridges). Meanwhile, 1st Platoon crossed the Creek to the south of this position and a squad began scouting through the bamboo, looking eastward. They were promptly suppressed by the Australian 3rd Platoon that was waiting in ambush in the orchard beyond.

The Australians crept forward to gain a better vantage point on the Creek, and their Matilda II advanced forward to confront the Ha-Gō, but the Japanese tank opened fire immediately, miraculously putting the Australian AFV out of action.
The Japanese 3rd Platoon then advanced into the southwestern field, but their lieutenant was fatally wounded by an Australian sniper.
The Australians mobilised their 2nd Platoon into and behind the storage shed (the northernmost building), including their Boys Anti-Tank Rifle; here they came under semi-effective fire from the Woodpecker-machinegun. Their Stuart Tank opened up on the 2nd Platoon once more, but the Japanese were hard to hit in the jungle.
Following the death of their lieutenant, the Japanese 3rd Platoon withdrew from their position taking cover behind the field, and smoke from the Mountain Gun was called in to cover the advance of the Company Commander who assumed control of the unit. The Ha-Gō opened fire on the sniper position, putting him out of commission. 1st Platoon then pushed forward into the bamboo southeast of the Creek, but came under heavy fire from the Australian 3rd Platoon.
The Australian FO advanced, making his way around the side of a building and out of view of the nearby Ha-Gō. Meanwhile to the north, the AIF 1st Platoon crossed the Creek and their PC came under fire from not one, but two Japanese snipers; these had little effect, but caused the Australians to rethink their line of advance. The Stuart continued to pin down the Japanese 2nd platoon with fire from its machinegun.

The Japanese HMG opened fire on the storage shed, hoping to knock out the Boys ATR so that the second Ha-Gō could move off without risk of coming under fire, but this action was largely unsuccessful.
The Australian FO called in fire from the 25-pounder, suppressing the Japanese HMG, and the Stuart Tank managed to find a shallow part of the the Creek and crossed to the western bank. Meanwhile to the south, 3rd Platoon opened up on the IJA 1st Platoon, eliminating their knee mortar and one squad, and suppressing another (impressive shooting!).
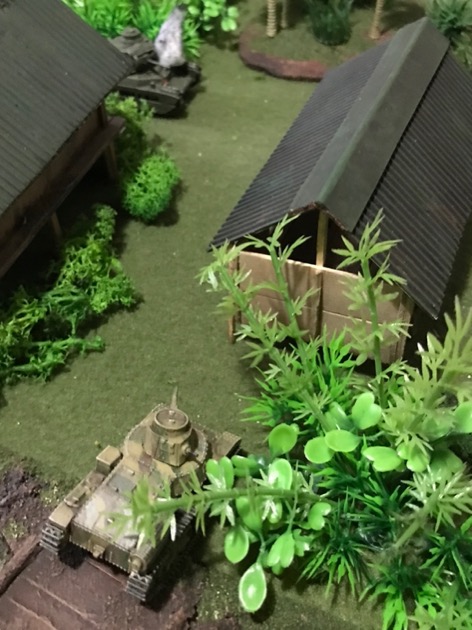
The sun was beginning to set, and so the Ha-Gō rolled forward into the eastern jungle where it got bellied on a log…
The Australians were unable to press forward due to the treat of the Japanese forces waiting in the western farmland and jungle, and the Japanese were unable to break through the AIF 3rd Platoon, but night had fallen and the Japanese won the battle, even though only one unit had achieved its objective (the Ha-Gō), with it in fact being bogged.
Conclusions and Observations
An interesting game. I like the Fog of War effect created by the Mac’s Missions. I think they are perfect for pick-up games, and encourage Crossfire enthusiasts who has not yet played them to give them a try.
My memory is vague on the exact timing and use of mortar/artillery smoke, but I do remember that up to two-thirds of smoke rounds that were called in during this game went astray.
I felt frustrated at not being able to mobilise my 2nd Platoon (due to the Stuart) and the second Ha-Gō (due to the threat of the Boys ATR. I could have rallied the former and performed a Retreat Move out of the jungle, but that seemed less of a priority than attempting to get my 1st and 3rd platoons across the Creek. In the end, it was the presence of the immobilised platoon and tank that actually prevented the Australians from achieving their Breakthrough objective. Having only the AFV advance to the eastern jungle felt like a shallow victory for the Japanese, but it was a victory none-the-less.
Are Mac’s Missions posted anywhere? They sound quite interesting.
Vincent, check out Mac’s Missions v3 – Revised Pick Up Games for Crossfire and Everything Mac’s Missions.