
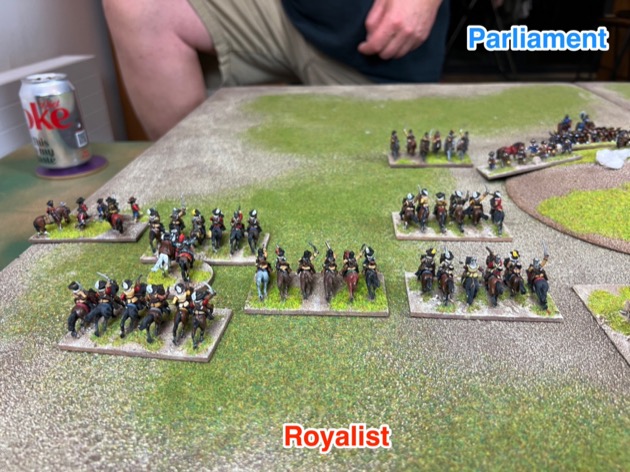
Chris and I played the 12th game of Populous, Rich and Rebellious, our four player Campaign using Tilly’s Very Bad Day, and set in the English Civil War. Actually there were four of us on the night. Adam joined me, of course, on the Royalist side. And in the absence of Jamie, Big Dave turned up from the USA to help Chris with the Parliamentarians.
Summary: Fantastic game. Parliament did some clever moves with well timed interpenetrations. Chris’s careful manoeuvring and Dave’s shear impetuousness was a winning combination. That and the fact Parliamentary shooting killed two Royalist Generals. Parliament victory.
Strategic Situation
I made a mistake in 1644 and gave the Royalists the strategic initiative for both battles. So, to balance the books, Parliament got to attack twice in 1645. Things were definitely tipping in their favour; last time they took Wales. This time they wanted to retake the South-East.

Phase 1: Game Set up
The mechanics of Populous, Rich and Rebellious influenced most of the game set up.
1.1. Agree game size
With four players we played a big game, with big armies on a big table.
1.2. Recruit armies
In Populous, Rich and Rebellious, campaign cards influence the orders of battle.
Campaign Cards

Chris didn’t do so well on campaign cards. He drew one Detrimental, one Beneficial and one Royalist (discarded).
- [Detrimental] ‘Let a cannonball divide me’ (Earl of Kingston-upon-Hull): For the entire battle one chosen commander is automatically killed if hit by cannon fire
- [Beneficial] ‘Best shifter and chooser of ground’ (William Waller): When generating terrain, after Step 3. Defender swaps terrain cards, the player can swap any two terrain cards (for some reason this wasn’t in the photo)
- [Royalist] Cornish Levies: Before the battle add two Pike+Shot units to the order of battle, but only if fighting in Cornwall or South West. Retain until used.
I got also got campaign cards, quite a few of them. My Detrimental card cancelled the Royalist one. The Parliamentary card was ignored. But that still left me two Beneficial cards.
- [Royalist] Veterans rally to the King: Before the battle add one Pike+Shot unit to the order of battle
- [Beneficial] Army well supplied: Before the battle add one Pike+Shot unit to the order of battle
- [Detrimental] Divert forces to put down Clubman risings: Before the battle remove one Pike+Shot unit from the order of battle, but only if 1644 onwards
- [Beneficial] Experienced officer: For the entire battle increase one chosen commander’s to hit in melee from 4-6 to 3-6
- [Parliament] “The Assessment” – Parliament’s excise tax: Before the battle add one Horse unit to the order of battle
Orders of Battle
For a big game with two players a side, we started with the big order of battle.
After applying the campaign cards, the the Royalists got a 20 units, compared to the Parliamentary array of 19 units.
Royalist Order of Battle
|
Parliament Order of Battle
|
1.3.A. Determine attacker
The Royalists had 20 units to Parliament’s 19 units. So despite being the strategic attacker, Parliament was the tactical defender.
We give the tactical attacker the initiative in Tilly’s Very Bad Day.
1.3.B. Game duration
The battle was fought in Autumn (10 game turns) on an Overcast day (-1) and started at noon (-1). So the game would finish after 8 game turns.
1.4. Place Terrain
As defender Chris on a big table, drew six Terrain Cards. He got a large field, medium field and a medium gentle hill.
Chris has draw the beneficial card: Best shifter and chooser of ground’ (William Waller): When generating terrain, after Step 3. Defender swaps terrain cards, the player can swap any two terrain cards.
That gave them two changes in the terrain. As defender he could swap or rotate. Best Shifter gave him a swap. Chris opted for a rotate and a swap. That these he had the hill and medium field together on one flank and close to both the centre line and central zone.

1.5. Scouting
We still didn’t do scouting. I now think we’ll ignore scouting for the rest of the campaign.
1.6. Deployment
Chris organised the Parliamentarians conventionally with an infantry centre and two cavalry heavy wings. His infantry were in the centre and a cavalry wing on the right. Unusually he deployed his left wing cavalry as a reserve behind the infantry. This gave him options on which direction to send them. They could go left, if the Royalists threatened his hanging flank. Or they could go right to create a hammer blow.
We also
1.7. Bombardment
Nothing to report.
Turn 1
Turn 1 demonstrated that Chris’s deployment was sound. My left wing (under Adam) roared forward and my centre also advanced quickly.


But my right lagged behind. This is because they started in and behind the big field. They had to extract themselves from that before they could reach Parliament’s exposed left flank.

Turn 2
The Royalist infantry trudged forward.

I advanced my right flank as fast as possible, but they were not fast enough.

Adam was leading the cavalry charge. The hope was to sweep away the Parliamentary defenders of the gentle hill and swing around behind their flank.

Chris perceived no imminent threat from my slow right flank so swung his reserve horse towards the other flank, where we were attacking.

His reserve cavalry could move freely because they were using the infantry as a shield.


We were hoping that congestion would stall the Parliamentary counter-attack.

Then the embarrassment began. One of our pike+shot units routed from melee.

Turn 3
I talk a lot about “Chris” and “Steven”, but each side was a team. On the defending team, Chris and Dave conferred a lot about what to do.

Adam was pushing his Royalist horse forward as quickly as possible.

The centre was becoming an infantry grind.


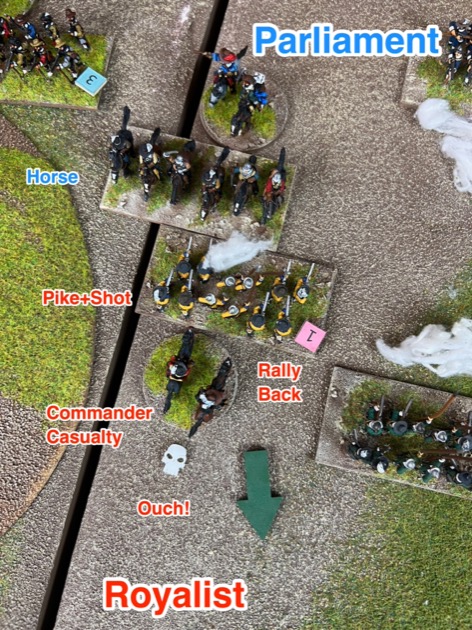
Then the embarrassment turned to fear. A lucky shot by a Parliamentary musketeer kills our right wing commander. Our attack on their open flank had now stalled.

By this stage, our Royalists were overlapping the Parliamentary defenders. But with a stalled right wing any advantage was more apparent than real. Chris was playing his traditional cat and mouse with my infantry. I’d advance and he would shoot and then pull back.

Just in case Chris turn one of his horse units around and sent it back the other way to face my stalled command.

And challenging the odds, some of the “stalled” Right Wing managed to make their command rolls and charged.

The rest of the Parliamentary reserve horse raced to face Adam on our left.


A couple of shots of melee.


And then post-melee.


Turn 4
Adam kept pushing his cavalry forward on the right.

On the hill, Dave’s cavalry interpenetrated the Parliamentary foot and charged the opposing Royalists.

There was a brief moment of light relief for the Royalists. To make space for Dave’s horse, Chris had to pull one of his infantry units back off the hill. And I charged it behind flank. Yay! Go the good guys.

Adam’s horse was pushed down the hill.

But it seesawed and in other places we won.


Turn 5
Chris continued to pull his infantry back.

There were lots of charges on the left and left centre

I lost my second general in the left centre. Now I had two commands that were stalled!
We scored a kill.

But Dave got a decisive result on the hill.

That was end game. Parliamentary victory.


Conclusions and Observations
A great game. I don’t know about the others but I find the bigger games, with more troops on a bigger table, more exciting.
“Let’s see the terrain and then organise our army.” This was a quote from one of the players. Nice try. Didn’t work. The campaign dictates that the armies are organised into commands before the players see the terrain. This is deliberate. Armies effectively deployed in march order. Sometimes they literally deployed from march. So decisions on structure happened before the terrain was seen.
I’ve noticed that, as the campaign progresses, we are trying different things in terms of army structure and deployment. We went through a phase where both armies would weight all their cavalry into one attacking wing. That was a pretty good tactic but we quickly discover that the other wing, with no horse, was quite weak and couldn’t do its protective job. So we are drifting back to wings which are more balance, both with cavalry. This hints that the rules reward historical organisation and deployment.
Going into the last year of the campaign, the odds are definitely against the King. The Royalists hod both capitals but Parliament holds the majority of regions.

| Game | Year + Round | Location | Game Size | Royalist | Parliament |
|---|---|---|---|---|---|
| 1 | 1642 Early | East Midlands | Small | Adam Strategic Defender Tactical Attacker Defeat |
Chris Strategic Attacker Tactical Defender Victory |
| 2 | 1642 Early | Wales | Small | Steven Strategic Attacker Tactical Attacker Defeat |
Jamie Strategic Defender Tactical Defender Victory |
| 3 | 1642 Late | South-East | Small | Adam Strategic Attacker Tactical Attacker Victory |
Chris Strategic Defender Tactical Defender Defeat |
| 4 | 1642 Late | East Anglia | Large | Steven Strategic Defender Tactical Defender Victory |
Jamie Strategic Attacker Tactical Attacker Defeat |
| 5 | 1643 Early | Upper Thames Valley | Small | Adam Strategic Defender Tactical Defender Victory |
Chris Strategic Attacker Tactical Attacker Defeat |
| 6 | 1643 Early | Wales | Small | Steven Strategic Attacker Tactical Defender Victory |
Jamie Strategic Defender Tactical Attacker Defeat |
| 7 | 1643 Late | Lower Thames Valley | Small | Adam Strategic Attacker Tactical Defender Victory |
Chris Strategic Defender Tactical Attacker Defeat |
| 8 | 1643 Late | Lower Thames Valley | Small | Adam Strategic Defender Tactical Attacker Victory |
Chris Strategic Attacker Tactical Defender Defeat |
| 9 | 1644 Early | South-East | Large | Adam Strategic Attacker Tactical Attacker Defeat |
Chris Strategic Defender Tactical Defender Victory |
| 10 | 1644 Late | South-East | Small | Adam Strategic Attacker Tactical Attacker Victory |
Chris Strategic Defender Tactical Defender Defeat |
| 11 | 1645 Early | Wales | Small | Adam Strategic Defender Tactical Defender Defeat |
Chris Strategic Attacker Tactical Attacker Victory |
| 12 | 1645 Late | South-East | Big | Steven Strategic Defender Tactical Attacker Defeat |
Chris Strategic Attacker Tactical Defender Victory |
Where to get Tilly’s Very Bad Day and Populous, Rich and Rebellious
Both are available for download as PDFs:
Tilly’s Very Bad Day (PDF)
Populous, Rich and Rebellious – English Civil War Campaign (PDF)