Chris, Adam and I had a go at Live Free or Die. The scenario was Alternative Chacabuco so a Liberators game using my Live Free or Die house rules for Big Base Liberators. Chris was the Patriots, Adam the Royalists and I was rules interpreter.
Summary: The game system defeated us. After hours of play we were no where near a conclusion so we gave up.
Deployment
The table was the same one we used for our recent Liberators HOTT game.

But Live Free or Die has units, which are lacking in Liberators HOTT. HOTT just has elements/stands/bases. But Live Free or Die has battalions, batteries and squadrons. I much prefer that. So much so that I printed out labels for each unit.
Here you can see O’Higgins about to climb Tahuilaca Hill.

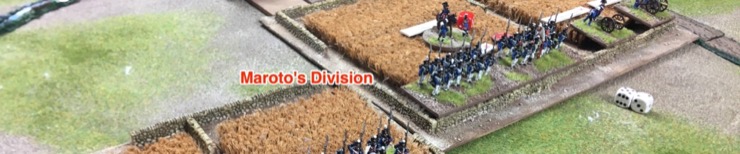
The Royalists were waiting on the other side of the hill. Maroto’s Division was deployed around Chacabuco Farm.

The Santiago Division was draped over the small hill between Los Tauretes Hill and the stream.

The Battle
O’Higgins took his men up Tahuilaca Hill. The scenario deployment pretty much demands this. But, as you’ll see, in Live Free or Die this is not a good tactic.

San Martin started Soler’s division marching towards the Royalists.

The brigades in Live Free or Die, “divisions” in this scenario, are not tight structural units. So Chris immediately broke up O’Higgins division and combined his cavalry behind Soler’s infantry.

On the same flank the Royalist Santiago division moved forward.

Under threat from the Royalist cavalry, Soler’s infantry formed square. The Patriot cavalry advanced behind the shield the squares offered.

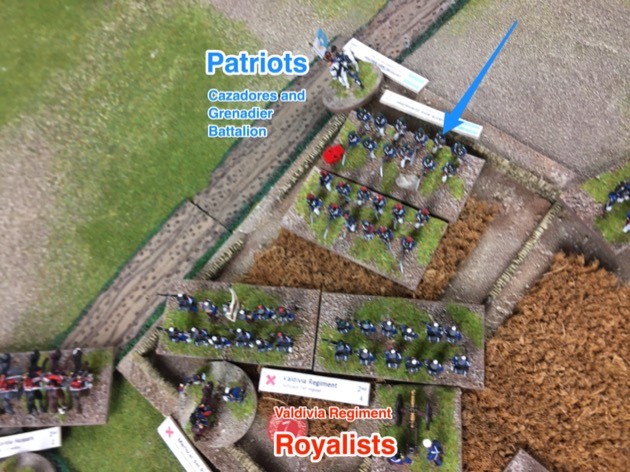
In the centre, the Patriot mixed Grenadiers and Cazadore battalion charged the Royalist battery in the fields.

Nearby the Patriot artillery started taking pot shots at the Royalist infantry in the fields. In this case the Talavera regiment.

Having succeeded against the Royalist guns, the Patriot mixed Grenadiers and Cazadore battalion was now facing the rather weak Valdivia regiment. The supporting Patriots were in square so were not going to contribute to the assault and the mixed Grenadiers and Cazadore battalion were alone. However, Valdivia was actively supported by the Talavera regiment and a squadron of the Concordia Hussars.

The cavalry of the Royalist Santiago division deployed into line and the combined Patriot horse rushed to engage.

The fight was inconclusive, although the Patriots probably had the advantage.


Eventually the superior Patriot horse drove off the Royalists. But by then the Royalist artillery was firing into the Argentine squares.

The Patriot artillery had another go at Talavera.

Undaunted by attacking alone, the Patriot mixed Grenadiers and Cazadore battalion charged Valdivia.

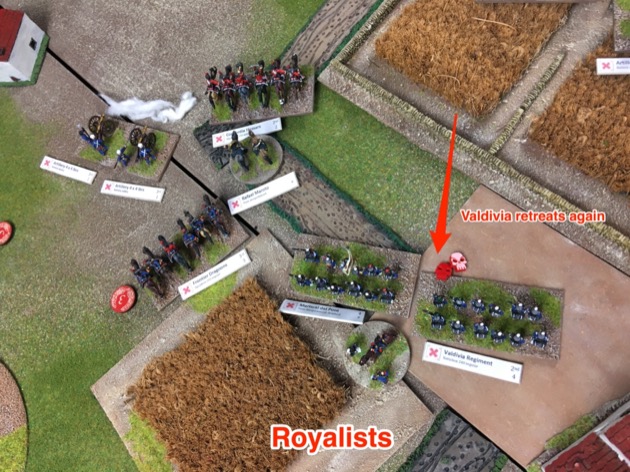
The melee result meant Valdivia had to retreat and lost a stand.

But that stand loss triggered a morale test, which Valdivia failed, causing a second retreat immediately after the first one.
But the Talavera and Chillan Regiments swung out to threaten the flank of the Patriot mixed Grenadier and Cazadore battalion.

O’Higgins had finally trudged over Tahuilaca Hill and he lead the Argentine 8th Regiment in a charge against the Chiloe Regiment.

The walk over the steep Tahuilaca hill had exhausted O’Higgins’s infantry and they were pushed back up the hill. Which caused form disorder.

The battle was a long way from finished. But by then it was already midnight in real life, on a school night, and we called it a draw.
Questions about the rules
Live Free or Die is promoted as a four page set of rules. The great thing about four pages is that it doesn’t take long to read. The bad thing is that four pages leaves a lot unsaid. So during our game we had questions. Questions the rules couldn’t answer.
Do artillery hasty Fire?
When charged infantry hasty fire with a lower chance to hit than volley fire. But the rules don’t explain what happens when guns are charged.
The options we considered were:
- Artillery don’t shoot when charged as the only option mentioned is infantry doing hasty fire
- Artillery hasty fire like infantry with reduced chance to hit
- Artillery always fire with the normal artillery rules regardless of whether they are being charged or not
We flip flopped on this. We started with option 2 (hasty fire) and moved to option 3 (shoot like artillery).
Is charging through rough halved?
Normal movement through rough is halved.
Units moving through rough ground or across obstacles suffer 1 DMZ and reduce their speed by half, unless in Skirmish.
But that was in section (6) Movement and there was no mention of this in section (4) Charges.
Despite that, we assumed charging through rough was also halved but that isn’t a given. It would have bene nice for this to be clear.
Two units shooting
The rules say when you get to five DMZ a unit loses a base and any extra DMZ are discarded. What wasn’t clear is if this is for all shooting at a target or or each unit shooting. If for all shooting, then a unit can only lose one base per turn (very slow), but if it is per unit shooting then a target can lose more than one base (slow).
At any time, if a unit accumulates 5 DMZ, permanently remove a base from that unit and clear off all DMZs.
Melee, retreat, then retreat again
We think a unit can retreat twice after melee.
The first retreat is from the melee results table itself.
-1 to -3: Driven Back! Suffer 2 DMZ and one casualty. Retreat a full move or behind the nearest friendly unit.
However, that casualty in the melee results causes a morale test.
Whenever a regiment removes a base due to casualty loss, it immediately rolls a Morale Test.
And a failed morale test causes a retreat. That makes two.
if no 5+ successes are rolled, the regiment immediately retreats away from the enemy.
We think that is right, but it is a bit convoluted to there there.
And, of course, these retreats have an impact on other friendly units and might cause other casualties, morale tests, and retreats.
Defending field and vineyards
We weren’t sure if the defender should benefit from the defending minor terrain melee modifier.
+1(d6) defending minor terrain
On balance we decided not.
Melee to flank or rear
There is no melee penalty for being hit in the flank or rear. Seems a bit odd.
Forming line in rough causes two DMZ
A lot of the infantry fight was in fields, which we classified as rough ground. You really don’t want to do that, fight in rough I mean, because each movement loses a DMZ.
Units moving through rough ground or across obstacles suffer 1 DMZ and reduce their speed by half, unless in Skirmish.
Actually, we think it is worse than that because fancy moves also lose a DMZ.
All formation changes are done during movement, requires a full move, and incurs 1 DMZ.
We assumed these were additive. So lose a DMZ for change of formation to line and lose a DMZ for doing this in rough ground. Two DMZ.
Observations and conclusions
The Good
I liked the look of the game. It was nice, for me, to get my Liberators armies on table again and have the units represent the actual units. This was a nice contrast to the recent HOTT game. In HOTT there are no units, just elements.
The Bad
I bent the rules to fit the Liberators period – see Live Free or Die house rules for Big Base Liberators. But I didn’t bend them enough to fit the period. Live Free or Die penalises infantry in rough ground too much. They take a DMZ every time they move or change formation. Do that a few turns in a row and your units start falling to pieces. In the game the Argentine 7th and 8th Regiments crossed Tahuilaca Hill to get to the Royalists. Moving at half speed this took many game turns. And they were taking a DMZ a turn, sometimes two. By the time these regiments got to the Royalists they were also losing bases. That just seemed too tough. In the American Revolution only skirmishers were comfortable in rough ground but in the Liberators period rough ground was attractive for all infantry.
The Ugly
We didn’t enjoy the game. There were three problems.
Firstly, we found that 4 pages does not mean quick play. In particular, we couldn’t figure out how to kill a unit. Chris did a quick calculation and we figured that with uninterrupted fire two batteries of cannons would take 35 game turns to destroy a unit of infantry, and bear in mind that we found one game turn takes one real hour to play. We decided we wouldn’t wait. Now, we have to admit, this might have been our misunderstanding, but for the life of us we couldn’t see how we could bring the game to a conclusion.
Secondly, we relearnt a lesson from the 1980s … never play a wargame that includes a “Morale Test”. Every time that rule got triggered, I could see Adam shudder with dread. Cascading morale tests is a good simulation technique, but it is rather tedious and personally I believe games should be fun.
Thirdly, the rules were not clear. We had to read and re-rear the rules. You can see the questions above for things we had to nut out during game play. Of course we having played a game we would know what to do next time but, frankly, there won’t be a next time.
To quote Chris: “I still think that at the end of the day, the rules were the winner.”
Where to get Live Free or Die
You can get the rule from Little Wars TV: Live Free or Die. This is what they have to say about the game:
Hmm, the AAR doesn’t make me want to get the rules. Unless I’m missing something.
Thanks for the report and review. A pity the rules don’t give a fun game. The Little Wars TV “Brandywine” videos make it seem way more interesting… but maybe that’s the scenario design (which would work with any rules) and the fact there was an interactive choice for viewers in the middle of the battle.
I fully agree with you that fun must come first, and I highly value your opinion on this, so it seems this ruleset is a hard pass for me.
The rule in LFoD is as you quote it:
“At any time, if a unit accumulates 5 DMZ, permanently remove a base from that unit and clear off all DMZs.”
My interpretation is:
“At any time, if a unit accumulates 5 DMZ, permanently remove a base from that unit and clear off THOSE 5 DMZs.”
For example: a unit with 4 DMZs acquires 3 more DMZs, making 7 in all. In my interpretation, this means the unit would lose a base and still retain the additional 2 DMZs.
I know that is not what the rule actually says, but it makes more sense, to me at any rate.