
I was already intending to write a post on how to edit/annotate images for Crossfire Battle Reports anyway, but the discussion following my last Crossfire Battle Report for Push to the City suggested the time was right. I’ll outline how I edit/annotate images at the moment but only because I’m looking for a replacement tool.
Is there a better way?
My current process is painful. Three tools, all of which are a bit annoying to use. If I could do all of this in one tool I’d be a happy man.
So although I wrote this post to explain what I do to edit / annotate photos for Crossfire Battle Reports, it wasn’t so you could learn how to do it. I wrote this post so you could suggest a different way. Specifically introduce me to a different tool, one that does everything I need.
I only need a short list of features – text with white edges, dashed arrows, tapered arrows (or just different), dashed boxes and lines, skulls, bombs, cropping, create a JPG – all of which I’ll describe below.
So if you know a Mac based tool that does all of this, then please get in touch.
[By the way, MS PhotoDraw 2000 did all of this. Unfortunately, Microsoft discontinued it as a product and it promptly stopped working on my XP machine of the time. Now, of course, I wouldn’t use it because it isn’t Mac. 🙂 ]

My current editing / annotation process
I use three applications for the annotations and it is very annoying. This is all on a mac.
The steps are:
- iPhoto to name and crop
- Skitch to draw movement arrows and write coloured text with white shadow
- Powerpoint to draw shooting dashed arrows, dashed boxes, skulls, bombs, etc
- Skitch again to crop if Powerpoint adds white space to one side
All rather painful but the end result is simple and effective. You can see in the Battle Report Symbols image the symbols I use to annotate. It is quite a small set.
1. iPhoto
I have been using iPhoto to crop. This isn’t really a deliberate choice, more an accident of using a Mac. When I load my photos from my camera or phone they end up in iPhoto. Simple really.
iPhoto has cropping capability that works for me, and the other packages don’t, so I crop in iPhoto. The feature I like is to “Constrain” the crop. I use particular ratios and iPhoto enforces these for me. I mean the ratio of the width to the height of the picture. I use ratios such as Square, 4:3, 5:3, 2:1, 8:3 and sometimes the portrait equivalents.
I also name the images in iPhoto – actually I give each picture a Title. So the image “P1070196.jpg” becomes “P1070196 Table at game end.jpg”. I usually leave the ID from the camera in the name of the file to ensure they appears in lists in time order. I know, for example, that the file “P1070194 Reinforcements or cannon fodder.jpg” was taken earlier in the game than “P1070196 Table at game end.jpg”.
The last thing I do in iPhone is I export using Title as the file name. I export to JPG which is photo friend format.
[With my move to OS X Yosemite (10.10.3) I guess I’ll be using the new Apple offering called Photos instead.]
2. Skitch
Skitch is a really stripped down image annotating package. It is really an addon to EverNote. Ironically I don’t use EverNote so I just use Skitch for annotating my JPGs.
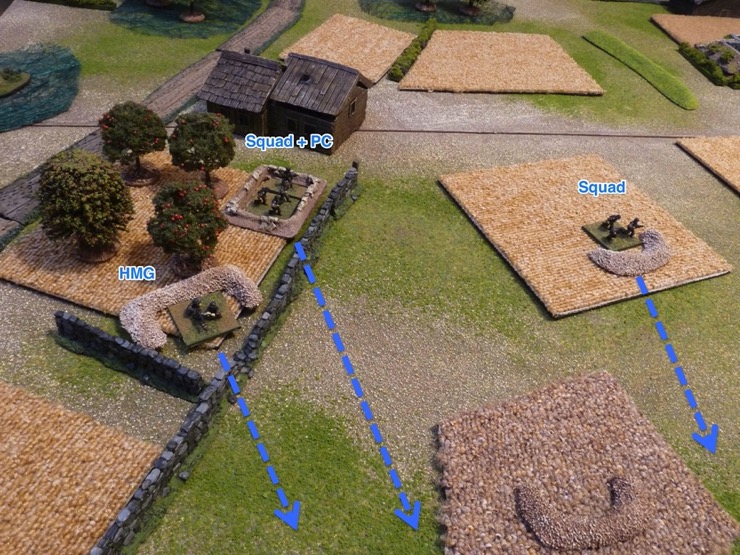
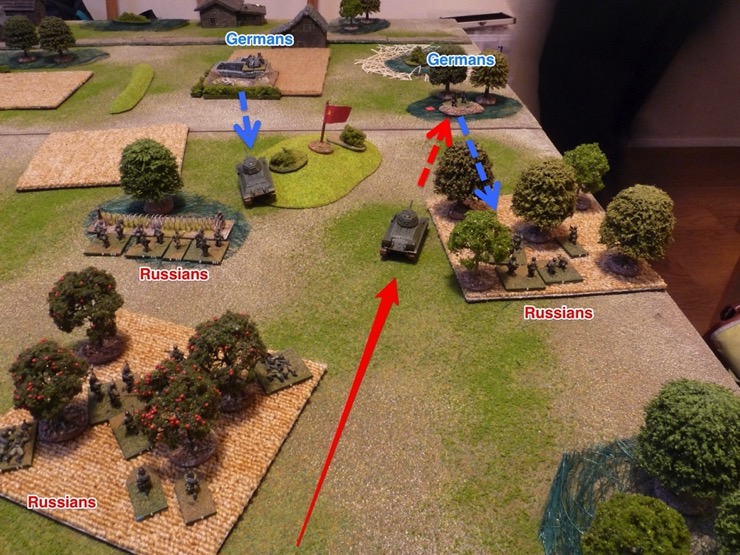
The arrows in Skitch have stems that are triangular – I quite like them and use them for movement arrows. On each photo I show where the stands came from. Skitch only does straight arrows so I have to do multiple arrows if the stand changes direction during movement.

I also use Skitch for the text annotations. Anything that needs a label gets one at this step. I like using Skitch for this because, by default, the text is coloured and has a white outline. The outline ensures the text shows up regardless of the photo in the background.

For both arrows and text Skitch offers a limited palette of colours. I only use Red, Blue and Black. Red and Blue for the protagonists and Black for anything that is neutral.
When I’m finished with Skitch I export the image over the top of the previous version. That means, if I get it wrong and later decide to change one of the annotations, I have to start again.
3. Powerpoint
The next tool is MS Powerpoint. I use Powerpoint to draw shooting dashed arrows, dashed boxes, skulls, bombs, etc.
PowerPoint is in no sense a photo editing tool. But it does allow me to do a few things so I’ve yet to find a replacement.
First you have to load the picture into a new slide of the PowerPoint deck. I use one slide per picture. I also copy and paste the name of the file into the Notes section of the slide. This is useful when I have to save the slide as a picture. Now for the editing.
If I get really keen, I strip the background. In my photos you’ll normally get sneak peaks of my sofa, book cases, baby’s high chair, etc. If I’m in the mood I’ll remove these from the shot so you just see the table. This isn’t so quick and easy so I normally just do this for one photo, the first one, showing the whole table.
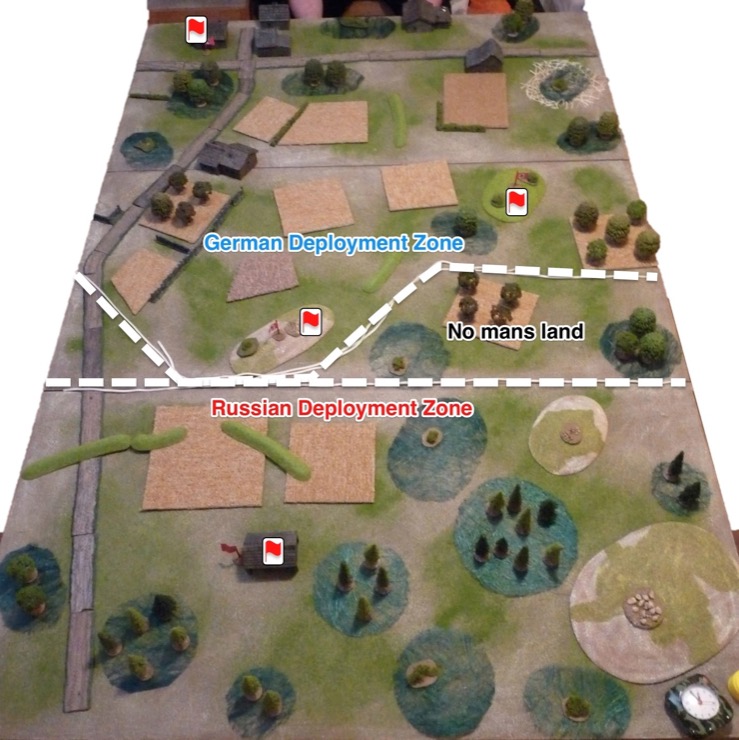
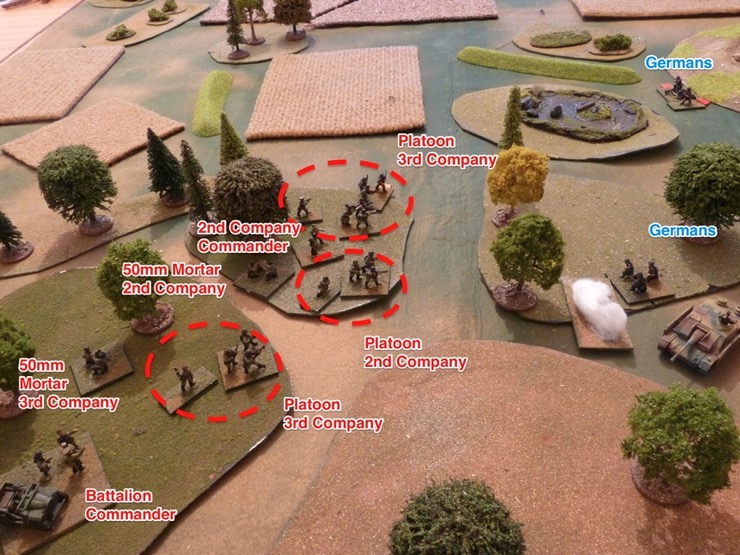
Often I want to show an area on the table. I use dashed boxes and lines for this. The photo above uses these dashed lines for the deployment zones. The one below uses a circled area to show were particular platoons are. I do this in PowerPoint because it allows me to have areas that are irregular shapes. Skitch, for contrast, only has rectangular shapes that are perfectly horizontal and without dashed lines; that is why I don’t use Skitch for this.
The most common thing I PowerPoint for is to put in dashed arrows to represent firing or just lines of fire. By “dashed arrow” I mean the stem is dashed, not the arrow head itself.
Combat, of course, results in casualties. I’ve taken to marking killed stands with a skull. If I’ve already removed the stand before I take the photo I use a full colour skull. But if the stand is still in the photo I overlay a transparent skull to show it is about to evaporate.

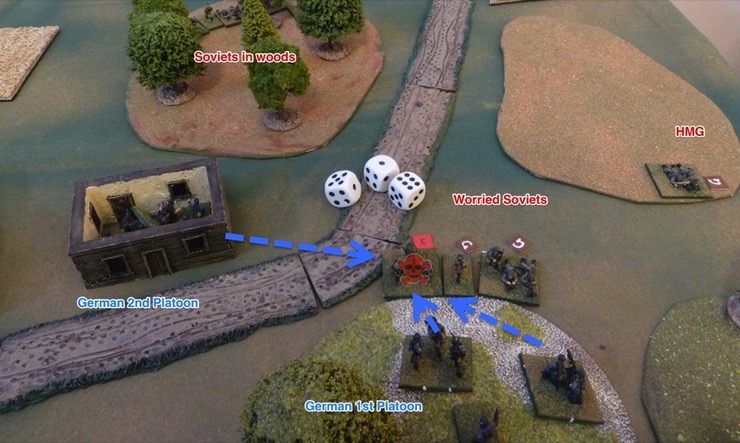
I use a “Boom!” symbol for explosions to hurt, particularly mines and indirect fire.
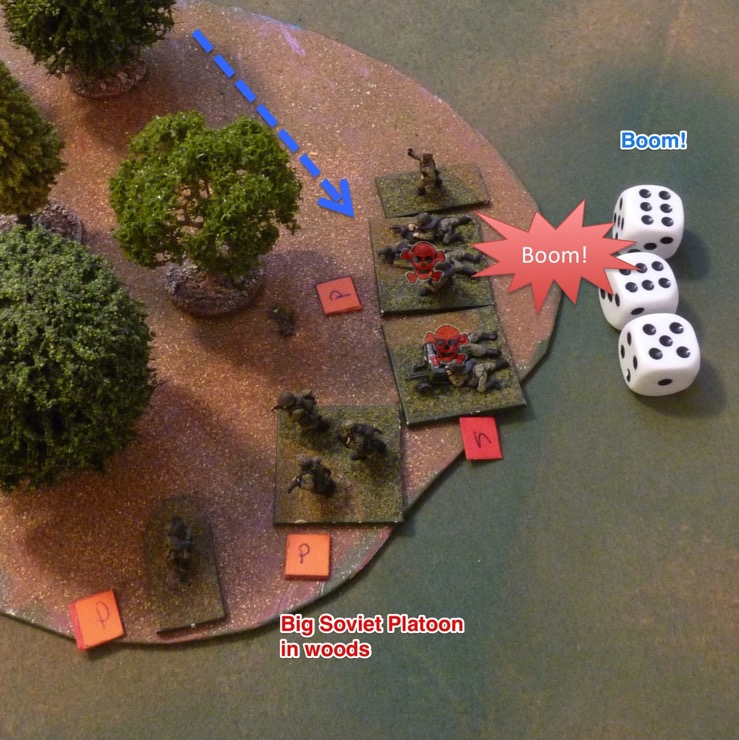
Most of these symbols are colour coded. Blue and Red for elements specific to one side. Black or White if they are neutral.
Finally, I save the slide as a picture, and over write the original JPG. There is a good chance, depending on how I cropped the picture, this will create a white border on one side of the new picture. [I don’t select the elements and save those as a picture as this creates a small JPG. I want as big as I can get.]
4. Skitch again
If PowerPoint has added a white area I use Skitch to crop it out.
End result
The end result is simple but effective. The point is to suggest movement and action, although there is none.
Thanks for this, Steve. I am also looking for other ways to do this. I presently use Quark express a desktop publishing program running on Xp8 that I purchased for publishing The Courier back in the day. I can’t update it to Windows 7 (THAT costs $500+) so I have split my hard drive into two sections; one running Xp8, the other Windows 7. The Quark program is starting to fail, probably because of accumulating errors in Xp8 as Microsoft no longer supports it – for some reason when it doesn’t load, I play a few turns of Civ V and then it will load!!!. But i can do any military symbol (have to draw them then save) and any terrain feature. It works very well but is dying so am looking for something else and am looking forward to what your readers suggest – except for Windows.
Dick Bryant
“No Scenario survives first contact with a wargamer”
I’m not a Mac user but I’d expect any decent drawing program to handle this, even free ones, especially if you build up an object library. In the PC world I use Corel Draw and Fireworks. CD does most things and there are cut-down but adequate cheap versions. Don’t know if it’s available for Mac.
re “I’d expect any decent drawing program to handle this”. That is reasonable. I expect the same. But so far I’ve been disappointed. The big problem for drawing packages is the text with white edging. For example Gimp, the major open source drawing tool on a Mac, lacks this single feature. You can get the effect but it takes several steps every time you type text – which makes Gimp useless for my purposes. In contrast, in Skitch all text comes like this with no extra effort. Similarly Preview, which is used to preview and annotate images and PDFs on a mac and comes pre-installed, also has all the annotations I need – except text with a white edge.
Corel Draw allows you easily to add text effects – outlines, glows, drop shadows etc. I suppose I just take this all for granted. And arrows and all other geometric shapes can be completely reshaped. I used CD here: http://doctorphalanx.blogspot.co.uk/2015/02/crossfire-at-cavalier-aars.html
I also used it to do these posters: http://doctorphalanx.blogspot.co.uk/2015/02/crossfire-at-cavalier_20.html Note the black outline to the white lettering. This could just as easily have been the other way round. The top lettering has a white glow so it stands out over the red cross-hair symbol.
You can do much more complicated things than that with it.