The Crossfire supplement Hit the Dirt contains maps made using Campaign Cartographer 2 (CC2 Pro) (available from www.profantasy.com). Bill Rutherford, one of the authors of Hit the Dirt, kindly gave me some advice on using CC2 and the notes below are based on Bill’s advice and my own fumbling experiences.

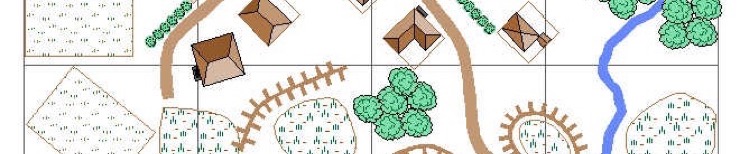
If you don’t have Hit the Dirt, the example map shows the kind of thing I’m talking about. Click on the thumb nail to see the full size version. For other examples browse around my Crossfire scenarios.
Preparation
You can just start drawing maps with CC2, but I found it worthwhile doing some homework first. And to be honest it took me 2 years to get this bit right.
Build your templates
You should build a couple of template to base your future maps on. I ended up with templates for the following table sizes:
- 2′ x 2′
- 3′ x 2′
- 4′ x 6′
- 6′ x 4′
- 4′ x 4′
- 5′ x 15′
- 6′ x 14′ (for the Shed)
All templates should contain these elements:
- A grid. Each square of my grids are 160′ to a side in CC2 terms and translates to 1′ x 1′ on the wargames table. The reason I picked 160′ as the grid size is because I used Phillip Rhodes Village.FSC for the buildings, and his square buildings are 40’x40′ which I use to represent my 3″x3″ terrain features on the table. The grid lines are Dark Grey (Colour 14). Put the grid on the Hex/Square Grid layer.
- A Map Border. These are white rectangles use crop any features that lap over the side of the grid. They work because the last step in the process is to bring them to the front, hence hiding anything behind. They’re white so you don’t notice them. Position them (using the Edit object tool) so that the corners of the Map Border are 10′ outside the corners of the grid, e.g. if the Grid starts at position (0′,0′) the corresponding corner of the Map Border has to be (-10′,-10′). Map the line width 17′; you can’t make it 20′ as it will then hide the outer most line of the grid. Not surprisingly the Map Border goes on the layer of the same name.
- A compass rose. A simple style is better for Crossfire; like Hit the Dirt I just use a arrow with an “N” above the arrow.
- Layers. This involves deleting/renaming some of the defaults and adding others. I use the following layers:
- Map Border
- Hex/Square Grid
- Coast/Sea
- Water/Rivers
- Roads
- Buildings
- Woods
- Orchards
- Boulder Fields
- Fields
- Rough Ground
- Rock Fields
- Hedges
- Walls
- Contours
- Boundaries
- Text
- Fill symbols. I renamed some of the standard fill symbols, and created my own for Boulders:
- Rough = Fens Symbol fill
- Fields = Meadow Symbol fill
- Rock fields = Rocky Symbol fill
- Boulder fields = Rock fields but with dark little mis-shapen lumps copied onto it
Build your catalog
It isn’t essential but I recommend you make a catalog of the symbols you want to use. I found making such a catalog time consuming in the short term, but made making the maps much faster as it meant I didn’t have to open other catalogs, and I didn’t have to edit features on the fly. For example, defining Hedgerow symbol as a hedge with 6 hedge shrubs means inserting them in a diagram is a matter of pick and plonk, rotating it as necessary. Similarly I made a Boulder field symbol and associated fill. (I couldn’t find a way to do the same thing for Thorn Thickets as CC2 gets very confused when a fill symbol is itself defined in terms of a fill symbol.) In fact I even edited all of Phillip’s Village.FSC images so the smaller items had a border 40′ x 40′, and larger buildings were divided into segments each of which are 40′ x 40′. In addition I cloned a few of the building symbols to make two story versions with a grey background.
What Symbols and Symbol Fills to use
Contour lines, hills and ridges are 3′ thick brown lines (colour 41) with a solid Brush Pattern (I used to use half-tone, but it was too faint). Use the option Draw > Lines > Perpendicular at Length to draw the radials on the contour lines; makes it so much simpler. My radials are 10′ long.
Roads: use the default Road tool from City Designer 2 (CD2) which is included free with CC2 Pro, or draw grey lines filled with light grey.
Rivers are similar but filled with blue, or use the default River tool. My streams are 8′ wide.
Buildings: Look on the Profantasy website for the Village.FSC catalog by Phillip Rhodes.
Fields, etc., are polygons filled with various Brush Pattern or Symbol fills, scaled to suit. Give your polygons an outline (Brown Colour 41). The various fills are:
- Rough = Fens Symbol fill
- Fields and Orchard background = Meadow Symbol fill
- Rock fields = Rocky Symbol fill
- Boulder fields = Rock fields but with dark little mis-shapen lumps copied onto it
- Thorn thickets = Earth Brush Pattern fill, then liberally sprinkled with the little lumps, either the rocky symbol or the dark lumps from the boulder fields.
- Rubble = Random Brush Pattern fill. Outline in Grey.
Trees are generally that roundish shrub top-view that comes with the buildings catalog.
Hedges are strings of little tree-tops.
Fences were simply drawn = a line with an X at one end
Walls are a made up of Wall Brick symbols which are themselves rectangular rounded polygons with hollow edges.
My lines indicating deployment zones etc are 3′ wide, black, long road dash.
What size of terrain features to use
Here is some advice on how big to make your features. I found that my features started out too small, so over time they grew. These suggestions assume the grid is made of 160’x160′ squares, each corresponding to 1’x1′ on the table. A Crossfire stand is 17’x17′ at this map scale.
I use Phillip Rhodes Village.FSC for the buildings. These are 40’x40′ on the map and correspond to my 3″x3″ building sectors.
I have various prepared symbol definitions for different sizes of woods (copses). Basically a tree (26’x26′) is the space necessary to fit a squad comfortably. Crossfire suggests each feature be able to contain 4-6 squads, so a tree is not a stand alone feature. A four tree copse (52’x52′) is the smallest possible woods feature as it can contain 4 squads comfortably. I also have copse symbols which are 78’x78′, 104’x104′, and 104’x52′.
| Feature/Things | Size on Map | Size on Table (Roughly) |
|---|---|---|
| Squad | 17’x17′ | 1¼”x1¼” |
| Square in the Grid | 160’x160′ | 1’x1′ |
| Single Fruit Tree * (for Orchard) | 17’x17′ | 2″x2″ |
| Single Tree * (for Wood) | 26’x26′ | 2″x2″ |
| 4 Tree Copse (Wood) | 52’x52′ | 4″x4″ |
| 7 Tree Copse (Wood) | 78’x78′ | 6″x6″ |
| 14 Tree Copse (Wood) | 104’x104′ | 8″x8″ |
| 8 Tree Long Copse (Wood) | 104’x52′ | 8″x4″ |
| Building Sector | 40’x40′ | 3″x3″ |
* Too small for a feature
The Drawing Process
It’s all simple shapes, done in layers to keep things organized.
It is a good idea to sketch out the map before you start using CC2. There are a few ways of doing this:
- Sketch it on paper.
- Use an unused layer (“Temporary”) to sketch out your map. Draw on shapes in a color you’re not planning to use, red, for example. The advantage of having it on a layer of its own is that it becomes easy to hide and/or delete.
- Instead of shapes insert a photograph of a table set up on your “Temporary” layer – assuming you’ve already played the scenario.
Using layers is vital to retaining your sanity. You can do the layers in whatever order you fancy, but a logical sequence would be:
- Map Border and I put the compass rose here too (should come with the template)
- Hex/Square Grid
- Coast/Sea
- Water/Rivers
- Roads
- Buildings
- Woods
- Orchards
- Boulder Fields
- Fields
- Rough Ground
- Rock Fields
- Hedges
- Walls
- Contours
- Boundaries for deployment lines and associated text
- Text e.g. Map Title
When doing a layer, say the vegetation layer, draw in all of the features (i.e. vegetation) before moving on to the next layer. Each time you change layers freeze all of the “other” layers to make sure you don’t screw things up; there’s a freeze all button that will freeze all but the current layer.
One nice thing about CC Pro 2 is the “Edit Properties button. You click on that and then on what you want to edit. It shows the current fill style because that’s one of the things you can edit… Much quicker than trial and error!
When you’re finished, bring the Map Border to the front, to tidy up all the edges, but make sure it doesn’t hide the Map Title.
Save often!
Enjoy!
Examples
All the following Crossfire Scenarios have maps made using CC2:
- 2 Foot City
- 3rd Battle of Kharkov
- 45 Pesetas
- 92nd Naval Infantry – The Sea Devils
- Astrang Crossings
- Armour Fest
- Battle Group Friebe
- Breakout
- “Colombina”
- Counter-Attack on Mérida
- Kamenets-Podosk
- Kodorov
- Krasny Bor: Black Wednesday
- Malmedy
- Mekensievy-Gory
- Ponyri Station and Hill 253.5
- Push to the City
- Ranville
- Russian Recce
- Russian Scouts
- Scenario for Crossfire novices
- Sitno
- SU-76i in 1902nd SAP
- The Old Chapel
- Tobruk
- Volkhov Bridgehead
- St Aubin-sur-Mer
- SU-152s up close and personal
- Zerstorer
And Megablitz Scenarios
And Shako